Friday, July 25, 2014

DIY Corn On The Cob Cotton Batting Ornament

My finished cotton batting corn on the cob.
      If you have never made a cotton batting ornament before, this is a nice little project to begin with.  In it you will learn the most basic skills needed in order to complete a cotton batting Christmas ornament.
      I know that some of you may think this is a strange subject for a Christmas ornament, however, it is very ordinary to see one or two corn cobs hanging among the branches of a glass collector's Christmas tree. To find a cotton batting one is not so very ordinary, at least not until now. Perhaps it will become traditional to those people learning this old craft? Only time will tell.

Supply List:
  • cotton balls
  • white school glue
  • tacky white glue
  • newsprint
  • masking tape
  • wire for hanging
  • yellow, gold, green, white and brown acrylic paints
  • tiny paint brush
Step-by-Step Instructions:
  1. Crush the newsprint into a small narrow cob shape, approximately two inches long. (pictured below)
  2. Wrap this newsprint form in masking tape.
  3. Insert a wire for hanging at the wider end of your cob. Tape and glue in this wire firmly.
  4. Unravel a couple of cotton balls and take a very tiny piece between your finger tips with a small bit of glue and roll this wad into a tiny ball. (picture just below) 
  5. Repeat this process until you have made approximately twenty of these kernel sized balls.
  6. Use the tacky white glue to begin sticking one, two, three kernels side by side in a spiral pattern at the very tip of your corn cob. Press these kernels together as you go. Take your time and let these dry as you go. It helps to work near a warm light or heater. As long as the tacky glue is holding the kernels of cotton batting together you can proceed to add to your "cob."
  7. As your cotton cob kernels multiple you will be able to deduce how many more of the kernels are needed. Perhaps thirty more depending upon the size of your wrapped form. This is different for every project.
  8. You will also need to keep squeezing together the kernels adding additional ones with tacky glue and then as these dry add a couple of more layers of white school glue to the surface of the corn cob. 
  9. After you have covered the cob, layer a few fine strips of rolled "narrow, leaf shaped" cotton for the "husks." glue these directly to the top of the ear of corn, twisting them around the wire hook.
  10. Let your finished cob dry overnight.
  11. Paint the corn cob using multiple yellow and gold colors on the kernels. Use a very tiny brush to get down inside the cracks with paint. 
  12. Use greens and browns to paint the husks.
  13. Let the cotton batting ornament dry and then seal it with a acrylic gel (Matt finish) to keep your ornament looking clean over time. 
  14. Store your cotton batting ornaments between white tissues inside a tin box with a tight sealing lid. These boxes are the types used to store butter cookies and sometimes candies.
The beginning of a corn cob, cotton batting ornament. Left,
unraveled cotton ball.  Center, a masked corn cob.  Right,
 are the rolled cotton kernels before they are pasted to the surface
 of the corn cob.
This is what your corn cob should look like prior to painting it.
 I have photographed it from different angles so that you may get
an idea about how it looks "in the round."
Related Content:

Thursday, July 24, 2014

Bend and Twist a Cotton Batting Bird Cage

      This is without a doubt one of my favorite ornament crafts. It is much simpler to make than it appears. I will be hanging this little bird in a cage on my both my Easter and Christmas trees this year.
      Mushroom birds come in all colors and are very fragile. You can find them in hobby shops and floral shops.
      You will need to store your cotton batting bird cages in sturdy tin containers in order to preserve their shape and to keep the mushroom birds from being crushed.

Supply List:
  • cotton balls
  • white school glue
  • wire cutters
  • 2 wire gauges (one heavier than the other but approximately the same thickness)
  • a "pick" of winter white berries
  • mushroom bird, blue
Step-by-Step Directions:
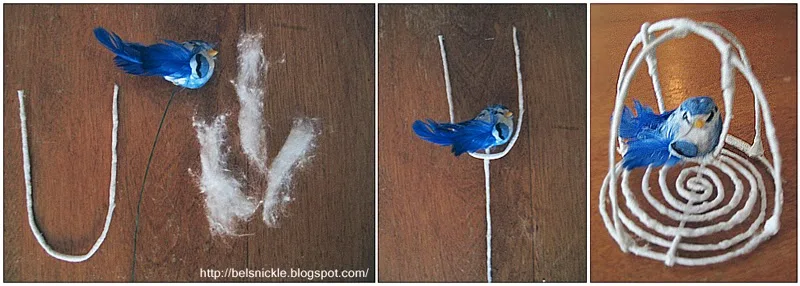
  1.  First you will need to unravel a few cotton balls. spread a bit of glue onto the wire and wrap thin pieces of cotton around the wire stem. After wrapping several wire lengths in this way, I roll them between my palms with more glue to make the application smooth. I work with lengths of wire approximately 24 inches long.
  2. The spiral wire (pictured) is of a heavier gauge than all the rest of the wire used on the ornament. I do not measure out the length of it. I simple shape the bottom of the bird cage in a spiral shape until I am pleased with it's appearance. Then I take this same wire cut a short piece of it to hook across the bottom of the spiral to keep it sturdy as I wrap the rest of my birdcage.
  3. The remaining parts of the project are wrapped using a lighter weight cotton covered wire. As you can see from the photos below, I took a piece of wire and wrapped it in the shape of an arch, approximately 8 inches in length, and hooked this wire to the underside of the bird cage's bottom.
  4. Wrap a second wire identical in length the opposite direction and then add a bit of glue and wrap cotton to the top of your arch where the to wires meet. Every time your wires are hooked and/or touch you should wrap and glue a bit of cotton at this point in the process. Do not do this prior to this point because you will need to make adjustments to the arched sections to ensure these look the way you wish them to.
  5. Now glue and wrap bits of fine cotton over the hooked pieces of wire on the edges of the spiral.
  6. Next, you will need to wrap the bird on a swing. I used a wired mushroom bird for this ornament. Cover the wire on the bird with cotton batting and white glue. before you twist it onto a piece of "u" shaped wire. Twist the bird into a "seat"
  7. Now hook both ends of this little "swing" at the top of your developing wire cage.
  8. Again, cover these hooked areas with a bit of cotton and white glue.
  9. Now you are ready to wrap another piece of wire around the outside of the birdcage and hook it around your arched wires to suggest a wall for your bird cage. I sometimes repeat this step if the bird cage is taller. But this particular one is shorter and I don't think it will look as nice to add more wire. 
  10. Cover these hooked areas with a bit of cotton and white glue.
  11. Bend a decorative pick of white berries over the top of the arch and again, cover these hooked areas with a bit of cotton and white glue.
  12. Finish your cotton batting, wire bird cage with a fancy, cotton wrapped hook.
Left, wrap and twist spiral shape out of the heavier gauge wire. Next add a cross brace to the underside of the wire spiral using the same stiff wire. Center, hook over the top of the spiral an arch shaped piece to suggest the dome of a bird cage. Right, repeat the same step in the opposite direction.
Left, bend a "u" shaped wire to create a swing for your mushroom bird. cover the wire connecting the bird to the swing in cotton batting and glue as well. Center twist the bird's wire around the swing and adjust it to look as though the bird is seated onto the wire swing. Right hook the swing piece onto the connecting arched pieces so that the bird dangles below.
Left, now bend the cage's walls around the arched wire pieces. Center an old-fashioned white berry pick. Right, I've finished the ornament.
More Bird Cages to Hang From Your Tree:

Wednesday, July 23, 2014

Craft a Belznickle Head, Patchwork Stocking Ornament

      For many years I have designed little stockings to hang from my children's Christmas trees. These are extra special because of the time and care it took to handcraft the faces. The old patchwork came from a damaged quilt remnant that I hadn't the heart to toss out.

I have yet to add the loops to the top of these stockings but they
are finished enough for you to see how these stockings
 will look hanging from our Christmas tree.

  Supply List:

  • Fur trim
  • patchwork scraps to sew the small stocking with
  • grey felt for the hood
  • embroidery floss for the stitching and braided cord
  • Acrylic paints: black, blue, red, gold, white, and two variations of flesh toned paint, if you are intending to paint a mask.
  • Flesh toned oven bake clay for the mask. (optional)
  • white paper clay if you plan to paint your mask
  • A face push mold (sold in hobby shops)
  • white tacky glue
  • acrylic gel sealer to preserve the face
  • embroidery needle
  • scissors
  • The pattern included with this project for the stocking and the "hood" of my Belznickle.

Step-by-Step Directions:
  1. First you will need to acquire patchwork scraps, sew them or purchase patchwork fabric from the sewing shop. These little stockings are sewn from old patchwork scraps that I already had on hand. Patchwork is also sometimes sold for the constructing of baby blankets, however, some of you my enjoy making your own patchwork. Visit Carolyn Wainscott to see how she she sews a patchwork Christmas stocking.
  2. Below is a pattern that you may download and print to use for a stocking similar to the one pictured here.
  3. I used a blanket stitch to sew together the two sides of my stockings. You may wish to craft the Belznickle's head and attach it to the stocking prior to this step. I did not do this because I made the small Christmas stockings prior to deciding to add the Belznickle head. 
  4. Slip a piece of wax paper between the two stocking halves before gluing the Belznickle mask on top of the front side of your stocking. This will prevent the glue from seeping through the fabric and sticking the two sides together while the mask dries.
  5. I made my mask by pressing paper clay into a half press mold. The mold that I used was purchased from a hobby supply store. The mask measures roughly 1 1/2 inches both up and down.
  6. The paper clay dries relatively fast, but I waited for the mask to dry overnight before gluing it on to the stocking.
  7. Below you can see the colors of acrylic that I used to paint the mask with: black, blue, red, gold, white, and two variations of flesh toned paint. I am aware that some of you do not have the confidence yet to paint ornaments. If this be the case, I recommend that you use a flesh toned low firing oven clay for the mask. Then add suggest a few facial features with fewer colors. Let your acrylic paints dry for an hour.
  8. Next, you will need to use tacky white glue to paste on the fur beard. You can use any kind of fur that you prefer for this procedure. I cut out a small "u" shape of fur to attach to the chin of my Belznickle and then added strips of fur to the inside of the felt hood attachment after sewing it to the stocking. (see photo process below)
  9. The felt hood is constructed by sewing together two end pieces and then attaching this strip to the stocking over the top of the Belznickle's head. Leave a bit of room above the head approximately one inch so that the Belznickle will look as though his head is inside his hood.
  10. stuff between his furry hair and the felt hood a bit of cotton batting and then glue with tacky glue a few strips of fur to the inside of the hood. (pictured)
  11. Now you are ready to trim out the rest of the hood with a few blanket stitches and a cord for the ties on his hood.
  12. Coat the mask with acrylic gel to protect the face from general wear.
  13. Add a cord made of extra scrap fabric or calico to hang the stocking from the tree.
Left, the paperclay mask is dry and glued to the patchwork stocking. Center, you can see the variety of paints that I used to paint my small masks with. Right, the masks have been painted and now I am ready to glue the fur onto my Belznickles faces.
Left, the fur trim beards have been glue both to the mask and the stocking material. Next, the felt hood brim is sewn to the patchwork stocking with a strong straight stitch. Center, I then glue down my Santa's bangs and tuck inside a bit of cotton batting to keep the hood stiff. Right, glue in the final grey fur strips to the upper, inside edge of the hood.
stocking pattern by Kathy Grimm

Decoupage Retro Papier Mâché Baubles

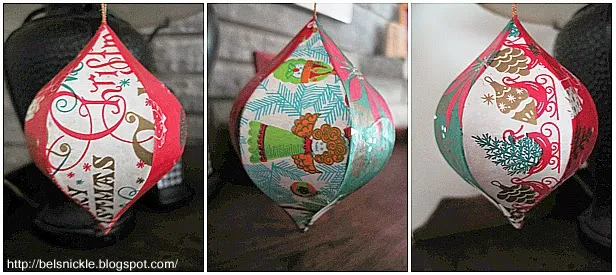
      I found this uniquely shaped, six sided ornament at a hobby shop on an after Christmas sale one year. I decided to use pages from an old sampler gift wrap book to decoupage each side of my ornament. You can also cover papier-mâché baubles such as this one with recycled Christmas cards, wallpapers, scrapbook papers or even photographs if you would prefer these to my own idea.

Supply List:
  • Mod Podge
  • soft brush
  • white school glue
  • a hexagon shaped papier-mâché bauble
  • retro/vintage wrapping papers
  • sheet of white typing paper
  • scissors
  • pencil 
7 Easy Step-by-Step Directions:
  1. Select the papers you wish to decoupage your prefabricated papier-mâché bauble with. I chose some original vintage/retro Christmas gift wrap from an old sampler book I had on hand.
  2. Use scratch paper, preferably white, to make a template from your six sided bauble.
  3. Press the paper firmly against the edges of one side of your papier-mâché bauble in order to capture a "creased" template for your ornament.
  4. Now use a pencil to trace a pattern where ever the creases have been made from the original papier-mâché form.
  5. Cut out the template and hold it up to the ornament making slight alterations to the template where ever you need them. 
  6. Place the template on top of your fancy papers and trace around it. Cut the first three shapes slightly larger than the second set of three so that no imperfections in your template will be noticeable as you glue the shapes to cover the sides of your hexagon ornament. Decoupage three sides first leaving every other side blank. Let these sides dry.
  7. Decoupage the last three sides and cover the finished ornament with a final coat of Mod Podge.
More Decoupage Christmas Ornaments:
Detailed photographs of my retro papier-mâché bauble.

Tuesday, July 22, 2014

Cut, Paste and Color A Paper Angel Tree Topper

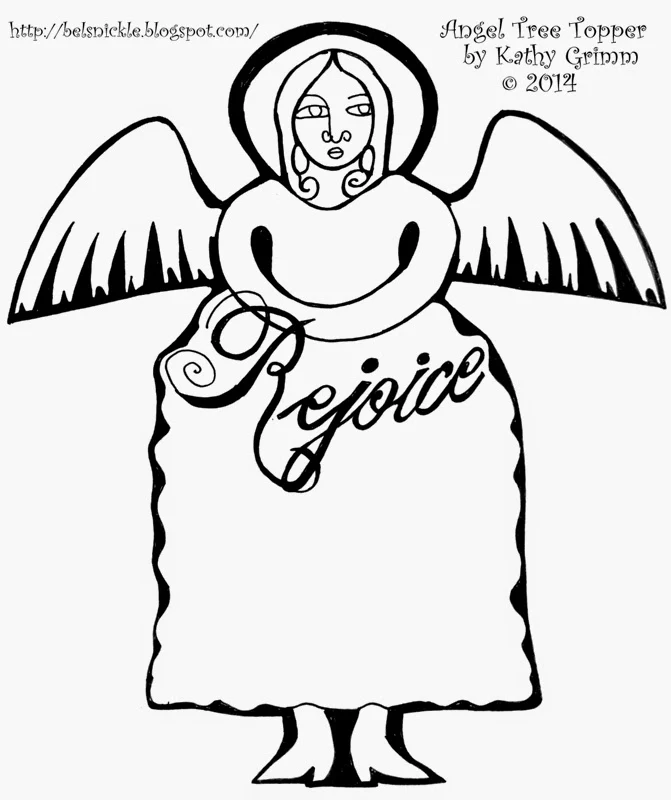
      I designed this brightly colored angel for one of my small trees last year. She is very light weight and made from card stock, scrapbook papers and markers. Simply download and print the pattern below. Cut and trace around the features that you would like in fancy papers. Then embellish the features with permanent markers, glitter and small decorative snowflakes. I colored both sides of this angel and included the "Rejoice" text on the front side of her gown.
      Glue both the front and back sides together along the edges only. Let the tree topper dry overnight before stapling in the paper toilet tube. Make sure you staple together one end of it before inserting the tube between your layers of card stock. (see picture below.) The tube will be the place to fit a narrow branch at the top of your Christmas tree. The tube helps prevent tearing and keeps the angel from losing her shape over time.
      You can decorate an entire tree with brightly colored papers ornaments and top it off with this angel. A tree topper such as this one will compliment a variety of styles and colors. Choose coordinating papers and or colors to achieve your own unique tastes. I will include more paper Christmas ornaments on this blog that you can cut, color and paste to go along with my angel in the near future.

Close up details of my finished paper angel tree topper.
I stapled together the ends of one half of a paper toilet roll and then inserted it between my two colored angels. Then I positioned it firmly over the top branch of a small tree.
Paper angel tree topper pattern. Enlarge the image to fit an 81/2 x 11 sized paper before printing.
More Paper Tree Toppers:

Saturday, July 19, 2014

Craft a Snow Baby From Cotton Batting

Close up of my first snowbaby.
     This cotton spun snow baby is made by layering cotton batting and white glue on top of a chenille stem figure wrapped with masking tape. The process, although contemporary, is very similar to those used by German and American cottage industries before and during the First and Second World Wars. If you should choose to make one for yourself, be patient and and allow for plenty of drying time between applications.

Supply List:
  • white cotton balls
  • translucent white glitter
  • white school glue
  • white tacky glue
  • chenille stems
  • newsprint
  • masking tape
  • a small china or clay head of a child
  • acrylic paints (black, brown, blue, red, flesh tone, white)
  • flesh tone oven bake clay (if you are making your own head)
  • fur and/or hair trims
  • wire for hanger
Step-by-Step Directions:
  1.  Twist and bend a small figure from chenille stems, crushed newsprint and masking tape.
  2. Apply white school glue to this figure and wrap a first layer of cotton batting around the limbs. Let dry.
  3. Crush and mask a snowball for your figure to sit upon.
  4. Cover the snowball with one layer of cotton batting and white glue. Let dry.
  5. Now glue the figure and snowball together with white tacky glue.
  6. Glue a hook firmly to the back of your figure at this point so that it may be covered with several layers of cotton batting.
  7. Use tacky glue to adhere either a china, composite, or clay mask or head to the body. Let this dry over night. You can see by the pictures below that I twisting wire around my clay mask in order to hold the face in position while it dried over night.
  8. Now you can layer rolled cotton into place with glue in order to "fill out" the body of your snowbaby. I chose to give my snowbaby a plump belly and bottom. 
  9. Next, add with glue a soft shaped hood around the mask.
  10. Let the figure dry overnight again.
  11. On the third day I am ready to add my last cotton batting layer. Let this layer dry completely.
  12. Add a dusting of translucent white glitter to the snowy areas. My snowbaby is holding two snowballs in her hands. I also glued glitter onto these.
  13. Paint the snow baby's facial features and glue on bits of hair and fur.
  14. I twisted a layer of cotton to a hook for hanging my snow baby as well.
Step-by-Step photo process of making a cotton batting snow baby.

Different views of my cotton batting snow baby figure.

More About Snow Babies:

Sew Primitive Sock Snowmen Ornaments

       As my children grew, I seemed to loose many matches of socks! But being a thrifty parent, I saved the random selection of socks in a basket just encase I ever managed to find a matching pair. 
      After several years of this ongoing frustration, I decided to use up the matchless pairs in a craft, of course, and now you see the result of my endeavors pictured on the right.

Supply List:
  • Very primitive snowman with shell button nose.
    white baby socks
  • old white button
  • plaid felt (brown tones)
  • small wire stem with leaves
  • yellow wool
  • hook for hanging
  • batting
  • needle and tan or white thread
  • black embroidery thread
Tea Bath Supply List:
  • black tea
  • small pot of water
  • stove top
Step-by-Step Instructions:
  1. Bring a few cups of water to a boil on the stove top; then turn off the heat.
  2. Add the black tea bag to the water and let the tea bath steep for ten minutes or more just to ensure that you stain will be dark. Don't remove the tea bag.
  3. Now soak the white baby socks in the tea bath for 40 to 50 minutes.
  4. Remove the socks and set them outside on a glass surface to dry. Make sure that you don't leave these to dry on top of something that you care not to stain! Do not dry the socks in a drying machine. The tea dye will leave a residue that may stain other clothes. Do not rinse out the socks either, this will remove some of the tea stain.
  5. Now stuff the socks with a poly-fill batting. 
  6. Wrap a small strand of embroidery around the middle of each sock to create a segmented looking snowman.
  7. Sew over this knotted floss, a small clipping of wool for the snowman's scarf.
  8. Twist the wire stem with leaves into a wreath shape and tack this element onto the front of the snowman's belly with thread so that he looks as if he is holding the miniature wreath.
  9. Sew on his button nose and add two little black "cross stitch" eyes.
  10. Cut from the plaid felt two triangle shapes and sew these right sides together leaving the shortest end of the triangle open to fit on top of your snowman's head.
  11. Turn the little hat right sides out and stitch the pointed hat to the top of the snowman's head.
  12. Push the wire hook through the back side of the knit material to hang up your primitive snowman. 
  13. Not only does he look cute, he smells good too!