The March of The Chocolate Soldiers by Margaret McBride Hoss
The Chocolate soldiers are marching to-day Through the heart of Candyville town. Down Marshmallow Street, With measured beat, Stride the ranks of butternut brown
Tramp-tramp-tramp-tramp- To the roll of sugar-plum drum, Heads erect. Step correct, The chocolate soldiers come!
March-march-march-march- Not a chocolate soldier lags, Left . . right . . . They pass from sight 'Mid a flutter of peppermint flags!
"What a perfect wife she would make for me!" he thought. "But she might be too grand. She's used to a Castle. It would be hard to ask her to move into a box with me and my twenty-four brothers. Still I wish I could get to know her." tin soldier (from our families book about The Steadfast Tin Soldier illustrated by Fred Marcellino)
Left the front view of my cardboard castle diorama. Right, the backside.
This is a different version of the Steadfast Tin Soldier.
To make a diorama similar to this one you will need to gather the following supplies. The project has many details and will take some older students (4th and 5th graders) more than one day to complete.
Supply List: on the right include a printable of ballerina.
a shoe box lid
brown paper bags
a fine tip black permanent marker
Mod Podge
green paper
a metallic wrapping paper
kitchen foil
several cotton balls
white school glue
masking tape
10 or 11 acorn caps
one tooth-pick
green glitter
printable of the ballerina (just right) and the tin soldiers (below)
extra white paper for the swans
one cup cake paper cup liner for skirt
ribbon (3-4 inches)
colored pencils,
two long narrow boxes the exact same size for the towers of the castle
a jewel for the dancer's skirt.
both flimsy and heavy scrap cardboard
newsprint
To make the figures for this diorama, print the patterns given below. Cut-out the figures and use colored pencils to color in the ballerina's arm, leg and face. Color all of the tin soldiers costume using a brilliant red and navy blue. Glue on the ruffled part of a cupcake liner to the dancer's waist to create a tulle skirt and finish off her costume with a silk ribbon bow and a small jewel bead. Color her tiara of flowers pink or blue. You may also wish to add details like a feather to the cap of the tin soldier. Mount both of the figures on flimsy cardboard, like the kind used to make cereal boxes with. You can further craft a small stand for the tin soldier and also glue a toothpick to the bottom of the ballerina's toe. About half of the toothpick many be pasted to the backside of her leg; let the other half stick out from the tip of her pointing toe. This will be poked inside the cardboard steps and secured with hot glue when the time comes to mount her inside the diorama.
Use a hot glue gun to assemble the acorn "trees." squeeze the glue inside the caps and stack these on top of each other until you have trees the height you prefer. Smear a bit of white glue onto the surfaces of these nut-cap trees and sprinkle on as much green glitter as you like.
Step-by-Step Instructions for The Castle:
To make the castle for this diorama, you will need to cut a backing to secure the two towers onto each end.
Then using masking tape, firmly wrap and glue this wall structure to the inverted side of a shoe box lid.
Cut and fold a cardboard roof to bend and then sandwich between the towers.
Cover the towers with brown wrapping paper and white school glue.
Cover the roof between the two with green paper.
Make sure that the space between the towers and beneath the roof is large enough to include the ballerina inside the gap.
Cover this gap's back wall and steps with decorative Christmas wrap.
Hot glue and mount the paper dancer by poking her toothpick tipped slipper inside the cardboard steps.
Mount the aluminum foil covered lake in front at the foot of the steps.
Hot glue acorn stacked trees around the lake.
Glue in the swans and cover the surfaces with cotton batting to make the foreground look as though it is covered with snow.
Now use the black permanent marker with a fine tip to draw on bricks or stones of the castle.
Mod Podge the castle structure.
Glue on additional snow around the towers and on the roof if you like.
The details of the mirrored lake where the wax swans swam. Except, our swans are made of paper.
In order to make the lake for the swans, cut a piece of cardboard in the shape you would like for the frozen pond; cover this with white school glue and then wrap the little mirrored lake with kitchen tin foil. Mount this on the bottom of the diorama's inverted, shoe-box lid just in front of the steps. Use the step-by-step instructions below to draw your swans on the extra white paper with a maker. Cut these swans out but include a small tab at the bottom of each swan. Fold this tab backwards (out of sight) and dab it with glue. Press the sticky tab firmly in place on top of the foil lake where ever you would like the swans to be swimming.
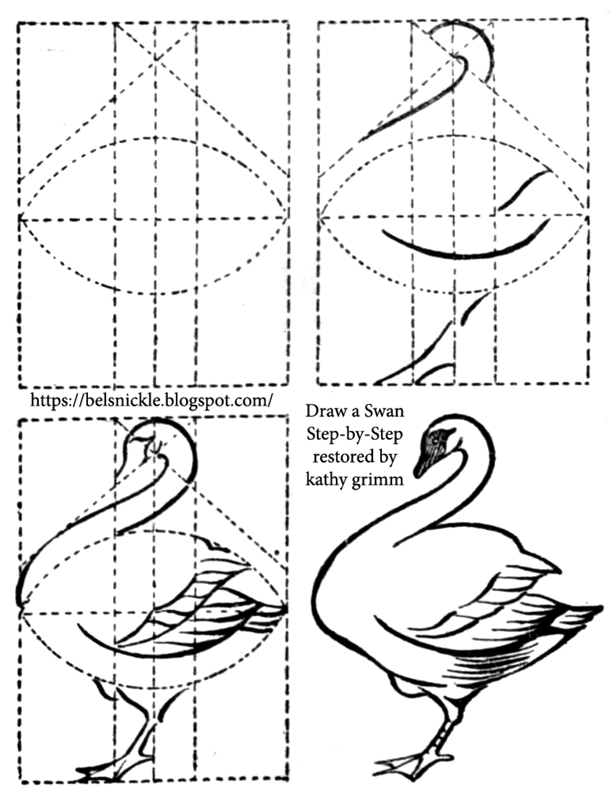
How to draw a swan Step-by-Step. For your pond.
The steadfast tin soldier with his brothers. Printable by kathy grimm for students and play only. Click to download the largest available size.
This Uncle Sam paper doll was designed
by George Piper in 1920.
I've restored this 1920 Uncle Sam Jumping-Jack by George Piper for your all American, patriotic Christmas tree. You will need some tiny brass brads, scissors and string to assemble him after you have printed out this paper doll.
Once he is assembled, use a hot glue gun to adhere a tiny bottle brush wreath or tree between his hands.
If you want your Christmas scrap to look "older" simply print it out onto yellowish-tan or beige paper.
Did you know that there are 38 total other countries that have red, white and blue colors in their national flags?Patriotic Christmas trees aren't only for Americans; countries like: Australia, Cuba, France, Haiti, Norway, Russia, Taiwan, and even the United Kingdom all have the red, white and blue as their very own national colors!
This graphic comes from a very old catalogue that is about 100 years old. I've cleaned it up of course. I hope that those of you who have red, white and blue Christmas themes on your trees this year will enjoy including it with a few tinsel trims among the the branches of a dusty green pine.
There are many other countries around the world that also have red, white and blue colors to represent their flag. So this new category here at my Christmas blog may inspire their holiday projects during December as well.
More eye candy about an antique, patriotic Christmas:
Two suggestions for temporary pendent trims of a chandelier making alternative use of the shield graphics.
These vintage suggestions come from a vintage Dennison company catalogue.
A Vintage Canadian/British shield graphic.
"This is our Christmas Tribute to military men and military families.
Thanks for your sacrifices so we can have the freedoms we do."
These girls have lovely voices; check them out. Watch out for those
Some of you may remember hanging drumming elves on your Christmas tree when you were quite small. You could make these for your own tree now with just a bit of glue and paper. Don't fidget over getting your own to look just like the one above though. His felt clothing has faded and the paper drum has turned yellow with age. Make your own bright and charming for the next generation to remember.
Pattern pieces for the elf's hat and collar.
Supply List:
Paper tube, such as a toilet paper tube
scissors
decorative paper
narrow decorative ribbon
holy leaf and berry sequins
1 inch Styrofoam ball
a bit of grey felt or any color you like for the hat and sleeves
a small piece of white felt for the collar
yarn for hair
nylon stocking, any flesh color
permanent black and red ink marker (felt tip)
one chenille stem (matched to nylon stocking in color)
white tacky glue
light weight cardboard
pencil
a razor or craft knife
metallic string for the hanger
pink soft pastel or blush from your makeup kit
needle with a large eye
Step-by-Step Instructions:
Cut 1 1/2 inch section from the paper tube.
Hold this paper tube against the light weight cardboard and draw around it's circumference. Repeat and cut two of these cardboard circles.
Use a bit of glue to attach the cardboard circle cut-outs to the bottom and top of the paper drum.
Cut from the decorative sheet of paper a 1 1/2 strip of paper approximately six inches long if you are using a standard size toilet paper roll. This should cover the paper drum neatly. Apply the tacky glue to secure the paper to the paper roll.
Cut out matching paper circles to cover the top and bottom of the drum.
Paste down a decorative ribbon along the top and bottom edges of the drum.
Tack on the sequin holly leaves and berries.
Cut two inches from your chenille stem for the drummer's arms.
Wrap the chenille stem with a bit of grey felt to create sleeves. Tack this felt down with tacky glue.
Bend the chenille stem to form two arms and glue this piece to the top of the drum.
Cut the 1 inch Styrofoam ball in half with a razor or craft knife.
Wrap and pin a small piece of nylon around one of the Styrofoam balls and pin it down at the back flat side of the Styrofoam head.
Glue a small piece of yarn at the brow of the elf.
Wrap the felt hat piece about the top of the head with some tacky glue. Let it dry
Cut another two inches of felt. Stab the chenille stem through the bottom of the elf's head to act as a neck.
Cut the collar from the white felt.
Stick the other end of the stem through the round collar and cardboard drum top between the arms with a little tacky white glue.
Draw eyebrows, eye lashes on with the black permanent marker.
Draw the lips with a red permanent marker.
Add a bit of blush to his checks with a soft pink pastel or makeup.
Cut the metallic string and thread it through a needle. Sew on the hanger.
Sequin ornaments like this little snare drum are becoming very popular among ornament collectors. I often find them tossed into plastic baggies and sold in bunches at garage sales. If you aren't lucky enough to find the real vintage ones, you can make them yourself. I've included directions below for those of you who can manage to purchase the polystyrene or Styrofoam drum shapes on the web. This little drum shape is not as easy to find in hobby or craft shops anymore.
Supply List:
2 inch diameter and 1 1/2 inch tall Polystyrene shaped drums or Drum-shaped Styrofoam pieces
8mm diameter cup sequins: red, green and white
red, green and white seed beads
star sequins
flat head pins
tacky white glue
white pipe cleaner or chenille stem
gold beads
1/2 yard of gold ribbon for trim
thin gold twine
Step-by-Step Directions:
Before pinning your drum, you will need to mark diagonal lines with a soft pencil on the side of your Styrofoam drum. Also leave a strip of space at both the top and the bottom of the side edges unpinned. The width of these strips should be the same as the gold ribbon you will be using to trim the edges of your drum.
Thread one seed bead onto your pin and then also a sequin of the same color. Touch the tip of each pin with a bit of white glue as you pin to hold your work in place after the glue dries.
Next pin four rows of red sequins following the diagonal pencil marks. Follow these four rows with four rows of white, then green sequins.
Use a bit of tacky glue to adhere the gold ribbon around the top and bottom edges of the drum's sides.
Pin gold beads through the gold trim allowing approximately 1/2 inch between each bead.
Twist the gold twine gently around each gold bead, there should be ten of these at the top and ten at the bottom. Look at the photos above and below to visualize this chris-cross pattern made by the twine.
Cut and pin a little loop for one end of the drum to hang a hook from.
Bend a white pipe cleaner 2 1/2 inches long in half and pin this down on top of the drum with a small piece of gold trim. Glue on a gold bead to each end of this pipe cleaner. This stem mimics the drum sticks for your sequin snare drum.
Pin a few seed beads plus starry sequins to both the top and the bottom of your Styrofoam drum and add a wire for hanging this little vintage drum.
Different angles of a small sequin snare drum made in the 1950s or 1960s for the Christmas tree.
This sleepy eyed soldier can't wait to slumber. He has hung on my Christmas tree for over twenty years now, watching and waiting for Santa. My soldier is dressed from the top of his hat to the toes of his boots in formal regimental attire. He sports a tall, bearskin hat decorated with an ornamental red feather and a glittering golden star.
He was not difficult to make. I simply cut out a large "U" shaped pattern extending the length of a toilet paper roll for his bearskin. Measure the diameter of the cardboard tube's opening and add 1/2 an inch to it so that you may have plenty of room to glue down the front of his bearskin to the back, along the outside edge of his paper hat. I used the paper from a heavy, recycled grocery bag to craft the soldier's hat. You can trim the outside edge of the hat later after fitting it and gluing it to one end of your paper tube. This measurement will vary given the size of the cardboard tube that you have chosen to work with.
A bearskin is a tall fur cap, usually worn as part of a
ceremonial military uniform. Traditionally, the bearskin
was the headgear of grenadiers, and it is still worn by grenadier
and guards regiments in various armies. This Drum Major is
in the United States Marine Band called, "The President's
Own. He also holds a ceremonial mace in preparation for
reporting to the parade commander at Marine Barracks in D. C.
Next you should stuff the hat and tube, that are glued together, from the bottom opening with soft cotton or polyester batting. This will support the inner shape of the bearskin hat so that it will not collapse over time. Then paste a cardboard circular disk at the bottom of your ornament to seal shut the opening of the ornament. You can measure this cardboard piece by holding the tube on top of a sheet of heavy cardboard and drawing around the tube's diameter with a number two pencil. Cut the circular shape out and hold it up to the end of the tube to ensure that it will close the end of the tube neatly. Squeeze out a tiny bit of glue around the edge of the cardboard circle and press the stuffed ornament on top of this last piece to finish off your soldier's form. Let the glued form dry over night before painting it.
I painted my sleepy eyed Christmas soldier with acrylic paints. But first, I drew a few simple lines on top of the stuffed cardboard shape on order to guide me while applying the paint. You might like to study similar uniforms in photos and video before drawing out your own design. Don't over complicate your ornament. Give him a face, coat, arms and pants. My little guy is in the sitting position, this is why the bottom side of his boots are painted on the front side of the tube. It is not easy to stand at attention on the boughs of an evergreen. He is one of the older Drum Majors and is allowed to sit near the bottom branches of the tree. Age has it's privileges!
After painting my soldier I gave him a generous coat of acrylic varnish. This will help preserve your work and give the homemade ornament some extra polish.
Changing of the guard at Buckingham Palace, summer 2010. Gotta love marching bands.
More ornaments from my collection representing St. Paul's Cathedral
and a Royal Guard wearing a bearskin hat.


