Wednesday, January 8, 2014

100 Victorian Scrap Resources


Large Online Victorian Scrap Collections:

Victorian Clip Art Collections Online:

Victorian Scrap From Journals:

Victorian Scrap from Flickr Photostream:

Victorian Pinterest Boards:
Victorian Scrap Collections from Picasa Web Albums:
Victorian Scrap Merchants and Dealers:

Victorian Reprints: Cards, Ornaments, Gifts, Scrap Etc...

Societies:
The John Grossman Collection of Antique Images  printed ephemera of visual culture from 1820 to 1920.
ephemerastudies.org at Louisiana Tech University

Samples and Articles About Victorian Print:

More Victorian Trade Card Links:

Research Victorian Subjects:

Curator, Randall Thropp talks about 
Victorian Christmas Artifacts.

Thursday, December 19, 2013

The Santa Claus Fortune Teller Puzzle

(Warning: fortune teller's do not promote truth.)

      In the system of the astrologers, the horoscope was cast from the conjunction of the stars at birth, taken in connection with that zodiacal sign which ruled the month when life began. For the Christmas horoscope we use signs, familiarly associated with the season. 
To Read Your Destiny.
      Find the sign in the inner or black circle, that represents the month in which you were born. Select any letter in the space allotted to you and write it down. Count six letters to the right (not counting the one already set down) and write the sixth letter next to the one already written. Proceed in this manner until you have gone the round of the circle. Point off the letters thus obtained into words and by commencing at the proper place you will find they make a sentence.
      The first or inner circle of letters relates to LOVE; the second, FATE: and the third, BUSINESS; and the fourth or outside circle Santa Claus offers some Christmas advice.
The Twelve Signs of Birth.
If born in January, the month of the reindeer.
If born in February, the month of the sleigh.
If born in March, the month of the fireplace.
If born in April, the month of the Christmas tree.
If born in May, the month of the stocking.
If born in June, the month of the pudding.
If born in July, the month of the boar's head.
If born in August, the month of the mistletoe.
If born in September, the month of the holly.
If born in October, the month of the star.
If born in November, the month of the turkey.
If born in December, the month of the bells.

"O Christ The Child"


O Christ The Child
Author Unknown

You little children in whose eyes
the undimmed light of heaven
glows,
Whose dreams are bright of para-
dise,
Whose thoughts are whiter than the
snows,
From holy lips and undefiled
Breathe your soft prayers like Christ
the Child.
And you whose thinning looks are
spent
With unreturning autumn's rime,
Whose forms, like wind worn trees,
are bent
Beneath the heavy storms of time.
Take Christ the Child to be your
guide
Past the dim shoal where shadows
hide.
Oh, saving hands; oh, thou that hears
An earthly mother's lullabies,
Who sharest all our doubts and fears,
Whose bosom trembles to our sighs,
Teach us thy gospel pure and mild.
Make us like thee, O Christ the Child!

"The Partridge In A Pear Tree" Candy Cone

       I handcrafted this candy cone one Christmas for my oldest child. It is based upon the theme of the 12 days of Christmas. 
      I purchased a prefabricated half mold from a hobby store to press the intricately designed 3D flowers from Sculpey clay. The partridges were Styrofoam birds left over from a Christmas beading craft. 
      I frequently purchase discounted craft supplies after the Christmas holiday for use in some project that they were not originally intended. These supplies are sold for pennies on the dollar from hobby retailers after customers have no interest in them. 
      However, this does not mean that these items can not be upcycled to create something unique, beautiful or of sentimental value. "Usefulness" is in the eye of the beholder!
Far left, I lined the inside of the cone with gold tinsel. The handle is strung with both seed beads and faux pearl beads. Middle, the partridge is made from Syrofoam. Right, there are actually two partridges included on the cone to enhance the 3D effect.

Close up views of the details on the candy cone; these were created by combining 3D sculpted clay pieces with bright colored acrylic paints.
Four different views of the same candy cone or horn of plenty, "A Partridge In A Pear Tree."


"Ever wonder about that silly little Christmas Song. Find out why it was written and how it helped preserve the message."

Tuesday, December 17, 2013

Clip Art of Christmas Toys

A little girl's Christmas kittens get a surprise when the jack-in-the-box pops open!

A small boy opens his stocking to see what Santa has brought him.


Have a question about the illustration? Just type it in the comment box and I'll get back to you as soon as possible. I only publish content that is closely related to the subject, folks.

Monday, December 16, 2013

Craft An Ornament of The Baby Jesus in His Manger

Young children ages 6 and up can craft this simple ornament of the baby Jesus in a manger without help from
 an adult. If you'd like to help younger children make a similar version, it is probably best for adults to assemble
 some of the parts in advance.
Top 1. Assemble and glue together mini craft sticks for the manger,
2. Tie on and string the gold beads for the hanger,
3. Glue the Easter grass onto the manger,
4. The finished first part of the baby Jesus in a manger ornament
This little baby Jesus ornament is crafted with the following supplies:
  • mini craft sticks
  • white school glue
  • thread
  • gold beads
  • Baby Jesus printable (included below)
  • flesh colored construction paper
  • paper grass
  • brown markers or watercolor paints
  • soft colored pencil in pink for subtle cheek color
Instructions:
   For the first part of the ornament craft project students or the teacher, depending on the age of the former, needs to glue together a small manger using mini wooden craft sticks. In the first example (1.), I have shown three possible ways to assemble the manger. Glue the pieces together using white glue and let these mangers dry overnight. If you are working with very young children, I suggest assembling this part of the craft in advance for them. (ages 2-5)
   For the second step (2.), tie a thread around the back side of the manger and glue down the edge of the thread. Let this dry for a bit before stringing gold beads on to the thread. Be generous with the length of the gold hanger so that there will be plenty of room for the paper baby Jesus that will be pasted on to the manger later. After stringing the beads on to the thread tie the end to the opposite side of the manger. 
   Glue onto the front side of your ornament a bit of paper grass (3.). I used a natural color because I prefer it but you may wish to use a yellow or gold variety of Easter grass on your own version of the ornament.
   To finish the little manger (4.), students may then color the mini craft sticks with brown watercolors, markers etc... I chose to color my mangers with a fine tipped marker to imitate the grain of wood that one might find in a wooden trough.
      Open a Word Doc and swipe in the little baby printables. Alter the page settings so that you can fit multiple images onto one page before printing them out. Because I assemble so many Christmas craft kits for young children, I print and cut batches of babies out for students to color and glue in their manger ornaments.  By these means, a teacher can print 100 baby images on as little as six or seven sheets of 8 1/2 by 11 inch standard sized paper. (You will need to trim down standard sized construction paper in advance to printing.)
   I highlighted the cheeks and elbows of my baby Jesus with just a hint of blush color before pasting him onto the manger grass.
Print your little babies on many flesh colored papers. I used pale brown and mauve
colored construction papers for my samples, but you may use whatever colors you like.
You may even print these images on white paper and offer your young crafters
flesh toned markers instead.

The finished, assembled manger ornaments.
Printable baby Jesus, version 1.
Printable baby Jesus, version 2.

Saturday, December 14, 2013

Belznickles With Glittery Coats


        These small Belznickles are dressed in glittery coats of bubblegum pink, yellowware gold, and a dusky blue shade. They stand approximately six to seven inches tall and each one carries a tiny bottle brush tree. Each figure is entirely handsculpted with CelluClay; there are no two exactly alike.


Wednesday, December 11, 2013

A Triquetra Knot Chrismon, Cut From A Scherenscnitte

Cut a Triquetra Knot with a scherenscnitte center for your Chrismon collection.
      This Trinity Knot is designed using both the classic trinity symbol and the ancient fish motifs of early Christians. You will need to print two copies of the pattern below in order to cut and paste the version that I have photographed in color in this post. Cut one of the scherenscnitte patterns entirely from fine white linen paper.
      Then cut out the center of your second pattern to use the classic trinity symbol as a template. Trace and cut two versions of this knot from a glittery, gold paper. You will need both a front and a  back side; this Chrismon is designed to be viewed from either of it's sides.

Scherenscnitte Pattern of a Trinity Fish Knot by Kathy Grimm
More About The Holy Trinity in Art:
"A clip from RAPTURE an original oratorio written and produced by Darren Thomas and performed by Symphonic Art's MPAC which stands for Music & Performing Arts Chorale. Full project is available on DVD at www.rebirthtoday.org in our R-Store."

Belznickles In White


    I sculpted some of my 2012, limited edition Belznickles in snowy white Winter cloaks. Each elderly figure carries a gold tinsel feather tree and stands approximately fourteen inches tall.
    Their features were painting with acrylics and varnished with a durable, long lasting transparent enamel finish and every Belznickle's base is lined with wool felt to protect  surfaces from scratching.

More links to Belznickles:
These friendly Belznickles by Kathy Grimm were painted for a 2012 limited edition.

Tuesday, December 10, 2013

Sculpt a Belznickle Head Candy Cone

This candy cone measure approximately
 12 inches in length.
       This the first candy cone that I made from CelluClay. I fashioned it on top of a prefabricated cone purchased from a hobby store. Although I could have made the cone myself, I thought perhaps it more important that the cone be made of a much heavier paper mache form. CelluClay dries light weight but is quite heavy when first applied. I didn't want the thickness of the medium to alter the shape of the cone before it dried. It took several weeks for the CelluClay to dry naturally because I did not make my earliest ornaments from this series in the summer. Through trail and error I would conclude to sculpt with CelluClay during the hot summer months only.
      I shaped the ridges of the Belznickle's beard with a toothpick. His features were painted with acrylic paints and then I varnished the surface of my candy cone with a wood floor varnish. I also finished the inside of the cone with CelluClay and painted it a bright red. (not shown) The cone itself is relatively light weight but it often contains heavier candies over the holidays. This is the reason for the thick wire handle.

More ornaments made with CelluClay:

A Manger Scherenscnitte Pattern by Kathy Grimm

A hand cut scherenscnitte of a manger scene.
        I have designed a brand new scherenscnitte pattern that our visitors may use for their personal crafts and for those crafts dedicated to the decorating of Chrismon trees! I cut my Chrismon of the baby Jesus in a manger from fine white drawing paper and then mounted the scherenscnitte onto heavy card stock covered with gold glitter.
       Teachers, parishioners and or pastors may wish to make heavy cardboard stencils from the pattern below so that little ones may trace, cut and paste their own contributions to your church's Chrismon tree. Or the stencil may be traced lightly onto a sheet of fine linen paper with the aid of a window or light table. Then adults can use either an x-acto knife or use 3-1/2" sharp pointed scissors to cut out the image of the baby Jesus cradled in a manger under the Star of David.

Scherenscnitte Pattern by Kathy Grimm © 2013
"Kid's Music video from the Kiddie Viddie series. - Song #4 from "Christmas Joy". Download this song for free at http://nubeat.org/ABCHscjT.html"

Monday, December 9, 2013

The Queen and King of Hearts Candy Cone

The raised parts of the candy cones are made using Sculpey and candy molds.

       In order to craft your own candy cone creation, you will need some very basic supplies. I have listed these below but, remember, that your candy cone creation will not be exactly like this one. The molds, design and additional decorative elements will give your cone it's own unique appearance.
  • A candy cone form, this may be either purchased or made by hand. If you are planning to layer molded clay parts onto the form as I have done in the example below, I recommend that you purchase a very sturdy cone.
  • Paper mâché pulp, like CelluClay to shape in a thin layer around the pasted objects. This reinforces the cone and also gives it's surface a texture like snow.
  • Paperclay or Sculpey for the making of decorative 3D applied figures - If you use Sculpey it must be oven baked while draped on top of the cone. This will ensure that it has the subtle curvature necessary in order to be glued to the cone's rounded shape. If you are unsure of how to accomplish this, it takes a bit of skill, only use the paperclay. Paperclay may be left for hours on the cone while it dries into the correct shape. You may use colored clay or choose to paint the clay later.
  • A variety of small half molds. For my particular candy cone project, I chose to mold the King and Queen of Hearts characters from molds produced for Hearth Song. These molds were originally produced for a bee's wax ornament kit produced in 1990 something. I purchased the kit for my oldest child and used it for this purpose many years ago. The molds were so cute that I decided to make something more elaborate with them for my younger daughter.
  • Tinsel to line the interior of the cone
  • Beads and wire to craft the fancy handle
  • White glue to adhere the decorative clay pieces to the surface of the cone.
  • A kind of enamel or acrylic varnish to finish the candy cone's surface 
  • Acrylic paints to color the surface of your cone as you wish
Process:
  1. To begin this process, choose small molded elements that relate to a specific design theme. These may be purchased in a local hobby store or be handmade by pressing a variety of small objects into Sculpey clay that are then carefully removed to leave a three dimensional impression. Bake the clay half mold in the oven as directed. Cool. You may press and unmold a variety of paperclay objects from this Sculpey press mold for future use in the candy cone project.
  2. Because you will be gluing these small molded objects to a cylindrical cone, you will need to make sure that they dry hard with a slight curvature. I dry my molded element directly on top of the surface of the cone along with a generous amount of white glue, while the clay piece is still yet pliable. Neither paperclay or Sculpey shrink enough during the drying or baking process for me to worry about them not shaping themselves properly to the finished surface. If I where using a high fire clay, I might need to worry about this process a bit and make allowances for it. However, with these two products, the fear is unnecessary.
  3. Sometimes the small molded pieces pop off of the cone during drying or baking. Do not trouble yourself over this, just apply more glue to the surface and reattach the element.
  4. Mix together a small amount of CelluClay as directed and apply this around your molded pieces to fill in the gaps on your cone. Let the entire piece dry. Depending upon the time of year, this could take one night or a week. If you are mass producing candy cones to sell in a little shop, this is the point in the project in which you may wish to set aside the cones until you have time to finish them at a later stage. I often do this part of my crafting in the early summer for a couple of weeks. Then I store the cones for painting later. This is because the summer heat helps to dry the CelluClay harder, faster, and also prevents mold from growing on the surface.
  5. Before painting the cone, take a sharp object and punch a whole at the top of the cone on either of it's sides for the handle. 
  6. Add an assortment of beads to a wire and twist this in place through the holes to shape a handle. Make sure their are no sharp ends left that may cause injury. 
  7. Using white glue, adhere a generous amount of tinsel to the interior of the cone or you may choose to simple paint it and add tissue before putting small gifts/candy inside of it.
  8. Paint the surface design of your cone to compliment a design and or color palette of your own choice.
  9. Varnish the outside surface with enamel or acrylic sealer in order to ensure the candy cone's life long use.
  10. Remember to always wrap the candies you give into the cone. I hang the same candy cones on my Christmas tree every year and fill these with all kinds of special sweets.
Candy Cone Forms and Templates:

The hanger for this candy cone is beaded with seed beads, bugle beads, pearl beads etc...

Sunday, December 8, 2013

How To Organize Christmas Parties

Organize a wintery sleigh ride.
       A house party at Christmas affords the young people of the family a chance to be entertained and cheery for a weekend or more. The charm of a house party is in the bringing together of congenial guests who spend several days with their hosts. When the girls or boys return from college or boarding school for the holidays they often bring with them as guests classmates whose homes are too remote to make it worth whole for them to take a long and expensive journey for the recess. The girl and the boy who hail from the west and attend an eastern school of learning, may be forced to spend a homesick holiday if no comrade tenders an invitation to join a family group.
       Outdoor sports, skating, coasting, tobogganing and sleigh riding are the pastimes of the country, while the city offers sight-seeing, music and the other diversions. Storytelling around a bonfire in Southern states is sure to be a favorite feature of the festivity and ice skating parties are certainly typical of those folks who live up North. Daily excursions such as these are thankfully hosted and organized by others: all you really need to think about is how and when to provide transportation. However, hosting house parties will take a bit of personal planning in advance.
       The long evenings at home, the little parties invited to meet the visitors, and the whole merry and swiftly passing time make a Christmas house-party one of the gala seasons of the year. The housekeeper finds that her provision for the table must be ample. Her pies and cakes disappear like magic, for young people are noted for good appetites. I will links to ideas and helpful ways to organize these home parties below.
       Tableaux, charades and conundrums are among the amusements appropriate to such a parties and I keep an updated listing of ideas for these entertainments here

Traditional Outdoor Christmas Parties:
Traditional Christmas Ideas for A House Party:
"GHRI Food Director Susan Westmoreland shares her favorite cookie recipes and shows you how to host a cookie swap."

Saturday, December 7, 2013

Decoupage Vintage Christmas Postcards

Our relations also frequent their local craft fairs with handmade ornaments to sell. Christmas craft fairs in St. Louis are an age old tradition among German immigrant descendants. These craft fairs are less about profits than they are about community Christmas spirit. Most folks just drink coffee, eat donuts, talk to old friends and neighbors while they browse the latest crafts. I think that if you talked long enough to the participants, you would discover that more money is spent preparing for these fairs than is ever made from selling the wares! The profits are in the memories and friendships.
       Decoupage (or découpage) is the art of decorating an object by gluing colored paper cutouts onto it in combination with special paint effects, gold leaf and so on. Commonly an object like a small box or an item of furniture is covered by cutouts from magazines or from purpose-manufactured papers. Each layer is sealed with varnishes (often multiple coats) until the "stuck on" appearance disappears and the result looks like painting or inlay work. Although the traditional technique used 30 to 40 layers of varnish which were then sanded to a polished finish, these little ornaments were crafted with perhaps only three or four coats of Modge Podge. They were sent to our family from relatives for our Christmas trees last year. Each vintage postcard image was mounted onto a thin, painted, wooden block and then the edges and corners were lightly sanded to give a worn, homey appearance to the ornament. The hangers are made of thick black wire topped off with a white button.
       I also have a selection of old postcard images here on my blog that crafters may use to make similar ornaments, if they'd like.

More Decoupage Christmas Ornament Crafts:

Friday, December 6, 2013

Craft A Christmas Candy Wrap Jester from A Clothespin!

       This little clothespin, doll ornament is decked out in left-over candy wrappers and gold tinsel that I saved during the holiday festivities. I guess you could say that I'm "old school" meaning that I am always looking to recycle the little bits of trim and foils that most people just toss away these days. This is not to say that I can't go out to a hobby shop and purchase 1.00 sheets of fancy paper; I just can't bear to throw away cute candy wrappers and so these eventually are used for decorating the tree somehow.
       This little jester is just one of many clothespin dolls that I have crafted over the years. His face and hands were made with Cernit Oven-Bake Modeling Clay pressed into Polyform molds. Sculpey makes many small press molds of detailed doll parts for crafts like the one pictured below. You can find all kinds of these molds in your local craft and hobby stores. 
       I use wood glue to apply foil trims with. Usually I have to clamp the tinsel temporarily while the glue dries but it is worth the extra trouble in order to avoid messier hot glue application. Also, tinsel heats up when it is applied with a hot glue and you are more likely to burn yourself during the process if you're not careful. 
       I wrapped his pointed hat, body and arms in foil then wrapped his neck with a bushy tinsel collar. Then I painted his features with a white acrylic paint to imitate "clown white" or "grease paint." Lastly I added a few bright features: a yellow smile and red rosy cheeks and outlined these with a permanent felt tipped marker.
The above pictures illustrate a jester clothespin doll as it looks from four different angles.
See additional examples of clothespin/spool dolls:

Punch Snowflakes to Craft A Christmas Tree?

      A few of our distant relations sent us this nice little handmade Christmas card this year. I thought that the use of a snowflake punch quite novel. Who would have thought to use green snowflakes to create a three-dimensional effect for a Christmas tree? Obviously, somebody did. The card was not crafted by our relations but I enjoy it just the same. 
       The crafter added a few jewels and a few cardboard cut-out letters to four layers of frames in order to create even more texture. Perhaps our family will make something similar to hang on the tree? This technique would look just as nice on a wreath ornament I think.

Craft a Salt Clay Angel from A Mold

The above Brown Bag Mold was copyrighted in 1986 by Hill Design.
       I crafted the molded angel ornament above from salt dough. The mold was produced by "Brown Bag Cookie Art" in 1986 (Angel With Lute) This company is still producing a line of stoneware molds every year I think. Here is their online address. You can also collect Brown Bag Molds online at Ebay so it helps to know the name of the mold you are looking for at least.
       You can find the salt clay recipe that I use personally at my arteducationdaily.blog if you'd prefer to try it. There are many salt clay formulas that students can use for a Christmas ornament craft projects that will produce lovely results. I also could have used paper clay in this mold and my angel would have been lighter weight. However, paper clay is significantly more expensive than salt clay. If you use salt clay, you do need to spray the mold with cooking spray before pressing the salt clay into the mold. You must then immediately remove the molded ornament before baking it at 250 degrees for two hours. I tap the edge of my mold gently on a wooden chopping board in order to un-mold the raw salt clay. This takes a bit of practice but the results are well worth it.
       After painting my angel with acrylic paints, I then applied a generous coat of gold translucent nail enamel for the finished appearance. You do not always need to use clear varnish on your salt dough ornaments. Experiment a little, try variations and layers of enamel that you ordinarily would not try on a few test pieces before varnishing your final molded ornament!

"Emily Warford Ivey shows us how to personalize our tree with simple 
and inexpensive homemade ornaments." Amanda Warford

An Adorable Snowman Craft Using Pine Cones

       This is one of my favorite pine cone ornaments! An aunt to our children gave each of my girls one of these handcrafted pine cone decorations for Christmas. The snowmen are made with paper clay, their arms are twigs and their noses tooth-picks painted orange. The craftswoman glued a tiny bottle brush Christmas tree to the center top of the pine cone before adding the snowmen. Then she  glued some artificial looking powdered snow around the tiny vignette and also onto the tips of the pine cone as well.

Thursday, December 5, 2013

Recycle Peanuts Gift Wrap Into Tags and Ornaments

       Here is are two economical, quick and simple ways to decorate a child's Christmas tree or presents with all of his or her favorite characters from Peanuts. I will use these little paper ornaments to decorate a classroom Christmas tree with.

        Above is a photo of both the original Peanuts wrapping paper (right) and the cut-outs pasted onto a piece of blue construction paper (left). My children cut the shapes out two to three times after pasting the pictures to red, yellow, blue and green papers. Each time they cut out their little tags, they would leave a narrow boarder around the tag. This made their tags heavier and more durable as well as adding more bright colors to the tags.

These Christmas Peanuts tags may be used to decorate gifts with if you'd prefer. I will hang them on a Peanuts themed Christmas tree in our classroom after they have been laminated; this will ensure  that the decorations will last for several years.

   Above is a Christmas bauble made by layering Snoopy and Woodstock character wrapping paper onto a light weight plastic Styrofoam ball with white glue. After the glue dries, add a thick coat of acrylic varnish to polish off your Christmas ornament creation!

More Peanuts Ornaments and Christmas Advent Calendars:

Monday, December 2, 2013

Craft a Pine Cone Santa Head Ornament

I made this pine cone Belznickle many years ago. He is a family favorite and is usually displayed near the top and front part of our largest Christmas tree.
      At first glance, this ornament looks complicated but it is much simpler to craft than many people believe. It is a very traditional craft. Back in the 1920s, folk artists in the Appalachia mountains made entire Santa/Belznickle figures from pine cones that they had collected from some of the surrounding pine trees. Most of the Appalachia woodlands are made up of deciduous trees but there are also some fine pines and firs mixed into the woods as well. 
       Victorians, 1837-1903,  also crafted Belznickle figures from giant pine cones. Originals of these are rare and highly prized by collectors!
       I crafted this Santa head using fur trim and a bit of silk Christmas holly. I simply hot-glued these two decorative elements to the top of my pine cone and painted the lower half with snowy white paint, glued on a bit of glitter and varnished the cone. I chose a cone that was missing some of it's pattern near the top so that I could blend into the cone a face of my own making. I sculpted this face using CelluClay. I repeated the lumpy pattern found on the cone in the shape of cheeks, closed eye lids and the nose with the paper pulp mixture. Then I let the head dry for a few days until I could paint and varnish Santa's features with acrylic paints.
      Above is a photo of my CelluClay, papier mâché pulp, both before and after I have mixed it with water. The mixture should have a sticky thick consistency after stirring the water in. It is important to mix these two ingredients well in order to dampen thoroughly the glue that is added to the pulp at the factory. Mixing the correct proportions will take some getting used to. This is a process that you do by experimentation. Don't throw out the mixture if it is too loose, just add more pulp. If it is too dry add more water.
More Examples of Pine Cone Santas or Belznickles:

Craft a Snowman From A Paint Stirring Stick

      When my girls were very small, they brought all kinds of quirky, cute little snowman crafts home during the holidays. This funny little guy has been hanging on one of our Christmas trees for fifteen some odd years. He is made from a paint stirring stick. One of the children's preschool teachers probably picked up a dozen of these at a paint store where they give them away with a purchase. Some stores give them away without a purchase. 
      The little ones then painted the lower larger half with white paint and the shorter, upper half with black. The teacher then hot glued a few simple trims on and each child dipped his or her finger into pink paint to fingerprint the rosy cheeks!
More things to make with discarded wooden rulers and yard sticks:
Search also Kim Pearson's "Repurposed Crafts" pinboard for new ideas!

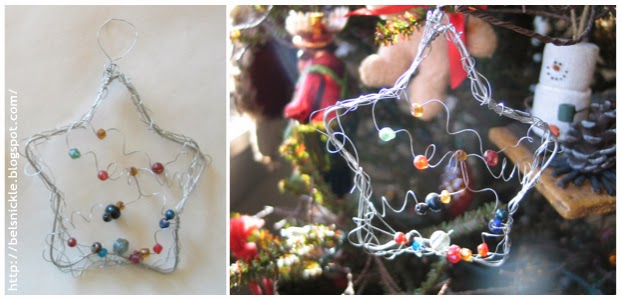
Christmas Ornaments Crafted With Wire and Glass Beads

Above is a wire wrapped cross made by my tween aged daughter several years ago. She chose to use silver wire for this Christmas ornament craft, but you could use any color of wire for the project.

      My daughters crafted these bent wire ornaments while they were in middle school. Although the craft is simple, I consider it more appropriate to older children. The wire can be a bit tricky to work with and it takes some strength to shape the outer wire armatures. You will need very heavy wire for the cross or star shapes. Form these first by carefully bending the wire around the outside edges of a couple of cookie cutters. Detach the finished shapes from the cookie cutters.Then take a pair of pliers and snip and crush the tail end of the wire to conform to the shape. You may then start wrapping a finer wire around the snipped end of each wire form, covering any sharp points with twists of fine wire. This is done to prevent people from rubbing their fingers across a surface of the ornament where they may cut themselves and also to reinforce the final chosen shape. Then randomly begin to twist, bend, and weave the light weight wire around the form. Add an occasional glass bead to the weave.

You will need to collect together only a few items to make this contemporary looking star. Use up some of those random glass beads left over from earlier projects to finish off the wire weave.

Similar Woven Wire Ornaments: