Friday, December 6, 2013

Craft a Salt Clay Angel from A Mold

The above Brown Bag Mold was copyrighted in 1986 by Hill Design.
       I crafted the molded angel ornament above from salt dough. The mold was produced by "Brown Bag Cookie Art" in 1986 (Angel With Lute) This company is still producing a line of stoneware molds every year I think. Here is their online address. You can also collect Brown Bag Molds online at Ebay so it helps to know the name of the mold you are looking for at least.
       You can find the salt clay recipe that I use personally at my arteducationdaily.blog if you'd prefer to try it. There are many salt clay formulas that students can use for a Christmas ornament craft projects that will produce lovely results. I also could have used paper clay in this mold and my angel would have been lighter weight. However, paper clay is significantly more expensive than salt clay. If you use salt clay, you do need to spray the mold with cooking spray before pressing the salt clay into the mold. You must then immediately remove the molded ornament before baking it at 250 degrees for two hours. I tap the edge of my mold gently on a wooden chopping board in order to un-mold the raw salt clay. This takes a bit of practice but the results are well worth it.
       After painting my angel with acrylic paints, I then applied a generous coat of gold translucent nail enamel for the finished appearance. You do not always need to use clear varnish on your salt dough ornaments. Experiment a little, try variations and layers of enamel that you ordinarily would not try on a few test pieces before varnishing your final molded ornament!

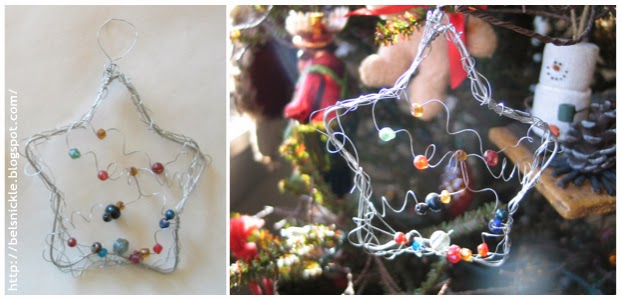
"Emily Warford Ivey shows us how to personalize our tree with simple 
and inexpensive homemade ornaments." Amanda Warford

An Adorable Snowman Craft Using Pine Cones

       This is one of my favorite pine cone ornaments! An aunt to our children gave each of my girls one of these handcrafted pine cone decorations for Christmas. The snowmen are made with paper clay, their arms are twigs and their noses tooth-picks painted orange. The craftswoman glued a tiny bottle brush Christmas tree to the center top of the pine cone before adding the snowmen. Then she  glued some artificial looking powdered snow around the tiny vignette and also onto the tips of the pine cone as well.

Thursday, December 5, 2013

Recycle Peanuts Gift Wrap Into Tags and Ornaments

       Here is are two economical, quick and simple ways to decorate a child's Christmas tree or presents with all of his or her favorite characters from Peanuts. I will use these little paper ornaments to decorate a classroom Christmas tree with.

        Above is a photo of both the original Peanuts wrapping paper (right) and the cut-outs pasted onto a piece of blue construction paper (left). My children cut the shapes out two to three times after pasting the pictures to red, yellow, blue and green papers. Each time they cut out their little tags, they would leave a narrow boarder around the tag. This made their tags heavier and more durable as well as adding more bright colors to the tags.

These Christmas Peanuts tags may be used to decorate gifts with if you'd prefer. I will hang them on a Peanuts themed Christmas tree in our classroom after they have been laminated; this will ensure  that the decorations will last for several years.

   Above is a Christmas bauble made by layering Snoopy and Woodstock character wrapping paper onto a light weight plastic Styrofoam ball with white glue. After the glue dries, add a thick coat of acrylic varnish to polish off your Christmas ornament creation!

More Peanuts Ornaments and Christmas Advent Calendars:

Monday, December 2, 2013

Craft a Pine Cone Santa Head Ornament

I made this pine cone Belznickle many years ago. He is a family favorite and is usually displayed near the top and front part of our largest Christmas tree.
      At first glance, this ornament looks complicated but it is much simpler to craft than many people believe. It is a very traditional craft. Back in the 1920s, folk artists in the Appalachia mountains made entire Santa/Belznickle figures from pine cones that they had collected from some of the surrounding pine trees. Most of the Appalachia woodlands are made up of deciduous trees but there are also some fine pines and firs mixed into the woods as well. 
       Victorians, 1837-1903,  also crafted Belznickle figures from giant pine cones. Originals of these are rare and highly prized by collectors!
       I crafted this Santa head using fur trim and a bit of silk Christmas holly. I simply hot-glued these two decorative elements to the top of my pine cone and painted the lower half with snowy white paint, glued on a bit of glitter and varnished the cone. I chose a cone that was missing some of it's pattern near the top so that I could blend into the cone a face of my own making. I sculpted this face using CelluClay. I repeated the lumpy pattern found on the cone in the shape of cheeks, closed eye lids and the nose with the paper pulp mixture. Then I let the head dry for a few days until I could paint and varnish Santa's features with acrylic paints.
      Above is a photo of my CelluClay, papier mâché pulp, both before and after I have mixed it with water. The mixture should have a sticky thick consistency after stirring the water in. It is important to mix these two ingredients well in order to dampen thoroughly the glue that is added to the pulp at the factory. Mixing the correct proportions will take some getting used to. This is a process that you do by experimentation. Don't throw out the mixture if it is too loose, just add more pulp. If it is too dry add more water.
More Examples of Pine Cone Santas or Belznickles:

Craft a Snowman From A Paint Stirring Stick

      When my girls were very small, they brought all kinds of quirky, cute little snowman crafts home during the holidays. This funny little guy has been hanging on one of our Christmas trees for fifteen some odd years. He is made from a paint stirring stick. One of the children's preschool teachers probably picked up a dozen of these at a paint store where they give them away with a purchase. Some stores give them away without a purchase. 
      The little ones then painted the lower larger half with white paint and the shorter, upper half with black. The teacher then hot glued a few simple trims on and each child dipped his or her finger into pink paint to fingerprint the rosy cheeks!
More things to make with discarded wooden rulers and yard sticks:
Search also Kim Pearson's "Repurposed Crafts" pinboard for new ideas!

Christmas Ornaments Crafted With Wire and Glass Beads

Above is a wire wrapped cross made by my tween aged daughter several years ago. She chose to use silver wire for this Christmas ornament craft, but you could use any color of wire for the project.

      My daughters crafted these bent wire ornaments while they were in middle school. Although the craft is simple, I consider it more appropriate to older children. The wire can be a bit tricky to work with and it takes some strength to shape the outer wire armatures. You will need very heavy wire for the cross or star shapes. Form these first by carefully bending the wire around the outside edges of a couple of cookie cutters. Detach the finished shapes from the cookie cutters.Then take a pair of pliers and snip and crush the tail end of the wire to conform to the shape. You may then start wrapping a finer wire around the snipped end of each wire form, covering any sharp points with twists of fine wire. This is done to prevent people from rubbing their fingers across a surface of the ornament where they may cut themselves and also to reinforce the final chosen shape. Then randomly begin to twist, bend, and weave the light weight wire around the form. Add an occasional glass bead to the weave.

You will need to collect together only a few items to make this contemporary looking star. Use up some of those random glass beads left over from earlier projects to finish off the wire weave.

Similar Woven Wire Ornaments:

Saturday, November 30, 2013

Charles Dickens on Christmas

Pin this image only please.
       "It is a wonderful thing" wrote Charles Dickens, "the period of Christmas! I wonder how many hundreds of thousands of parents have discovered at Christmas time, under the magic of the season--through some little, little thing done by son or daughter--that those they thought estranged from them, by those things which come between, still loved them with a memory more tender than they had dreamed of.
       "I wonder how many sons and daughters, under the magic influence of Christmas, have had their hearts softened so as to be moved by some little manifestation of love by father or mother, which they would have thought little of, perhaps despised, at any other season."

      The following pictures were restored by Kathy Grimm for the purpose of reprinting on Christmas Cards or including a little print with a handwritten letter for a loved one. Visitors should read The Terms of Use before downloading them from here. Use them in your own personal crafts and letters freely but do not redistribute them over the web or profit from them by selling the work in it's original state. (This means burning the jpgs. to CDs or using them to draw traffic to web pages.) The quotes are from the same book, "A Christmas Carol" by Dickens. The paintings were originally painted by A. C. Michael for "A Christmas Carol" by Charles Dickens - Published by New York : Hodder and Stoughton 1911, A Bound / Flex Cover / Reprint / FBRE, Ltd., 1911.
"For it is good to be children sometimes, and never better than at Christmas,
when its mighty Founder was a child Himself."
"There is nothing in the world so irresistibly
contagious as laughter and good humor."
"I wear the chain I forged in life...
 I made it link by link,
 and yard by yard;
 I girded it on of my own free will,
 and of my own free will I wore it."
More About "A Christmas Carol"