Showing posts with label Made For Worship. Show all posts

Friday, December 3, 2021

A free pattern for a Chrismon Crown cross stitch...

A free cross stitch crown pattern for those
of you who enjoy needlework.
        For this crown cross stitch use five strongly contrasting colors of: wool, floss, embroidery silk, filoselle or crewel. Any one of these fibers may be handsomely commingled in a design of this kind. The squares marked alike are to be alike in color, and the colors may be whatever you choose. Although a Chrismon crown would be traditionally worked in gold, silver, white and or yellows. The design may also be embroidered on canvas of any variety, or on a cloth, felt, velvet, plush etc...

More Chrismon Cross Stitch Patterns:

Thursday, November 29, 2018

DIY the prophet Jonah and Whale

       Modern Christians often teach that it was a whale who swallowed Jonah in order to transport him safely between the waters surrounding Tarshish to the port of Joppa. However, the Bible says that he was swallowed by a great fish. Which may have been a whale, presuming that whoever wrote the book of Jonah did not know the difference between fish and swimming mammals.
My finished ornament of Jonah and the giant whale. This ornament is made from cotton batting, dryer lint and toothpicks.
"Now the LORD provided a huge fish to swallow Jonah, and Jonah was in the belly of the fish three days and three nights. From inside the fish Jonah prayed to the LORD his God. He said: "In my distress I called to the LORD, and he answered me. From deep in the realm of the dead I called for help, and you listened to my cry. You hurled me into the depths, into the very heart of the seas, and the currents swirled about me; all your waves and breakers swept over me. I said, 'I have been banished from your sight; yet I will look again toward your holy temple.'  The engulfing waters threatened me, the deep surrounded me; seaweed was wrapped around my head. To the roots of the mountains I sank down; the earth beneath barred me in forever. But you, LORD my God, brought my life up from the pit. "When my life was ebbing away, I remembered you, LORD, and my prayer rose to you, to your holy temple.  "Those who cling to worthless idols turn away from God's love for them. But I, with shouts of grateful praise, will sacrifice to you. What I have vowed I will make good. I will say, 'Salvation comes from the LORD.'" And the LORD commanded the fish, and it vomited Jonah onto dry land. Then the word of the LORD came to Jonah a second time: "Go to the city of Nineveh and proclaim to it the message I give you." Jonah obeyed the word of the LORD and went to Nineveh. ( A 550 mile journey from the port of Joppa!) Now Nineveh was a very large city; it took three days to go through it." Jonah 1:17 through Jonah 3:3 (NIV)

       Whether or not you believe that he was saved by a swimming mammal or giant fish, this symbol will certainly remind any believer who would like to include the stubborn old prophet, Jonah, on their Jesse Tree this Christmas that he was also recorded to be in the lineage of King David and therefore in the family of Christ as well.

Above is the plastic, green sperm whale my brothers played with when we were kids. Keep in mind, it is important to learn to sculpt three dimensional objects by touch. Examination with both the hands and eyes, will help your brain to relay information back to your hands quicker and with more accuracy. This is for educational purposes mind you. After you have learned to sculpt sample prototypes, you must make your own unique models for profit because of copyright laws.
Supply List:
  • newsprint
  • masking tape
  • white school glue
  • dryer lint (grey)
  • paper mache' pulp
  • plastic sperm whale (toy)
  • small black beads for eyes (two)
  • wire
  • wooden toothpicks
  • few white cotton balls
  • Exacto knife
  • acrylic paints for Jonah's body 
Right, featured: "A Sperm Whale Encounter" by Howard Hall, students may observe the size, and coloration of sperm whales.


Jonah tossed about above the blow hole of a super large whale.
Step-by-Step Instructions:
  1. Touch and examine the model whale carefully. Spend time looking at its properties while running your fingertips over the surface of the whale.
  2. Now crush and mask with tape a similar shape.
  3. Use a knife to dent the surface area for a bead on either side of the whale's head. Glue these beads into place. You many use a small amount of tape to keep the eyes in position while the glue dries.
  4. Mix together the paper pulp according to the directions on the package. 
  5. You may add a bit of glue to your water while you dampen the pulp to give it extra strength.
  6. Let the paper mache' stiffen and dry out before layering glue and dryer lint onto it's surface. Keep your work in a dry, warm area so that it will harden quickly. 
  7. I worked in some white areas with a bit of unraveled cotton on the whale's belly because I preferred the coloration. 
  8. Dig out a hole in the top of the whales head for it's spout. 
  9. Cut wire pieces and roll glue with unraveled cotton between the palms of your hands. 
  10. Twist these wire into curls. Then bind them together to mimic a fountain of water spray. (see photograph)
  11. Glue this water spray into the 1/2 inch hole for it's spout. 
  12. Cover any torn or disturbed areas around the spout with additional grey lint.
  13. Now cut off, with your Exacto knife, the sharp tips of many toothpicks. These will become the teeth of the sperm whale. Glue them in place between the jaws. 
  14. Next you will need to shape a small man from a half piece of toothpick and cotton wading; this is Jonah.
  15. Between your fingertips, wad and roll a bit of cotton and white glue for Jonah's head. Then glue it the end of a broken toothpick and let it dry.
  16. Now twist another bit of batting around the toothpick to resemble a basic body shape. You can glue a second, shorter toothpick to the upper torso to make his arms. Wrap the figure with cotton until it looks like a miniature human. Give him a beard.
  17. After Jonah dries, paint his coat, beard and head with acrylic paints.
  18. Glue Jonah to the wire water spout or to the inside of the whales jaws. 
More Jesse Tree Symbols for Christmas Ornaments:

Friday, June 16, 2017

The Open Bible Chrismon

A simple interpretation of the Open Bible Chrismon.
       This contemporary Chrismon, an Open Bible is described at The Christian Clip Art Review. I used the traditional gold and white Chrismon colors to make this simple Open Bible Ornament.

Supply List:
  • corrugated cardboard
  • masking tape
  • hot glue gun and hot glue sticks
  • metallic gold spray paint
  • gold ribbon
  • white paper
  • stapler
  • printed paper that reads "Holy Bible" and verse from Luke 4:16
  • double stick tape
Directions:
  1. Cut a cover for the Chrismon Bible ornament out of corrugated cardboard. Cover this in masking tape.
  2. Trim off the masking tape.
  3. Bend the book cover in half.
  4. Spray paint this cover with gold metallic paint outdoors. Spray paint inside a cardboard box so that it may be tossed in the recycling bin after use. 
  5. Cut and staple several sheets of white paper that may be fitted between the covers of this Bible Chrismon ornament. Make sure that the printed pages are stapled at the inner-most fold. 
  6. Hot glue these stapled pages between the corrugated cardboard Bible cover after using double stick tape to position the pages open permanently.
  7. Hot glue a long gold ribbon down the center of the pages seam. Make sure the ribbon looped at the top of the book is long enough for the Chrismon to hang easily from the tree.
Far left, cardboard book cover, masked. Next the cover trimmed. Center, paper pages lined up and stapled. Right, pages are taped open with double stick tape.
Karen Barber shares her Chrismon tree with the web.

Tuesday, December 13, 2016

Beaded Pearl Icicles

I made eleven pearl icicles from left over beads.
       As usual, I spend a bit of time going through old craft supplies in December, trying to organize them in some new fashion. However, this is somewhat useless because I have far too much stuff! 
       I did find a old bag of lovely faux pearls. These appeared to be vintage; perhaps I salvaged them from some garage sale somewhere, who knows? There weren't really enough of them to start something big so I recycled these into a handful of beaded pearl icicles for my Victorian themed tree.

Supply List:
  • pearl beads, a large variety of sizes
  • wire or long ornament hooks
  • cotton batting 
  • white glue
  • needle-nose jewelry pliers
Step-by-Step Instructions:
  1.  I used long ornament hooks for this ornament craft so all that I needed to do was straighten my wires out before starting. However, if you are measuring out your wire for beaded pearl icicles you may wish to do a bit of experimenting at first with the lengths. These may be as long or short as you like. The larger your tree the longer the icicles need to be in order for them to display nicely on the branches. I decided to use four and a half inch wires to string my beads on for a five foot tall tree.
  2. Unravel a few cotton balls and set these aside.
  3. Apply white glue to approximately an inch to an inch and a half length of the wire starting from the end. 
  4. Twist, "wrap", a small bit of cotton batting around the length of the wire where you have applied the white glue. 
  5. Now gingerly shape this end of the wire into a hook.
  6. Bead your faux pearls onto the opposite end of the wire; selecting first, the largest bead and then the next largest and so on. 
  7. After stringing your beads thus, take the needle-nose jewelry pliers and bend a loop at the tip of the icicle to prevent the beads from falling off the wire.
More links to icicle crafts:

Tuesday, December 2, 2014

Craft a Golden Tassel Angel Ornament

This elegant Victorian angel ornament is made with a lovely golden tassel and cotton batting wings. Tassels were often used on ornaments during the Victorian Era.
Click to download largest file.
 Supply List:
  • prefabricated porcelain doll head with shoulders
  • gold tassel
  • short white feathers
  • white cotton balls
  • two ribbon types, wired edges
  • hot glue gun
  • white school glue
  • tiny embellishments: flowers, gems etc...
  • cardboard
  • scissors
  • white chenille stem
  • white or gold glitter
Left, here is a gold tassel. It is so shinny that I can hardly photograph it without a glare! The porcelain head is easy to find in a hobby shop. These kinds of items are popular around Christmas time. The cotton batting wings are not as easy to find. You can make these yourself though.

See how snug and finished the tassel skirted angel looks?
This is because all of the hot glue is hidden inside of the
doll's breast plate. Now all I need to do is wrap the out-
side of her bodice with a gold ribbon.
Step-by-Step Instructions:
  1. Cut one chenille stem in half and wrap each end with a bit of cotton batting; these will be the "hands" of the angel.
  2. Cut to fit two narrow pieces of wire edged ribbon to wrap around the chenille stem. The wired edges should be wrapped around the wrist's of the angel. Glue these ribbons into place.
  3. Fold the finished chenille stem arms in half and hot glue this stem up inside of the angel's shoulders. See photo right.
  4. Now hot glue the tassel up into place just underneath the chenille stem arms. There should be enough room behind the breast plate to accommodate the tassel neatly. Be generous with the hot glue. 
  5. Now wrap a gold ribbon around the breast plate all the way to the back of the angel's shoulder plate and clip off so that the ribbon is the size that you need to cover the top half of the angel's torso neatly. Hot glue this ribbon in place.
  6. Hot glue the angel's hands to hold whatever embellishments you have collected for her arms.
  7. Click and print out the wing pattern above to trace on top of your cardboard.
  8. Hot glue white feathers along the lower half of the wings.
  9. Unravel a few white cotton balls and glue a layer or two of cotton batting around the upper half of each wing covering the ends of the feathers. Repeat this step several times. Be sure to also wrap the batting around the edges of the wings.
  10. End with a final layer of white glue on top of the cotton batting and sprinkle the wings with a bit of white glitter. Let the wings dry.
  11. Hot glue the wings to the backside of the angel's breast plate at her shoulders.
Left, cut the chenille stem in half and glue a bit of cotton batting to the tips of the wire stem to create soft stubby hands. Center, the doll's head has a cavity and breast plate. I will fill this cavity with hot glue and push the wire armature inside it before I hot glue the tassel in place. Right, see I have measured the length of the arms to my own liking before wrapping these with a wire edged ribbon. Don't glue the arms into place until you have checked out the length of the stem and wrapped it in an attractive ribbon.

This little porcelain beauty is dressed; all she needs now is a set of cotton batting wings.

More Tassel Skirted Dolls:

How To Make A Tassel From Scratch.

Tuesday, November 18, 2014

DIY White Feathered Angel Ornament

       I crafted this silver and white angel from a single porcelain head, one pipe cleaner and a fistful of white downy feathers. She would look marvelous on a Victorian tree!
Supply List:
  • white feathers
  • silver beaded thread
  • silver tinsel ruffle
  • silver gems
  • silver wired ribbon
  • silver cross charm
  • small porcelain doll head/breastplate
  • one white chenille stem
  • scissors
  • hot glue gun
  • toothpicks
Step-by-Step Instructions:
  1. Cut the chenille stem in half.
  2. Position the pipe cleaner or chenille stem in the center of the wired ribbon. Then wrap the stem while hot gluing the edges of the ribbon into shape. I did not use the full length of this ribbon to wrap my stem; I only used approximately 1/3 of the ribbon. See picture below.
  3. Now bend the covered stem in half and hot glue this up inside the breastplate of the doll. There should still be plenty of room left there for you to hot glue the feathers and silver tinsel.
  4. Hot glue the silver beaded thread around the outside of the angel's breastplate. (shown below)
  5. Hot glue multiple white feathers stacked on top of one another then hot glue the silver tinsel on top of the feathers.
  6. Hot glue the stack of feathers and tinsel to the inside cavity of the porcelain doll's breastplate just beneath the chenille stem arms.
  7. Bend the arms to the front and hot glue a small charm between the angel's hands; I chose a silver cross.
  8. Finally hot glue a selection of shorter white feathers to her backside; stacking and gluing until you are satisfied with the results. It's that easy!
  9. Hot glue the silver beaded thread on top of her head to make a halo. Use the tip of a toothpick to clean away excess glue while you are working. This will greatly improve the quality of the angel's appearance.
Position the pipe cleaner or chenille stem in the center of the wired ribbon.
 Then wrap the stem while hot gluing the edges of the ribbon into shape.
 I did not use the full length of this ribbon to wrap my stem; I only used
approximately 1/3 of the ribbon.
Left, you can see that I have wrapped and hot glued some tiny silver beads around the outside
 of the breast plate of my angel. Left, here I have hot glued the ribbon wrapped chenille stem
 to the inside shell of my porcelain doll's breast plate.
An angel crafted almost entirely with white feathers.
The angel's backside.
More Angels Made with Feathers:

How to Make a Paper Doily Angel

My version of a paper doily angel includes also a metallic
cupcake liner and accordion shaped wings. I left the face
blank because I thought it fitting for a stylized angelic
countenance.
Supply List:
  • (2) 4inch white paper lace doilies
  • tacky white glue
  • white school glue
  • hot glue gun
  • approx. 1/2 inch spun cotton head (white cotton balls to make)
  • tooth picks
  • metallic thread for hanger/hair
  • 1 metallic cupcake liner
Step-by-Step Instructions:
  1. Cut one paper doily in half.
  2. Shape one of these clippings into a cone and glue it along it's edge overlapping the two sides slightly. Set this cone aside to dry.
  3. Cut from the second clipping two sleeves. You will need to shorten these a bit in order to keep the arms in proportion with the skirt. Shorten the sleeves by cutting off the pointed half of each cutting. Use a toothpick to help you roll and shape the sleeves. Glue the edges together with white tacky glue. Set these tiny cone shaped sleeves aside to dry.
  4. Shape the cotton batting head by breaking a toothpick in half and wrapping a wad of cotton batting around it's tip. Add white school glue as you wrap the head shape. Set this piece aside to dry as well.
  5. Cut out the center of one metallic cupcake liner. Cut 3/4 of the accordion strip for the bottom ruffle of the angel's skirt and save the shorter ruffle for the top half of the angel's dress.
  6. Glue the longer metallic ruffle to the inside of the cone shaped skirt using a hot glue gun.
  7. Hot glue the second shorter ruffle around the top of the cone shaped skirting.
  8. Now use the white tacky glue to add a sleeve to either side of the angel's dress.
  9. Snip off a very small point of the cone dress to insert the cotton batting head.
  10. Use white tacky glue to adhere the head to the top of the cone shaped dress. It also helps to secure the head with glue on the inside of the cone shaped dress.
  11. Now finish the front of the dress by adding another clipping of the lace doily at the angel's collar.
  12. Hot glue a gold metallic loop to the backside of the angel's dress to hang the angel with.
  13. Cut a second doily in half and accordion fold each clipping. 
  14. Hot glue the wings to the backside of the paper doily angel covering the end tip of the metallic hanger.
  15. Wrap neatly a piece of gold twine in a circular fashion around the top of the angel's head using tiny amounts of hot glue as you go.
  16. I did not prefer to add a face to this stylized paper angel but you can add a few simple features if you wish.
Far left, my 4" doilies. Next, you will need two doilies cut in half for the project. Center, see how the sleeve sections are cut. Right, the simple cotton batting head is easy to wrap and shape from a cotton ball, half a toothpick and some white school glue.
Left, half of the paper doily folded into a cone shaped skirt. Center, tiny sleeves for the paper angel's arms. Right, it only takes one metallic cup cake liner to jazz this paper angel up a bit.
This is how the paper doily looks in the round before I have added the wings and hair/halo.
Watch these creative sisters craft a similar version on video. This angel includes a wooden bead for her head and yarn for her hair instead of my cotton batting head with gold twine for my angel's hair. Their version also excludes the foil cupcake liner.

Friday, August 1, 2014

DIY Miniature Toothpick Nativity

      Although you do not need a great deal of experience to craft a Nativity ornament like this, you will need an abundance of time. The stable alone will take several hours to construct and it must be allowed plenty of time to dry. It is an ideal craft project for fourth and fifth graders and the amount of time it takes to complete is dictated by the size of the box you select to use as your stable. 

Supply List:
  • stalks of wheat
  • small cardboard box, about the size of a soap box
  • both flat sided toothpicks and round toothpicks, natural, unstained colors
  • decorative printed papers (very small designs, plain or striped)
  • flesh colored acrylic paints
  • cotton balls
  • wire for hanger and shepherd's staffs
  • white glue
  • tacky glue
  • wood glue
  • small sized cupcake foil liner (gold)
Step-by-Step Instructions For The Stable:
  1. Choose a small box for a stable. I chose a soap box.
  2. Reinforce this box with masking tape and glue. Tape down all the flaps.
  3. Cut away one whole side of the box. 
  4. I cut extra cardboard from another recycled cereal box to bend a narrow strip into the A shaped roof.
  5. I left the loft space above my stable open and also cut an additional rectangular window at the backside of this cardboard stable. (pictured below)
  6. Cover every surface of the box with masking tape and tape on a wire hook to the roof top for hanging as well.
  7. Now you are ready to start gluing flat sided toothpicks over the surface of your small cardboard stable. I cut my toothpicks with scissors to fit the sides of the stable in advance. This can be time consuming if you do not cut the toothpicks in groups of six or seven at once. Flat sided tooth picks are very fragile so this method of cutting is easier than you may think. 
  8. Glue the toothpicks directly onto the masked surface with Elmer's wood glue. This type of glue will allow you to work quickly. Decide in advance which direction your tooth picks should be glued. 
  9. I chose to glue heads of wheat to the surface of my loft floor and also to trim the outside of the box with as well.
  10. I bent a singular wheat grass stem into a star shape and twisted thin pieces of cotton around the star points to hold it into place. I then glued the star to my ornaments hook.
  11. Let your stable dry completely over night. Now you are ready to fashion the Nativity characters from the round-sided toothpicks.
Above is the little soap box that I covered with masking tape for this Nativity craft.
      The second half of this project involves the crafting of the Nativity figures. I chose to focus upon the shepherds, angel, and Holy Family from the book of Luke, chapter 2. Below I have shown photos of the process of gluing a toothpick angel. However, all of the tiny figures in my Nativity are made by the same process.

Adjust this little paper pattern to fit your own toothpick figures.
Step-by-Step Instructions For The Toothpick Figures:
  1. Depending upon the size of your stable, you may need to trim away a bit of the height of your figures. When I made my figure of Mary, I cut away half of the toothpick's length so that she would look as though she were knelling beside the manger of Jesus. I used only one small end of a toothpick to craft the baby with. (shown below)
  2. Hold two round toothpicks together between your finger tips. Put a bit of glue on top of the spiked tips and wrap a fine bit of cotton batting around the two toothpicks to shape all of the figure's heads. 
  3. Add also a little glue down the length of the toothpicks where they share a common side. Set these little shapes aside to dry.
  4. I then painted my figures heads a tannish color with acrylic paints and let them dry again.
  5. As you can see from the photographs below, the clothing on the tiny angel was made by: cutting out tiny templates, tracing around these on top of my selected decorative paper and then cutting these to fit my toothpick figure. 
  6. First wrap the paper around the neck of each figure to measure it's proper length. Trim off enough of your cone shaped cloak so that the bottom edge of the figure's gown is level to the stable's floor. In the case of my angel, I clipped off enough paper to expose her feet. She was to be floating above the stall and I wanted to expose the toothpick stubs for preference sake.
  7. Next you will use one round-sided toothpick to shape the adult figure's arms. Twist a cone shaped sleeve to fit this single toothpick. Add a bit of glue between the paper sleeve and the single tooth pick as you twist it into place. Clip off the toothpick end to finish the arm. Make two and glue these to opposite sides of your figures.
  8. I dabbed a bit of glue to the top of my angel's head to add a cotton batting halo. 
  9. For my shepherds, I dabbed glue to the top and backsides of their heads and also underneath their chins. Then I wrapped small pieces of cotton batting around their heads to imitate the head covering most commonly worn by Bible characters often portrayed in the Nativity. The baby Jesus was wrapped entirely with cotton batting to imply swaddling.
  10. Then I bent a couple of wire stems, covered in cotton batting, into shepherd's crooks.
  11. The angel figure was given an additional trim. I shaped a small, gold cupcake liner into a halo and/or wings and glued this piece to her back before gluing her onto my stable vignette.
Left, the tiny toothpick figures are compared here to the size of a penny. Center, the cloak of my toothpick angel is shaped like a cone. Right, press the paper cloak firmly at the neck while the tacky glue dries.
Left, twist the cone shaped sleeve around just one toothpick to create the angel's arms. Center, you can see the blunt end of the rounded toothpick underneath the sleeve. Right, leave a tiny amount of the toothpick tip showing so that your angel will look as though she has tiny hands.
Left, see a detailed photo of how my toothpick angel looks from beneath the skirt. It helps to stuff a very tiny amount of cotton under the skirt with the tip of your scissors and a small amount of glue in order to help the cone retain it's shape. Center, my toothpick angel is finished! Right, a detailed photo of the angel from the backside.
Details from my toothpick Nativity Vignette. Left, the star bent from a single wheat grass stem. Center, the Nativity figures: Mary, Joseph, the baby Jesus, two shepherds and an angel bringing glad tidings of great joy. The floor of the Nativity is also covered with wheat grains. These figures are glued in place. Right, see how all of the sides are covered with flat sided toothpicks.
Left, the angel is suspended above the peaceful scene watching over the tiny figure of baby Jesus. The baby is wrapped in cotton batting and so are the heads of all the adults watching over him. Right, I switched the direction of the toothpicks on the backside of my stable to imply a "doorway."
      There are some amazing toothpick structures built by people across the internet. My stable is quite humble by comparison to be sure!
More Toothpick Crafts:

Monday, December 16, 2013

Craft An Ornament of The Baby Jesus in His Manger

Young children ages 6 and up can craft this simple ornament of the baby Jesus in a manger without help from
 an adult. If you'd like to help younger children make a similar version, it is probably best for adults to assemble
 some of the parts in advance.
Top 1. Assemble and glue together mini craft sticks for the manger,
2. Tie on and string the gold beads for the hanger,
3. Glue the Easter grass onto the manger,
4. The finished first part of the baby Jesus in a manger ornament
This little baby Jesus ornament is crafted with the following supplies:
  • mini craft sticks
  • white school glue
  • thread
  • gold beads
  • Baby Jesus printable (included below)
  • flesh colored construction paper
  • paper grass
  • brown markers or watercolor paints
  • soft colored pencil in pink for subtle cheek color
Instructions:
   For the first part of the ornament craft project students or the teacher, depending on the age of the former, needs to glue together a small manger using mini wooden craft sticks. In the first example (1.), I have shown three possible ways to assemble the manger. Glue the pieces together using white glue and let these mangers dry overnight. If you are working with very young children, I suggest assembling this part of the craft in advance for them. (ages 2-5)
   For the second step (2.), tie a thread around the back side of the manger and glue down the edge of the thread. Let this dry for a bit before stringing gold beads on to the thread. Be generous with the length of the gold hanger so that there will be plenty of room for the paper baby Jesus that will be pasted on to the manger later. After stringing the beads on to the thread tie the end to the opposite side of the manger. 
   Glue onto the front side of your ornament a bit of paper grass (3.). I used a natural color because I prefer it but you may wish to use a yellow or gold variety of Easter grass on your own version of the ornament.
   To finish the little manger (4.), students may then color the mini craft sticks with brown watercolors, markers etc... I chose to color my mangers with a fine tipped marker to imitate the grain of wood that one might find in a wooden trough.
      Open a Word Doc and swipe in the little baby printables. Alter the page settings so that you can fit multiple images onto one page before printing them out. Because I assemble so many Christmas craft kits for young children, I print and cut batches of babies out for students to color and glue in their manger ornaments.  By these means, a teacher can print 100 baby images on as little as six or seven sheets of 8 1/2 by 11 inch standard sized paper. (You will need to trim down standard sized construction paper in advance to printing.)
   I highlighted the cheeks and elbows of my baby Jesus with just a hint of blush color before pasting him onto the manger grass.
Print your little babies on many flesh colored papers. I used pale brown and mauve
colored construction papers for my samples, but you may use whatever colors you like.
You may even print these images on white paper and offer your young crafters
flesh toned markers instead.

The finished, assembled manger ornaments.
Printable baby Jesus, version 1.
Printable baby Jesus, version 2.

Wednesday, December 11, 2013

A Triquetra Knot Chrismon, Cut From A Scherenscnitte

Cut a Triquetra Knot with a scherenscnitte center for your Chrismon collection.
      This Trinity Knot is designed using both the classic trinity symbol and the ancient fish motifs of early Christians. You will need to print two copies of the pattern below in order to cut and paste the version that I have photographed in color in this post. Cut one of the scherenscnitte patterns entirely from fine white linen paper.
      Then cut out the center of your second pattern to use the classic trinity symbol as a template. Trace and cut two versions of this knot from a glittery, gold paper. You will need both a front and a  back side; this Chrismon is designed to be viewed from either of it's sides.

Scherenscnitte Pattern of a Trinity Fish Knot by Kathy Grimm
More About The Holy Trinity in Art:
"A clip from RAPTURE an original oratorio written and produced by Darren Thomas and performed by Symphonic Art's MPAC which stands for Music & Performing Arts Chorale. Full project is available on DVD at www.rebirthtoday.org in our R-Store."

Tuesday, December 10, 2013

A Manger Scherenscnitte Pattern by Kathy Grimm

A hand cut scherenscnitte of a manger scene.
        I have designed a brand new scherenscnitte pattern that our visitors may use for their personal crafts and for those crafts dedicated to the decorating of Chrismon trees! I cut my Chrismon of the baby Jesus in a manger from fine white drawing paper and then mounted the scherenscnitte onto heavy card stock covered with gold glitter.
       Teachers, parishioners and or pastors may wish to make heavy cardboard stencils from the pattern below so that little ones may trace, cut and paste their own contributions to your church's Chrismon tree. Or the stencil may be traced lightly onto a sheet of fine linen paper with the aid of a window or light table. Then adults can use either an x-acto knife or use 3-1/2" sharp pointed scissors to cut out the image of the baby Jesus cradled in a manger under the Star of David.

Scherenscnitte Pattern by Kathy Grimm © 2013
"Kid's Music video from the Kiddie Viddie series. - Song #4 from "Christmas Joy". Download this song for free at http://nubeat.org/ABCHscjT.html"

Monday, December 2, 2013

Christmas Ornaments Crafted With Wire and Glass Beads

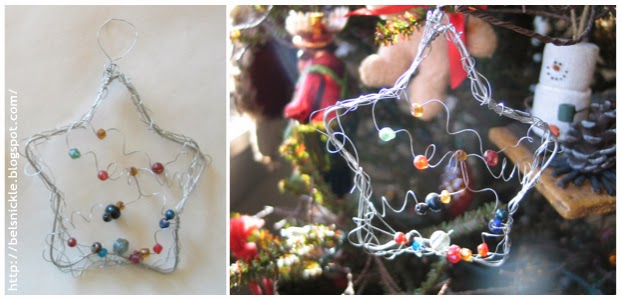
Above is a wire wrapped cross made by my tween aged daughter several years ago. She chose to use silver wire for this Christmas ornament craft, but you could use any color of wire for the project.

      My daughters crafted these bent wire ornaments while they were in middle school. Although the craft is simple, I consider it more appropriate to older children. The wire can be a bit tricky to work with and it takes some strength to shape the outer wire armatures. You will need very heavy wire for the cross or star shapes. Form these first by carefully bending the wire around the outside edges of a couple of cookie cutters. Detach the finished shapes from the cookie cutters.Then take a pair of pliers and snip and crush the tail end of the wire to conform to the shape. You may then start wrapping a finer wire around the snipped end of each wire form, covering any sharp points with twists of fine wire. This is done to prevent people from rubbing their fingers across a surface of the ornament where they may cut themselves and also to reinforce the final chosen shape. Then randomly begin to twist, bend, and weave the light weight wire around the form. Add an occasional glass bead to the weave.

You will need to collect together only a few items to make this contemporary looking star. Use up some of those random glass beads left over from earlier projects to finish off the wire weave.

Similar Woven Wire Ornaments:

Monday, August 12, 2013

Craft a Communion Cup for The Chrismon Tree

      This little Chrismon ornament is made with cut-up egg carton parts, a bit of air-dry clay, gold spray paint and gold beads. You will also need to acquire a paper pulp egg carton, masking tape, white glue, transparent glitter and a pair of scissors to begin the craft with. This chalice has a fluted edge at it's base. The base was made by pressing tin foil into a tiny tart tin. Then the foil was covered entirely with masking tape so that CelluClay would adhere to it.
      Cut out the small segments of your egg carton until you have stacked a similar looking shape to the one on the left above. Mask each shape separately and glue these together with tacky white glue. Some egg cartons have cross shapes inside the cups. You can see one of these in the photo on the right. I pressed two small pieces of air dry clay into this cup and pulled them out. The imprint made my cross shape that I then glued onto both sides of a circular piece of cardboard to fit into the cup. This is the communion wafer. I dripped glue into this cup and firmly pressed the wafer shape into it to dry over night.
      Above is a photo of my CelluClay, papier mâché pulp, both before and after I have mixed it with water. The mixture should have a sticky thick consistency after stirring the water in. It is important to mix these two ingredients well in order to dampen thoroughly the glue that is added to the pulp at the factory. Mixing the correct proportions will take some getting used to. This is a process that you do by experimentation. Don't throw out the mixture if it is too loose, just ad more pulp. If it is too dry add more water. Then layer a thin amount over the communion cup minus the wafer. Let the cup dry for a couple of days and then spray paint it in a well ventilated area, outside is best.
       Next you will need to add a touch of white paint to the wafer and a touch of transparent glitter to the sides of the cup. I then bored a tiny whole through the wafer and strung a gold beaded hanger for the Chrismon to finish my ornament for the Christmas display.


One Bread, One Body

Scriptural Reference for the Chrismon is Luke 22:14-20

14 When the hour came, Jesus and his apostles reclined at the table. 15 And he said to them, “I have eagerly desired to eat this Passover with you before I suffer. 16 For I tell you, I will not eat it again until it finds fulfillment in the kingdom of God.”
17 After taking the cup, he gave thanks and said, “Take this and divide it among you. 18 For I tell you I will not drink again from the fruit of the vine until the kingdom of God comes.”
19 And he took bread, gave thanks and broke it, and gave it to them, saying, “This is my body given for you; do this in remembrance of me.”
20 In the same way, after the supper he took the cup, saying, “This cup is the new covenant in my blood, which is poured out for you.

 More About Communion Symbolism:

Sunday, August 11, 2013

Craft Tear Drop Shaped Chrismons with Shells

      Shells are often used in Christian churches to symbolize baptism. This is because in ancient times Christians were often baptized along side river banks, near oceans, lakes etc... Shells were readily picked up and filled with water to splash the person or persons who were being baptized. Both dunking and sprinkling were done depending on the age or fragility of the person being baptized at the time. There were no arguments concerning technique, only the point of understanding the act and the meaning behind it was considered important. Shells over the passing of time became so closely associated with the sacrament that they have been used in art and as Chrismons ever since. 
All you will need for this craft is a few shells with holes in them, glass beads and a fine strong wire. I twisted a long piece of wire through the hole in each shell and then strung a variety of gold and yellow beads, including some small glass fish, onto the wire hanger. These tear drop Chrismon ornaments make nice additions to your congregation's ornament collection not only because they add variety and texture to the mix but also because very little parish members can help put them together.
      The liturgy of baptism in the Catholic, Eastern Orthodox, Lutheran, Anglican, and Methodist traditions makes clear reference to baptism as not only a symbolic burial and resurrection, but an actual supernatural transformation, one that draws parallels to the experience of Noah and the passage of the Israelites through the Red Sea divided by Moses. Thus, baptism is literally and symbolically not only cleansing, but also dying and rising again with Christ. Catholics believe that baptism is necessary for the cleansing of the taint of original sin, and for that reason infant baptism is a common practice. The Eastern Churches (Eastern Orthodox Church and Oriental Orthodoxy) also baptize infants on the basis of texts, such as Matthew 19:14, which are interpreted as supporting full Church membership for children. In these traditions, baptism is immediately followed by Chrismation and Communion at the next Divine Liturgy, regardless of age. Orthodox likewise believe that baptism removes what they call the ancestral sin of Adam. Anglicans believe that Baptism is also the entry into the Church and therefore allows them access to all rights and responsibilities as full members, including the privilege to receive Holy Communion. Most Methodists and Anglicans agree that it also cleanses the taint of what in the West is called original sin, in the East ancestral sin.
      Eastern Orthodox Christians usually insist on complete threefold immersion as both a symbol of death and rebirth into Christ, and as a washing away of sin. Latin Rite Catholics generally baptize by affusion (pouring); Eastern Catholics usually by submersion, or at least partial immersion. However, submersion is gaining in popularity within the Latin Catholic Church. In newer church sanctuaries, the baptismal font may be designed to expressly allow for baptism by immersion. Anglicans baptize by submersion, immersion, affusion or sprinkling.
      According to a tradition, evidence of which can be traced back to at latest about the year 200, sponsors or godparents are present at baptism and vow to uphold the Christian education and life of the baptized.
      Baptists argue that the Greek word βαπτίζω originally meant "to immerse". They interpret some Biblical passages concerning baptism as requiring submersion of the body in water. They also state that only submersion reflects the symbolic significance of being "buried" and "raised" with Christ. Baptist Churches baptize in the name of the Trinity—the Father, the Son, and the Holy Spirit. However, they do not believe that baptism is necessary for salvation; but rather that it is an act of Christian obedience.
      Some "Full Gospel" charismatic churches such as Oneness Pentecostals baptize only in the name of Jesus Christ, citing Peter's preaching baptism in the name of Jesus as their authority. They also point to several historical sources that maintain that the early church always baptized in the name of the Lord Jesus until development of the Trinity Doctrine in the 2nd century.

More About Shell Art for Advent: