Showing posts with label Biblical. Show all posts

Friday, June 16, 2017

The Open Bible Chrismon

A simple interpretation of the Open Bible Chrismon.
       This contemporary Chrismon, an Open Bible is described at The Christian Clip Art Review. I used the traditional gold and white Chrismon colors to make this simple Open Bible Ornament.

Supply List:
  • corrugated cardboard
  • masking tape
  • hot glue gun and hot glue sticks
  • metallic gold spray paint
  • gold ribbon
  • white paper
  • stapler
  • printed paper that reads "Holy Bible" and verse from Luke 4:16
  • double stick tape
Directions:
  1. Cut a cover for the Chrismon Bible ornament out of corrugated cardboard. Cover this in masking tape.
  2. Trim off the masking tape.
  3. Bend the book cover in half.
  4. Spray paint this cover with gold metallic paint outdoors. Spray paint inside a cardboard box so that it may be tossed in the recycling bin after use. 
  5. Cut and staple several sheets of white paper that may be fitted between the covers of this Bible Chrismon ornament. Make sure that the printed pages are stapled at the inner-most fold. 
  6. Hot glue these stapled pages between the corrugated cardboard Bible cover after using double stick tape to position the pages open permanently.
  7. Hot glue a long gold ribbon down the center of the pages seam. Make sure the ribbon looped at the top of the book is long enough for the Chrismon to hang easily from the tree.
Far left, cardboard book cover, masked. Next the cover trimmed. Center, paper pages lined up and stapled. Right, pages are taped open with double stick tape.
Karen Barber shares her Chrismon tree with the web.

Tuesday, December 2, 2014

Craft a Golden Tassel Angel Ornament

This elegant Victorian angel ornament is made with a lovely golden tassel and cotton batting wings. Tassels were often used on ornaments during the Victorian Era.
Click to download largest file.
 Supply List:
  • prefabricated porcelain doll head with shoulders
  • gold tassel
  • short white feathers
  • white cotton balls
  • two ribbon types, wired edges
  • hot glue gun
  • white school glue
  • tiny embellishments: flowers, gems etc...
  • cardboard
  • scissors
  • white chenille stem
  • white or gold glitter
Left, here is a gold tassel. It is so shinny that I can hardly photograph it without a glare! The porcelain head is easy to find in a hobby shop. These kinds of items are popular around Christmas time. The cotton batting wings are not as easy to find. You can make these yourself though.

See how snug and finished the tassel skirted angel looks?
This is because all of the hot glue is hidden inside of the
doll's breast plate. Now all I need to do is wrap the out-
side of her bodice with a gold ribbon.
Step-by-Step Instructions:
  1. Cut one chenille stem in half and wrap each end with a bit of cotton batting; these will be the "hands" of the angel.
  2. Cut to fit two narrow pieces of wire edged ribbon to wrap around the chenille stem. The wired edges should be wrapped around the wrist's of the angel. Glue these ribbons into place.
  3. Fold the finished chenille stem arms in half and hot glue this stem up inside of the angel's shoulders. See photo right.
  4. Now hot glue the tassel up into place just underneath the chenille stem arms. There should be enough room behind the breast plate to accommodate the tassel neatly. Be generous with the hot glue. 
  5. Now wrap a gold ribbon around the breast plate all the way to the back of the angel's shoulder plate and clip off so that the ribbon is the size that you need to cover the top half of the angel's torso neatly. Hot glue this ribbon in place.
  6. Hot glue the angel's hands to hold whatever embellishments you have collected for her arms.
  7. Click and print out the wing pattern above to trace on top of your cardboard.
  8. Hot glue white feathers along the lower half of the wings.
  9. Unravel a few white cotton balls and glue a layer or two of cotton batting around the upper half of each wing covering the ends of the feathers. Repeat this step several times. Be sure to also wrap the batting around the edges of the wings.
  10. End with a final layer of white glue on top of the cotton batting and sprinkle the wings with a bit of white glitter. Let the wings dry.
  11. Hot glue the wings to the backside of the angel's breast plate at her shoulders.
Left, cut the chenille stem in half and glue a bit of cotton batting to the tips of the wire stem to create soft stubby hands. Center, the doll's head has a cavity and breast plate. I will fill this cavity with hot glue and push the wire armature inside it before I hot glue the tassel in place. Right, see I have measured the length of the arms to my own liking before wrapping these with a wire edged ribbon. Don't glue the arms into place until you have checked out the length of the stem and wrapped it in an attractive ribbon.

This little porcelain beauty is dressed; all she needs now is a set of cotton batting wings.

More Tassel Skirted Dolls:

How To Make A Tassel From Scratch.

Tuesday, November 18, 2014

DIY White Feathered Angel Ornament

       I crafted this silver and white angel from a single porcelain head, one pipe cleaner and a fistful of white downy feathers. She would look marvelous on a Victorian tree!
Supply List:
  • white feathers
  • silver beaded thread
  • silver tinsel ruffle
  • silver gems
  • silver wired ribbon
  • silver cross charm
  • small porcelain doll head/breastplate
  • one white chenille stem
  • scissors
  • hot glue gun
  • toothpicks
Step-by-Step Instructions:
  1. Cut the chenille stem in half.
  2. Position the pipe cleaner or chenille stem in the center of the wired ribbon. Then wrap the stem while hot gluing the edges of the ribbon into shape. I did not use the full length of this ribbon to wrap my stem; I only used approximately 1/3 of the ribbon. See picture below.
  3. Now bend the covered stem in half and hot glue this up inside the breastplate of the doll. There should still be plenty of room left there for you to hot glue the feathers and silver tinsel.
  4. Hot glue the silver beaded thread around the outside of the angel's breastplate. (shown below)
  5. Hot glue multiple white feathers stacked on top of one another then hot glue the silver tinsel on top of the feathers.
  6. Hot glue the stack of feathers and tinsel to the inside cavity of the porcelain doll's breastplate just beneath the chenille stem arms.
  7. Bend the arms to the front and hot glue a small charm between the angel's hands; I chose a silver cross.
  8. Finally hot glue a selection of shorter white feathers to her backside; stacking and gluing until you are satisfied with the results. It's that easy!
  9. Hot glue the silver beaded thread on top of her head to make a halo. Use the tip of a toothpick to clean away excess glue while you are working. This will greatly improve the quality of the angel's appearance.
Position the pipe cleaner or chenille stem in the center of the wired ribbon.
 Then wrap the stem while hot gluing the edges of the ribbon into shape.
 I did not use the full length of this ribbon to wrap my stem; I only used
approximately 1/3 of the ribbon.
Left, you can see that I have wrapped and hot glued some tiny silver beads around the outside
 of the breast plate of my angel. Left, here I have hot glued the ribbon wrapped chenille stem
 to the inside shell of my porcelain doll's breast plate.
An angel crafted almost entirely with white feathers.
The angel's backside.
More Angels Made with Feathers:

Friday, August 1, 2014

DIY Miniature Toothpick Nativity

      Although you do not need a great deal of experience to craft a Nativity ornament like this, you will need an abundance of time. The stable alone will take several hours to construct and it must be allowed plenty of time to dry. It is an ideal craft project for fourth and fifth graders and the amount of time it takes to complete is dictated by the size of the box you select to use as your stable. 

Supply List:
  • stalks of wheat
  • small cardboard box, about the size of a soap box
  • both flat sided toothpicks and round toothpicks, natural, unstained colors
  • decorative printed papers (very small designs, plain or striped)
  • flesh colored acrylic paints
  • cotton balls
  • wire for hanger and shepherd's staffs
  • white glue
  • tacky glue
  • wood glue
  • small sized cupcake foil liner (gold)
Step-by-Step Instructions For The Stable:
  1. Choose a small box for a stable. I chose a soap box.
  2. Reinforce this box with masking tape and glue. Tape down all the flaps.
  3. Cut away one whole side of the box. 
  4. I cut extra cardboard from another recycled cereal box to bend a narrow strip into the A shaped roof.
  5. I left the loft space above my stable open and also cut an additional rectangular window at the backside of this cardboard stable. (pictured below)
  6. Cover every surface of the box with masking tape and tape on a wire hook to the roof top for hanging as well.
  7. Now you are ready to start gluing flat sided toothpicks over the surface of your small cardboard stable. I cut my toothpicks with scissors to fit the sides of the stable in advance. This can be time consuming if you do not cut the toothpicks in groups of six or seven at once. Flat sided tooth picks are very fragile so this method of cutting is easier than you may think. 
  8. Glue the toothpicks directly onto the masked surface with Elmer's wood glue. This type of glue will allow you to work quickly. Decide in advance which direction your tooth picks should be glued. 
  9. I chose to glue heads of wheat to the surface of my loft floor and also to trim the outside of the box with as well.
  10. I bent a singular wheat grass stem into a star shape and twisted thin pieces of cotton around the star points to hold it into place. I then glued the star to my ornaments hook.
  11. Let your stable dry completely over night. Now you are ready to fashion the Nativity characters from the round-sided toothpicks.
Above is the little soap box that I covered with masking tape for this Nativity craft.
      The second half of this project involves the crafting of the Nativity figures. I chose to focus upon the shepherds, angel, and Holy Family from the book of Luke, chapter 2. Below I have shown photos of the process of gluing a toothpick angel. However, all of the tiny figures in my Nativity are made by the same process.

Adjust this little paper pattern to fit your own toothpick figures.
Step-by-Step Instructions For The Toothpick Figures:
  1. Depending upon the size of your stable, you may need to trim away a bit of the height of your figures. When I made my figure of Mary, I cut away half of the toothpick's length so that she would look as though she were knelling beside the manger of Jesus. I used only one small end of a toothpick to craft the baby with. (shown below)
  2. Hold two round toothpicks together between your finger tips. Put a bit of glue on top of the spiked tips and wrap a fine bit of cotton batting around the two toothpicks to shape all of the figure's heads. 
  3. Add also a little glue down the length of the toothpicks where they share a common side. Set these little shapes aside to dry.
  4. I then painted my figures heads a tannish color with acrylic paints and let them dry again.
  5. As you can see from the photographs below, the clothing on the tiny angel was made by: cutting out tiny templates, tracing around these on top of my selected decorative paper and then cutting these to fit my toothpick figure. 
  6. First wrap the paper around the neck of each figure to measure it's proper length. Trim off enough of your cone shaped cloak so that the bottom edge of the figure's gown is level to the stable's floor. In the case of my angel, I clipped off enough paper to expose her feet. She was to be floating above the stall and I wanted to expose the toothpick stubs for preference sake.
  7. Next you will use one round-sided toothpick to shape the adult figure's arms. Twist a cone shaped sleeve to fit this single toothpick. Add a bit of glue between the paper sleeve and the single tooth pick as you twist it into place. Clip off the toothpick end to finish the arm. Make two and glue these to opposite sides of your figures.
  8. I dabbed a bit of glue to the top of my angel's head to add a cotton batting halo. 
  9. For my shepherds, I dabbed glue to the top and backsides of their heads and also underneath their chins. Then I wrapped small pieces of cotton batting around their heads to imitate the head covering most commonly worn by Bible characters often portrayed in the Nativity. The baby Jesus was wrapped entirely with cotton batting to imply swaddling.
  10. Then I bent a couple of wire stems, covered in cotton batting, into shepherd's crooks.
  11. The angel figure was given an additional trim. I shaped a small, gold cupcake liner into a halo and/or wings and glued this piece to her back before gluing her onto my stable vignette.
Left, the tiny toothpick figures are compared here to the size of a penny. Center, the cloak of my toothpick angel is shaped like a cone. Right, press the paper cloak firmly at the neck while the tacky glue dries.
Left, twist the cone shaped sleeve around just one toothpick to create the angel's arms. Center, you can see the blunt end of the rounded toothpick underneath the sleeve. Right, leave a tiny amount of the toothpick tip showing so that your angel will look as though she has tiny hands.
Left, see a detailed photo of how my toothpick angel looks from beneath the skirt. It helps to stuff a very tiny amount of cotton under the skirt with the tip of your scissors and a small amount of glue in order to help the cone retain it's shape. Center, my toothpick angel is finished! Right, a detailed photo of the angel from the backside.
Details from my toothpick Nativity Vignette. Left, the star bent from a single wheat grass stem. Center, the Nativity figures: Mary, Joseph, the baby Jesus, two shepherds and an angel bringing glad tidings of great joy. The floor of the Nativity is also covered with wheat grains. These figures are glued in place. Right, see how all of the sides are covered with flat sided toothpicks.
Left, the angel is suspended above the peaceful scene watching over the tiny figure of baby Jesus. The baby is wrapped in cotton batting and so are the heads of all the adults watching over him. Right, I switched the direction of the toothpicks on the backside of my stable to imply a "doorway."
      There are some amazing toothpick structures built by people across the internet. My stable is quite humble by comparison to be sure!
More Toothpick Crafts:

Tuesday, July 22, 2014

Cut, Paste and Color A Paper Angel Tree Topper

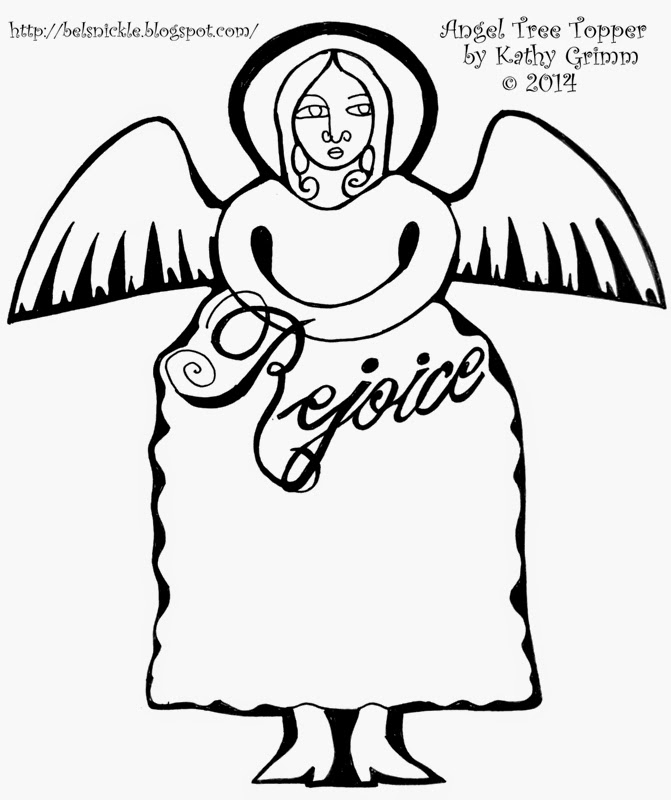
      I designed this brightly colored angel for one of my small trees last year. She is very light weight and made from card stock, scrapbook papers and markers. Simply download and print the pattern below. Cut and trace around the features that you would like in fancy papers. Then embellish the features with permanent markers, glitter and small decorative snowflakes. I colored both sides of this angel and included the "Rejoice" text on the front side of her gown.
      Glue both the front and back sides together along the edges only. Let the tree topper dry overnight before stapling in the paper toilet tube. Make sure you staple together one end of it before inserting the tube between your layers of card stock. (see picture below.) The tube will be the place to fit a narrow branch at the top of your Christmas tree. The tube helps prevent tearing and keeps the angel from losing her shape over time.
      You can decorate an entire tree with brightly colored papers ornaments and top it off with this angel. A tree topper such as this one will compliment a variety of styles and colors. Choose coordinating papers and or colors to achieve your own unique tastes. I will include more paper Christmas ornaments on this blog that you can cut, color and paste to go along with my angel in the near future.

Close up details of my finished paper angel tree topper.
I stapled together the ends of one half of a paper toilet roll and then inserted it between my two colored angels. Then I positioned it firmly over the top branch of a small tree.
Paper angel tree topper pattern. Enlarge the image to fit an 81/2 x 11 sized paper before printing.
More Paper Tree Toppers:

Monday, December 16, 2013

Craft An Ornament of The Baby Jesus in His Manger

Young children ages 6 and up can craft this simple ornament of the baby Jesus in a manger without help from
 an adult. If you'd like to help younger children make a similar version, it is probably best for adults to assemble
 some of the parts in advance.
Top 1. Assemble and glue together mini craft sticks for the manger,
2. Tie on and string the gold beads for the hanger,
3. Glue the Easter grass onto the manger,
4. The finished first part of the baby Jesus in a manger ornament
This little baby Jesus ornament is crafted with the following supplies:
  • mini craft sticks
  • white school glue
  • thread
  • gold beads
  • Baby Jesus printable (included below)
  • flesh colored construction paper
  • paper grass
  • brown markers or watercolor paints
  • soft colored pencil in pink for subtle cheek color
Instructions:
   For the first part of the ornament craft project students or the teacher, depending on the age of the former, needs to glue together a small manger using mini wooden craft sticks. In the first example (1.), I have shown three possible ways to assemble the manger. Glue the pieces together using white glue and let these mangers dry overnight. If you are working with very young children, I suggest assembling this part of the craft in advance for them. (ages 2-5)
   For the second step (2.), tie a thread around the back side of the manger and glue down the edge of the thread. Let this dry for a bit before stringing gold beads on to the thread. Be generous with the length of the gold hanger so that there will be plenty of room for the paper baby Jesus that will be pasted on to the manger later. After stringing the beads on to the thread tie the end to the opposite side of the manger. 
   Glue onto the front side of your ornament a bit of paper grass (3.). I used a natural color because I prefer it but you may wish to use a yellow or gold variety of Easter grass on your own version of the ornament.
   To finish the little manger (4.), students may then color the mini craft sticks with brown watercolors, markers etc... I chose to color my mangers with a fine tipped marker to imitate the grain of wood that one might find in a wooden trough.
      Open a Word Doc and swipe in the little baby printables. Alter the page settings so that you can fit multiple images onto one page before printing them out. Because I assemble so many Christmas craft kits for young children, I print and cut batches of babies out for students to color and glue in their manger ornaments.  By these means, a teacher can print 100 baby images on as little as six or seven sheets of 8 1/2 by 11 inch standard sized paper. (You will need to trim down standard sized construction paper in advance to printing.)
   I highlighted the cheeks and elbows of my baby Jesus with just a hint of blush color before pasting him onto the manger grass.
Print your little babies on many flesh colored papers. I used pale brown and mauve
colored construction papers for my samples, but you may use whatever colors you like.
You may even print these images on white paper and offer your young crafters
flesh toned markers instead.

The finished, assembled manger ornaments.
Printable baby Jesus, version 1.
Printable baby Jesus, version 2.

Wednesday, December 11, 2013

A Triquetra Knot Chrismon, Cut From A Scherenscnitte

Cut a Triquetra Knot with a scherenscnitte center for your Chrismon collection.
      This Trinity Knot is designed using both the classic trinity symbol and the ancient fish motifs of early Christians. You will need to print two copies of the pattern below in order to cut and paste the version that I have photographed in color in this post. Cut one of the scherenscnitte patterns entirely from fine white linen paper.
      Then cut out the center of your second pattern to use the classic trinity symbol as a template. Trace and cut two versions of this knot from a glittery, gold paper. You will need both a front and a  back side; this Chrismon is designed to be viewed from either of it's sides.

Scherenscnitte Pattern of a Trinity Fish Knot by Kathy Grimm
More About The Holy Trinity in Art:
"A clip from RAPTURE an original oratorio written and produced by Darren Thomas and performed by Symphonic Art's MPAC which stands for Music & Performing Arts Chorale. Full project is available on DVD at www.rebirthtoday.org in our R-Store."

Tuesday, December 10, 2013

A Manger Scherenscnitte Pattern by Kathy Grimm

A hand cut scherenscnitte of a manger scene.
        I have designed a brand new scherenscnitte pattern that our visitors may use for their personal crafts and for those crafts dedicated to the decorating of Chrismon trees! I cut my Chrismon of the baby Jesus in a manger from fine white drawing paper and then mounted the scherenscnitte onto heavy card stock covered with gold glitter.
       Teachers, parishioners and or pastors may wish to make heavy cardboard stencils from the pattern below so that little ones may trace, cut and paste their own contributions to your church's Chrismon tree. Or the stencil may be traced lightly onto a sheet of fine linen paper with the aid of a window or light table. Then adults can use either an x-acto knife or use 3-1/2" sharp pointed scissors to cut out the image of the baby Jesus cradled in a manger under the Star of David.

Scherenscnitte Pattern by Kathy Grimm © 2013
"Kid's Music video from the Kiddie Viddie series. - Song #4 from "Christmas Joy". Download this song for free at http://nubeat.org/ABCHscjT.html"