Thursday, November 29, 2018

DIY the prophet Jonah and Whale

       Modern Christians often teach that it was a whale who swallowed Jonah in order to transport him safely between the waters surrounding Tarshish to the port of Joppa. However, the Bible says that he was swallowed by a great fish. Which may have been a whale, presuming that whoever wrote the book of Jonah did not know the difference between fish and swimming mammals.
My finished ornament of Jonah and the giant whale. This ornament is made from cotton batting, dryer lint and toothpicks.
"Now the LORD provided a huge fish to swallow Jonah, and Jonah was in the belly of the fish three days and three nights. From inside the fish Jonah prayed to the LORD his God. He said: "In my distress I called to the LORD, and he answered me. From deep in the realm of the dead I called for help, and you listened to my cry. You hurled me into the depths, into the very heart of the seas, and the currents swirled about me; all your waves and breakers swept over me. I said, 'I have been banished from your sight; yet I will look again toward your holy temple.'  The engulfing waters threatened me, the deep surrounded me; seaweed was wrapped around my head. To the roots of the mountains I sank down; the earth beneath barred me in forever. But you, LORD my God, brought my life up from the pit. "When my life was ebbing away, I remembered you, LORD, and my prayer rose to you, to your holy temple.  "Those who cling to worthless idols turn away from God's love for them. But I, with shouts of grateful praise, will sacrifice to you. What I have vowed I will make good. I will say, 'Salvation comes from the LORD.'" And the LORD commanded the fish, and it vomited Jonah onto dry land. Then the word of the LORD came to Jonah a second time: "Go to the city of Nineveh and proclaim to it the message I give you." Jonah obeyed the word of the LORD and went to Nineveh. ( A 550 mile journey from the port of Joppa!) Now Nineveh was a very large city; it took three days to go through it." Jonah 1:17 through Jonah 3:3 (NIV)

       Whether or not you believe that he was saved by a swimming mammal or giant fish, this symbol will certainly remind any believer who would like to include the stubborn old prophet, Jonah, on their Jesse Tree this Christmas that he was also recorded to be in the lineage of King David and therefore in the family of Christ as well.

Above is the plastic, green sperm whale my brothers played with when we were kids. Keep in mind, it is important to learn to sculpt three dimensional objects by touch. Examination with both the hands and eyes, will help your brain to relay information back to your hands quicker and with more accuracy. This is for educational purposes mind you. After you have learned to sculpt sample prototypes, you must make your own unique models for profit because of copyright laws.
Supply List:
  • newsprint
  • masking tape
  • white school glue
  • dryer lint (grey)
  • paper mache' pulp
  • plastic sperm whale (toy)
  • small black beads for eyes (two)
  • wire
  • wooden toothpicks
  • few white cotton balls
  • Exacto knife
  • acrylic paints for Jonah's body 
Right, featured: "A Sperm Whale Encounter" by Howard Hall, students may observe the size, and coloration of sperm whales.


Jonah tossed about above the blow hole of a super large whale.
Step-by-Step Instructions:
  1. Touch and examine the model whale carefully. Spend time looking at its properties while running your fingertips over the surface of the whale.
  2. Now crush and mask with tape a similar shape.
  3. Use a knife to dent the surface area for a bead on either side of the whale's head. Glue these beads into place. You many use a small amount of tape to keep the eyes in position while the glue dries.
  4. Mix together the paper pulp according to the directions on the package. 
  5. You may add a bit of glue to your water while you dampen the pulp to give it extra strength.
  6. Let the paper mache' stiffen and dry out before layering glue and dryer lint onto it's surface. Keep your work in a dry, warm area so that it will harden quickly. 
  7. I worked in some white areas with a bit of unraveled cotton on the whale's belly because I preferred the coloration. 
  8. Dig out a hole in the top of the whales head for it's spout. 
  9. Cut wire pieces and roll glue with unraveled cotton between the palms of your hands. 
  10. Twist these wire into curls. Then bind them together to mimic a fountain of water spray. (see photograph)
  11. Glue this water spray into the 1/2 inch hole for it's spout. 
  12. Cover any torn or disturbed areas around the spout with additional grey lint.
  13. Now cut off, with your Exacto knife, the sharp tips of many toothpicks. These will become the teeth of the sperm whale. Glue them in place between the jaws. 
  14. Next you will need to shape a small man from a half piece of toothpick and cotton wading; this is Jonah.
  15. Between your fingertips, wad and roll a bit of cotton and white glue for Jonah's head. Then glue it the end of a broken toothpick and let it dry.
  16. Now twist another bit of batting around the toothpick to resemble a basic body shape. You can glue a second, shorter toothpick to the upper torso to make his arms. Wrap the figure with cotton until it looks like a miniature human. Give him a beard.
  17. After Jonah dries, paint his coat, beard and head with acrylic paints.
  18. Glue Jonah to the wire water spout or to the inside of the whales jaws. 
More Jesse Tree Symbols for Christmas Ornaments:

Sunday, November 18, 2018

Merry Acrostic Christmas

CHRIST'S coming inaugurated among men a new era of good will, and as a consequence thrones are tottering, chains are loosening, prison doors are opening and practical Christian beneficence is flooding the world with sunshine and fills it with songs of gladness. - Rev. Dr. P. S. Henson.
HERE is that "glad tidings," that gospel of "great joy" of which the angel spake to the wondering shepherds -- this announcement of God's love for man and man's sonship to God. And these "glad tidings" are for "all people," so the angel said. There is not a single soul to whom the tidings of Christmas come that is not assured of the love of the almighty and infinite Father.
REFORM ye, then -- so sounds the voice of the Eternal Spirit, the power back of evolution -- reform ye, for the kingdom of heaven is at hand! So we may gird ourselves to every task of reform with new hope and fresh enthusiasm and ring our Christmas bells again. - Rev. Dr. R. Herber Newton.
IT may be that in every gift, with which at this blessed Christmastide we gladden our children's hearts we are the Magi again offering treasure to the Holy Child. We may make it so. But richer gifts than these will be required. Our endurance shall be our gift to him who gave himself. Is there toil for us, that we may honor him? Is there self denial? Are there holy consecrations and humble service, that shall make the world at last a spotless sacrifice to him who purchased it?
SO we keep Christmas because of its good tidings of great joy. The season of its occurrence is our ripest time. The north wind and the snow in that wind have made us what we are. It drove us to the hearth, to the sacred fires of the inner circle, to the building of the keystone in the arch of our civilization, the home of the Christian man. - Rev. Dr. S. P. Cadman.
TODAY all institutions are beginning to imitate the wise men from the east, who brought to the Divine Child their gold and aromatic spices their frankincense and treasure. Christ's estimate of the value of childhood has conquered the world. His thought of childhood is the very heart and genius of Christian civilization. - Rev. Dr. Newell Dwight Hillis.
MORNING, noon and night, for breakfast, dinner and supper, the first thing on awaking and the last thing on going to sleep, every hour of every day of every week of every month of the year we want the spirit of Christmas, for it is the spirit of ministration, of giving, of service, of doing for others. - Rev. Dr. Francis E. Clark
AND did you ever think what a peculiarly blessed sound in the ears of those watching shepherds of the valley of Bethlehem was the announcement of the angels, "Christ has come?" Ever since the gate of paradise was shut against our first parents his advent had been looked forward to as the hope of a lost world.
STILL there is call for strenuous endeavor and constant fight against evils without and within, as though God would remind us that this is not our rest, that the true holiday (holy day, as it used to be written) is above at his right hand. - Rev. Dr. P. S. Henson.
More Encouragement:

Thursday, October 25, 2018

Holly Holiday Gift Tags by kathy grimm

       Trim some Christmas gifts this year with these traditional holly gift tags. These come in both green and red versions. For personal, home use only.

A printable of Christmas gift tags free from kathy grimm

Saturday, October 6, 2018

DIY a Paper Mache Bell

I used vintage looking wrapping paper to cover this plastic bell shape. The "bell" was made from a recycled fruit cup.
       Here is a bit of an update to a classic kindergarten Christmas craft. In the past little ones have used paper cups for a similar bell shape. I've replaced that material here with a sturdier recycled, plastic fruit cup. Don't forget to add the jingle-bell for sound!

Supply List:
  • scrap wrapping paper
  • masking tape
  • recycled bell shaped plastic food containers
  • wire for the hanger
  • tiny jingle-bell
  • Mod Podge
  • white transparent glitter
  • stickers (optional)
Step-by-Step Instructions:
  1. Wash and dry plastic containers that once had food stuffs stored inside them.
  2. Poke a hole through the bottom of the container in order to twist a wire through for a hanger at the end of the craft process. Keep this hole clean from masking tape and paper mache.
  3. Cover the entire surface of the plastic container with masking tape, both inside and out.
  4. Using Mod Podge, layer clippings from wrapping paper both inside and out.
  5. You can also use stickers to decorate your bell. I've included a sample bell below showing Nativity stickers.
  6. Cover a wire with white tape or cotton batting and insert it through the hole, stringing a small jingle bell through it on the inside of the bell shaped ornament. Twist the wire in place.
The plastic fruit containers are covered completely in masking tape before the paper mache
process is applied. This helps the glue to stick properly to the smooth surfaces.

Sample Christmas bell crafted with Nativity stickers.

More Paper Mache Bell Crafts:

Christmas Day

Clap your hands and
Shout with glee,
For dear old Santa's here!
He's filled the stockings
And trimmed the tree,
And comes to wish you cheer!

Friday, April 13, 2018

Vintage German Beeswax Ornaments

       One of my girls purchased these small beeswax ornaments from an estate sale very near our home. These decorations were in a large flat box along with some papers saying they were from Germany. Germans often trimmed their feather trees with beeswax poured into Springerle cookie molds and then painted these with whatever sort of paint they had at hand.

The wax here was dyed brown in order to imitate gingerbread. Then the ornaments were
 painted with trimmings made to imitate almonds, raisins, cloves and icing.
The wax in these ornaments was dyed red and then the carved designs were highlighted
 with gold toned gilding paint.
This hunter dressed from head to toe in German costume holds a rifle and is trimmed in gold
 metallic paint. Many beeswax ornaments like this one are painted with meticulous detail,
particularly if the ornaments is poured with white or ivory wax.
More gingerbread ornaments: Santa, Christmas tree, and star. Springerle molds are
hand-carved for the expressed purpose of shaping gingerbread cookies. So it is only
natural that "wax" gingerbread should be a theme for the production of such pieces.
Red Star of Bethlehem was painted with gilding paints but most of it has worn away.
Beeswax ornaments from Germany often are cast in the traditional red color of
the Christmas holiday.
An ivory colored wax ornament, green leafy cross and gold painted relief work. This decoration may
have been crafted foran Easter egg tree.
Below and above you can see how different crafts peoples interpreted the wax castings from the same mold.
One set is in red with gilded highlights and the other set is cast with white wax and painted naturalistically.
In the past, Germans crafted these very delicate, light weight figures from their Springerle molds for their feather trees.
I have two versions of this same rocking horse. Here is the casting done up with red wax. It is
then washed with a black paint so that the design of the carving may be fully appreciated.
This ornament is two-sided. Some Springerle molds are two sided and some have flat unadorned
 sides with detailed carvings on the front.
I love the tiny details of this molded, wax steam engine!
Here is the second version of the toy rocking horse shown above in red. Here it was poured with white wax
and painted with traditional green and red colors. You can see tiny flecks of gold paint on it's surface; most of
this paint has worn away with handling over the years.
This angel carries tulips and candles. Tulips in early Christian cultures were symbolic of
The Holy Trinity. This is why you will find many old Christmas figures that carry them.
A wax figure of an angel carries two burning candles and she has gilded features.
Tiny wax soldiers dressed in old German uniforms; blue coats, gold buttons and trim, plus rifles,
boots and gold trimmed hats finish off the details.
A jolly St. Nicholas dressed in red and trimmed with gold highlights.
A gilded wax basket holds brilliantly painted flowers in rose, blue and yellow.
A wax pony with a red saddle and gold trimmed mane, hooves, and tail.
A sweet little buro surrounded by flowers and a brilliant sun, may have been cast for an Easter egg tree.
Small, authentic German feather tree candles. These are trimmed with green and red molded wax boarders.
The Virgin Mary holds baby Jesus and she is dressed in a traditional blue headcovering and a white gown.
Her baby wears nothing.
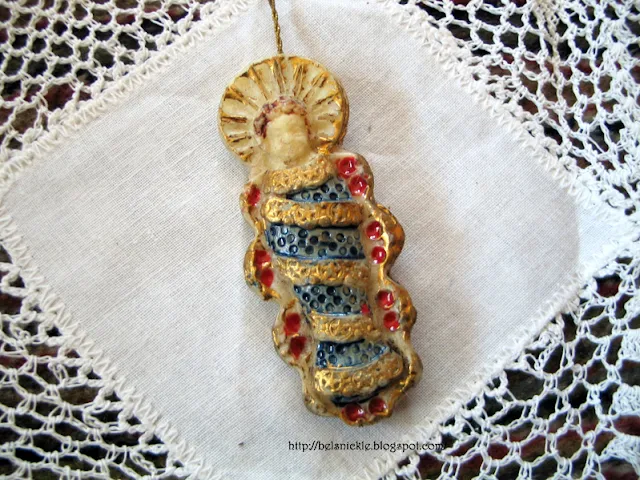
Baby Jesus has a halo and is wrapped elaborately in a blue, red and gilded blanket.
This tiny wax figure has a broken wing, but still plays her merry heart out!
A tiny, red wax angel sports very little of the gilded paint she was once trimmed with.
These three wax ornaments are probably modern.
Wax gingerbread man and woman trimmed with almonds, raisins and colored icing.
My daughter says these versions are a bit spooky and cheerful at the same time?
Wax figures such as these were painted to imitate gingerbread cookies.
A red beeswax Christmas ornament holds a tulip.
A wise man or king carries a flaming candle.
Yet another wise man carries a Christmas candle with a halo surrounding it.
The angles figures here were cast in white wax and then their gowns were painted bright blue.
Their wings and dress details were then gilded. Their hangers are made from gilded twine as well.
This tiny wax rabbit is painted very realistically compared to the other figures in this collection.
 It looks more contemporary to me. Perhaps it was made at a later date?
Small, white beeswax candles are traditional decorations on a German feather tree. These frequently decorated with some sort of molded wax applications in green, red or gold. Included in the photo are the metal clamps used to attach these candles to a feather tree. It is not unusual to find these candles unused in many owner's collections. Often times this is due to the desire for authentic decorations without the addition of authentic candle burning. No one wants to see their home, let alone their antique feather tree go up in flames!
A red beeswax angel plays a horn. She was cast and hand-painted in Germany.
Two more gingerbread stars poured from wax and painted to look like the real thing.

Thursday, January 18, 2018

Sleigh Bells, Rocking Reindeers and Mystery Toys...

Sleigh Bells
by L. Smith

RING out, ye merry jingling bells!
Clear and sweet your music swells
On the crisp and wintry air.
Sending echoes everywhere.
The moon, her shining face aglow,
Sends our shadows 'cross the snow;
And as we swiftly skim along,
I listen to the sleigh bells' song.
The bright stars watch us from the sky
As our sleigh goes gliding by,
Like an undulating wave
Wherein my happy soul doth lave.
Ring out, ye bells! Merrily ring!
Oh, what pleasure you can bring!
So Very joyous is your song:
Merrily, merrily glide along! 
 
 
       Below is Santa riding his reindeer rocking horse. A loves to test drive this toy best inside of his workshop at the North Pole! You can color this paper reindeer toy, cut it out, fold along the dotted lines and paste the the "A" tabs to the opposite panel to make the paper toy 3D and able to rock.
Santa's Rockin' Reindeer Toy.
 
 
       Harry has written Santa a letter requesting his dream toy. He hopes that Santa will have all the right tools in his workshop to make his wish come true on Christmas morning! Can you guess what that toy is? Well, just to make sure that you know, print, cut and reassemble the mystery puzzle below.

Find out what Toy Santa is building for Harry at the workshop.

Wednesday, January 10, 2018

DIY A Bauble Ornament Wreath

A Vintage inspired wreath is easy to assemble if you have plenty of baubles. It takes approximately 80 of these baubles
to complete a full looking 14 inch sized wreath and this is a 16 to 18 inch one. Hannah used newer baubles for her
creation. She is a collector and could not bring herself to deface antique baubles with hot glue.
        My younger daughter crafted this bauble wreath for our home last year and gave it to me for Christmas. So, this year it hung in our dining room! She used several very large packages of new baubles in the following colors: pink, blue, silver and gold. She also included a long garland of small silver beads, a silver reindeer and gold/silver sparkly leaves from a few pics. 
       She started the wreath by selecting a foam wreath form in a large size and wrapping it with a large silk ribbon in blue. Hannah also wrapped a substantial wire in the same ribbon for hanging the wreath and attached it firmly with hot glue to the back side of the form in her second step.
       Then it was a simple process of assembling the baubles with hot glue and around the wreath until she was satisfied with it's appearance. She then hot glued the finishing touches to the bauble wreath, tucking garland, gold leaves and a small reindeer between the baubles with strategic dabs of glue as she went. 
       The entire process took her approximately four hours and caused a few burns on her hands. I loved it and she rolled her eyes as I gushed over her masterpiece. She let me know that she would not be crafting another in the near future and that it would be the only craft she would make for me to post here for a very long time. Hannah is not "a crafty person" and she is always quick to remind me of that little known fact!

Close up photos of this Vintage inspired, bauble wreath.

Tuesday, January 9, 2018

Traditional Gilded Walnut Ornaments

Traditional painted walnuts photographed outside on my patio moss. Next year I will include them on my
German feather tree perhaps? More than likely, my young ones will make off with them before I ever
 get a chance to use them!
Above you can see the boxes I used to spray
paint my walnuts silver and gold in.
       Painted walnuts are very traditional to the Victorian Christmas tree. These ornaments can look so very different depending on how you paint them and what flowers you select for the trimming of the tops of each walnut. I chose traditional Christmas poinsettia in white and red, plus a few silk holly leaves to hot glue to the samples shown here. But these walnuts would be just as lovely painted in pinks and blues with matching trims. You could make walnuts to match your own tree colors exactly, of course.

Supply List:
  • English walnuts
  • metallic spray paints: gold and silver
  • tiny Christmas pics
  • wires for hanging
  • hot glue gun and hot glue sticks
  • cardboard boxes 
Step-by-Step Instructions:
  1.  Make sure your walnuts are clean and free of dirt.
  2. Purchase several pics to cut apart and reuse in the decorative applications on top of each walnut. I chose a traditional poinsettia and holly leaves. 
  3. When you spray paint your walnuts, make sure to do so outside in a well ventilated area. I chose to do so inside of cardboard boxes because it makes it easier for me to clean up the mess. I just break down the boxes and toss them into the recycling bin when I've finished with the spray paint.
  4. Insert the wire hangers and glue these into place.
  5. Hot glue your silk flowers to the tops of each walnut to add a nice finished touch of decoration.
Left, you can see the silver painting on top of newsprint and Right a few close up shots of the old-fashioned ornaments.
More About Gilded Walnuts: