Friday, April 13, 2018

Vintage German Beeswax Ornaments

       One of my girls purchased these small beeswax ornaments from an estate sale very near our home. These decorations were in a large flat box along with some papers saying they were from Germany. Germans often trimmed their feather trees with beeswax poured into Springerle cookie molds and then painted these with whatever sort of paint they had at hand.

The wax here was dyed brown in order to imitate gingerbread. Then the ornaments were
 painted with trimmings made to imitate almonds, raisins, cloves and icing.
The wax in these ornaments was dyed red and then the carved designs were highlighted
 with gold toned gilding paint.
This hunter dressed from head to toe in German costume holds a rifle and is trimmed in gold
 metallic paint. Many beeswax ornaments like this one are painted with meticulous detail,
particularly if the ornaments is poured with white or ivory wax.
More gingerbread ornaments: Santa, Christmas tree, and star. Springerle molds are
hand-carved for the expressed purpose of shaping gingerbread cookies. So it is only
natural that "wax" gingerbread should be a theme for the production of such pieces.
Red Star of Bethlehem was painted with gilding paints but most of it has worn away.
Beeswax ornaments from Germany often are cast in the traditional red color of
the Christmas holiday.
An ivory colored wax ornament, green leafy cross and gold painted relief work. This decoration may
have been crafted foran Easter egg tree.
Below and above you can see how different crafts peoples interpreted the wax castings from the same mold.
One set is in red with gilded highlights and the other set is cast with white wax and painted naturalistically.
In the past, Germans crafted these very delicate, light weight figures from their Springerle molds for their feather trees.
I have two versions of this same rocking horse. Here is the casting done up with red wax. It is
then washed with a black paint so that the design of the carving may be fully appreciated.
This ornament is two-sided. Some Springerle molds are two sided and some have flat unadorned
 sides with detailed carvings on the front.
I love the tiny details of this molded, wax steam engine!
Here is the second version of the toy rocking horse shown above in red. Here it was poured with white wax
and painted with traditional green and red colors. You can see tiny flecks of gold paint on it's surface; most of
this paint has worn away with handling over the years.
This angel carries tulips and candles. Tulips in early Christian cultures were symbolic of
The Holy Trinity. This is why you will find many old Christmas figures that carry them.
A wax figure of an angel carries two burning candles and she has gilded features.
Tiny wax soldiers dressed in old German uniforms; blue coats, gold buttons and trim, plus rifles,
boots and gold trimmed hats finish off the details.
A jolly St. Nicholas dressed in red and trimmed with gold highlights.
A gilded wax basket holds brilliantly painted flowers in rose, blue and yellow.
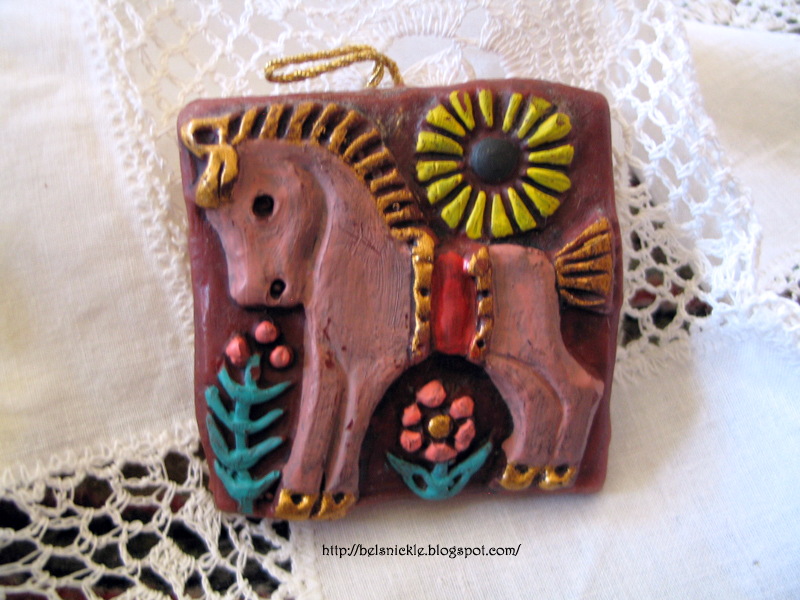
A wax pony with a red saddle and gold trimmed mane, hooves, and tail.
A sweet little buro surrounded by flowers and a brilliant sun, may have been cast for an Easter egg tree.
Small, authentic German feather tree candles. These are trimmed with green and red molded wax boarders.
The Virgin Mary holds baby Jesus and she is dressed in a traditional blue headcovering and a white gown.
Her baby wears nothing.
Baby Jesus has a halo and is wrapped elaborately in a blue, red and gilded blanket.
This tiny wax figure has a broken wing, but still plays her merry heart out!
A tiny, red wax angel sports very little of the gilded paint she was once trimmed with.
These three wax ornaments are probably modern.
Wax gingerbread man and woman trimmed with almonds, raisins and colored icing.
My daughter says these versions are a bit spooky and cheerful at the same time?
Wax figures such as these were painted to imitate gingerbread cookies.
A red beeswax Christmas ornament holds a tulip.
A wise man or king carries a flaming candle.
Yet another wise man carries a Christmas candle with a halo surrounding it.
The angles figures here were cast in white wax and then their gowns were painted bright blue.
Their wings and dress details were then gilded. Their hangers are made from gilded twine as well.
This tiny wax rabbit is painted very realistically compared to the other figures in this collection.
 It looks more contemporary to me. Perhaps it was made at a later date?
Small, white beeswax candles are traditional decorations on a German feather tree. These frequently decorated with some sort of molded wax applications in green, red or gold. Included in the photo are the metal clamps used to attach these candles to a feather tree. It is not unusual to find these candles unused in many owner's collections. Often times this is due to the desire for authentic decorations without the addition of authentic candle burning. No one wants to see their home, let alone their antique feather tree go up in flames!
A red beeswax angel plays a horn. She was cast and hand-painted in Germany.
Two more gingerbread stars poured from wax and painted to look like the real thing.

Thursday, January 18, 2018

Sleigh Bells, Rocking Reindeers and Mystery Toys...

Sleigh Bells
by L. Smith

RING out, ye merry jingling bells!
Clear and sweet your music swells
On the crisp and wintry air.
Sending echoes everywhere.
The moon, her shining face aglow,
Sends our shadows 'cross the snow;
And as we swiftly skim along,
I listen to the sleigh bells' song.
The bright stars watch us from the sky
As our sleigh goes gliding by,
Like an undulating wave
Wherein my happy soul doth lave.
Ring out, ye bells! Merrily ring!
Oh, what pleasure you can bring!
So Very joyous is your song:
Merrily, merrily glide along! 
 
 
       Below is Santa riding his reindeer rocking horse. A loves to test drive this toy best inside of his workshop at the North Pole! You can color this paper reindeer toy, cut it out, fold along the dotted lines and paste the the "A" tabs to the opposite panel to make the paper toy 3D and able to rock.
Santa's Rockin' Reindeer Toy.
 
 
       Harry has written Santa a letter requesting his dream toy. He hopes that Santa will have all the right tools in his workshop to make his wish come true on Christmas morning! Can you guess what that toy is? Well, just to make sure that you know, print, cut and reassemble the mystery puzzle below.

Find out what Toy Santa is building for Harry at the workshop.

Wednesday, January 10, 2018

DIY A Bauble Ornament Wreath

A Vintage inspired wreath is easy to assemble if you have plenty of baubles. It takes approximately 80 of these baubles
to complete a full looking 14 inch sized wreath and this is a 16 to 18 inch one. Hannah used newer baubles for her
creation. She is a collector and could not bring herself to deface antique baubles with hot glue.
        My younger daughter crafted this bauble wreath for our home last year and gave it to me for Christmas. So, this year it hung in our dining room! She used several very large packages of new baubles in the following colors: pink, blue, silver and gold. She also included a long garland of small silver beads, a silver reindeer and gold/silver sparkly leaves from a few pics. 
       She started the wreath by selecting a foam wreath form in a large size and wrapping it with a large silk ribbon in blue. Hannah also wrapped a substantial wire in the same ribbon for hanging the wreath and attached it firmly with hot glue to the back side of the form in her second step.
       Then it was a simple process of assembling the baubles with hot glue and around the wreath until she was satisfied with it's appearance. She then hot glued the finishing touches to the bauble wreath, tucking garland, gold leaves and a small reindeer between the baubles with strategic dabs of glue as she went. 
       The entire process took her approximately four hours and caused a few burns on her hands. I loved it and she rolled her eyes as I gushed over her masterpiece. She let me know that she would not be crafting another in the near future and that it would be the only craft she would make for me to post here for a very long time. Hannah is not "a crafty person" and she is always quick to remind me of that little known fact!

Close up photos of this Vintage inspired, bauble wreath.

Tuesday, January 9, 2018

Traditional Gilded Walnut Ornaments

Traditional painted walnuts photographed outside on my patio moss. Next year I will include them on my
German feather tree perhaps? More than likely, my young ones will make off with them before I ever
 get a chance to use them!
Above you can see the boxes I used to spray
paint my walnuts silver and gold in.
       Painted walnuts are very traditional to the Victorian Christmas tree. These ornaments can look so very different depending on how you paint them and what flowers you select for the trimming of the tops of each walnut. I chose traditional Christmas poinsettia in white and red, plus a few silk holly leaves to hot glue to the samples shown here. But these walnuts would be just as lovely painted in pinks and blues with matching trims. You could make walnuts to match your own tree colors exactly, of course.

Supply List:
  • English walnuts
  • metallic spray paints: gold and silver
  • tiny Christmas pics
  • wires for hanging
  • hot glue gun and hot glue sticks
  • cardboard boxes 
Step-by-Step Instructions:
  1.  Make sure your walnuts are clean and free of dirt.
  2. Purchase several pics to cut apart and reuse in the decorative applications on top of each walnut. I chose a traditional poinsettia and holly leaves. 
  3. When you spray paint your walnuts, make sure to do so outside in a well ventilated area. I chose to do so inside of cardboard boxes because it makes it easier for me to clean up the mess. I just break down the boxes and toss them into the recycling bin when I've finished with the spray paint.
  4. Insert the wire hangers and glue these into place.
  5. Hot glue your silk flowers to the tops of each walnut to add a nice finished touch of decoration.
Left, you can see the silver painting on top of newsprint and Right a few close up shots of the old-fashioned ornaments.
More About Gilded Walnuts:

Ornaments From Nut Shells and Thistle Pods

Acorn caps, dried thistle pods and sweet gum balls collected
on a family walk through the woods. Note. I left the acorns
for the squirrels and only took the caps. I waited a few weeks
before harvesting the dried thistle so that the birds would
remove the seeds on their own. The thistle above has been
picked clean of it's edible contents.
       Crafting with nuts, seeds and shells is not only fun for your little ones but it is also very inexpensive. You can take advantage of your local markets in order to stock your craft supply, if you don't have the time or climate to hunt from mother nature's ample supply yourself. I often purchase bags of various nuts, beans and seeds prior to the long Winter months. For every December, I'm sure to be stuck inside with students because of school cancellations, icy roads and extreme cold temperatures and if I have left over material, the local wildlife is happy to feast on the left overs!
       Alternatively, you may prefer to collect a supply of these materials during autumn walks in parks. Young children can collect acorns and acorn caps, dried thistle, seed pods etc... from the fields or paths through the woods. Use these family walks as opportunities to talk about the animals and birds that eat the seeds from the pods and how these are an important food source for them to store for winter. Then collect a few for the family to work with in their Christmas crafts at home. 
       Seed craft can be made to look quite sophisticated, so you need not worry about your older kids becoming bored with this craft material. Enlist them in the discussions about bird habitats so that they become the teachers of their younger siblings. Make this kind of outing an annual event, a family time that they can look forward to every year and that they can repeat with their own children someday.
       Seed shells in particular have one other characteristic that make them an excellent craft material, they are very light weight. Tiny ornaments made from them may be hung on the most delicate branches of a table top tree. So they are ideal for hanging on the branches of a Cypress tree, the antique tips of a German feather tree or even on a collection of pussy willow intended for the Spring celebration of Easter/Lent.
       I will include a series of nut and seed ornaments on both of my holiday blogs this year so that those of you who have too much free time this winter, will find ample ideas for the manipulation of this annual Fall harvest!
       Below is a listing of basic supplies that crafters will need in order to complete the nut shell/pod ornaments I will be posting this winter of 2018:
  1. For adults and children 5th grade and up - a small set of hand tools: pliers, scissors, razor blades, tweezers, tiny clippers etc...
  2. Old fishing and tackle box - plastic for storing tools apart from younger children
  3. tacky, sticky school glue - Although this takes longer to dry, it is by far a superior glue to hot glue! Hot glue looks bad and it is not as permanent.
  4. box of wooden tooth picks and a small bag of wooden skewers
  5. wax or baker's parchment to protect surfaces while you work
  6. empty egg cartons for sticking elements into to dry
  7. fast drying acrylic paints, all colors
  8. acrylic varnish (spray, for finishing projects)
  9. Zip lock freezer bags for storing nuts, seeds, shells in a cold garage or back porch - Remember that these pods and nuts are attractive to insects and mice; keep them in cold storage until they are used and toss out the edible nut parts into the woods.
  10. You will need a tin container for storing your final pieces: cookie tins, old popcorn containers etc... (These containers are ideal for keeping your ornaments free from moisture, insects, and mice. I have kept fragile ornaments given to me that are more than thirty years old, in mint condition inside of tins!)   
Who benefits from nutty plants? Review these articles before taking your next family walk in the woods.

Saturday, December 23, 2017

A Visit to Bethlehem In Spirit

A Visit to Bethlehem In Spirit
by James Montgommery

The scene around me disappears,
And, borne to ancient regions,
While time recalls the flight of years,
I see angelic legions
Descending in an orb of light:
Amidst the dark and silent night
I hear celestial voices.

"Tidings, glad tidings from above
To every age and nation!
Tidings, glad tidings! God is love,
To man he sends salvation!
His Son beloved, his only Son,
The work of mercy hath begun;
Give to his name the glory!" 

Through David's city I am led;
Here all around are sleeping;
A light directs to yon poor shed;
There lonely watch is keeping:
I enter; ah, what glories shine!
Is this Immanuel's earthly shrine,
Messiah's infant temple?

It is, it is; and I adore
This Stranger meek and lowly,
As saints and angels bow before
The throne of God thrice holy!
Faith through the veil of flesh can see
The face of thy divinity,
My Lord, my God, my Savior!

Sunday, December 3, 2017

DIY odds and ends tree stocking

       Sometimes simple ideas are the most appealing. I made this homespun Christmas stocking from scraps of left over wool and stray beads/buttons from earlier crafts. It was very easy to whip together and I didn't need to visit a sewing shop to acquire any of my supplies.

Above, a grey wool stocking depicting a faux feather tree trimmed with odds and ends from
my button box.
Supply List:
  • scrap wool felt (approx. 1/3 yard)
  • faux tree branches, chenille stems 
  • buttons and beads for tree ornaments
  • scraps for tree stand
  • embroidery needle and a variety of threads
  • dental floss for the hanger
  • red berries for the tips of the faux tree branches
Step-by-Step Instructions:
  1. With right sides facing together, pin a paper stocking pattern on top of your wool felt and cut out two sides of a Christmas stocking. (If you don't have a pattern there is one on this page.)
  2. Determine the side that you will use as the front and using a tiny whip stitch, sew on the chenille stems to look like a feather tree. (see the photo above)
  3. Applique a tree stand beneath it from felt scraps, I used a bit of green with gold floss. 
  4. Sew on beads, Christmas berries and buttons to trim your faux feather tree. 
  5. Sew together the two sides of your stocking with a blanket stitch using embroidery floss in any color that satisfies your taste. I used a ivory to gold variegated floss to stitch up the sides of my steel grey wool stocking.
  6. Leave the opening at the top, but sew around it's edges with the same fancy stitching in order to prevent the wool from unraveling over time.
  7. String together a handful of beads using your dental floss for strength. 
  8. Attach this beaded hanger to your wool stocking and now you are ready to decorate a mantle or Christmas branches with the woolen creation. 

Saturday, December 2, 2017

Sew a traditional chimney stocking

Left, Note the holes at the bottom for attaching him to the stocking. Right, A Belznickle character for my chimney stocking.
       Here is one of several chimney stocking patterns I have created from earlier Victorian designs. It is my own interpretation; obviously, because of the Belznickle! Chimney stockings are not new to  American homes but, alas, as all decorative things in America, they have fallen out of fashion here.
        I, however, am not a slave to what is fashionable; I have more of a curious nature than that. Vintage designs and the history of objects have always been peculiar hobbies of mine. So, here is a pattern to make one, two, or three for your own mantle this Christmas.

Left, Stitching through the cardboard to attach the Belznickle. Right, The backside of my chimney stocking.
       Chimney stockings are usually stuffed with candies, nuts and/or small toys. This is in part because they are a bit more narrow than other Christmas stocking designs. Chimney stockings also  have a Christmas character either poking out of the top of the chimney cap or through a fireplace depicted at the bottom of the stocking. My version here does not have a fireplace at the bottom, only a suggested foot. But I will include other versions of stocking patterns on this blog that will show you how to make a variety of interpretations in the future if you are interested in these.
       You will need to purchase "brick" novelty print online for this sewing craft, for the fabric stores in the U. S. do not carry it this season. Perhaps we may start a trend here and brick or stone novelty prints will make a come back? But for now, you will need to search fabric suppliers online.
See how long I've made the chimney stocking? Most of these designs are very long and nar-
row. It's up to you to decide just how long you wish the stocking to be. I include the lower
boot half in the pattern and the snowy piece above, but you must extend the length of the
chimney part in accordance to your own tastes. The face mold that you acquire to use on
your Belsnickle or Santa figure will also effect your own version of this stocking design.
Supply List:
  • novelty cotton print of brick (1 yard)
  • needle and matching threads
  • cotton batting or white felt or faux white snowy fabric
  • Sculpey clay
  • press mold mask
  • paper clay
  • wood glue or hot gun glue 
  • masking tape
  • acrylic paints: flesh tones, red, brown, eye colors, white etc...
  • acrylic sealer or Mod Podge
  • stiff cardboard
  • pattern (below)
  • embroidery needle or nail
  • dental floss
Step-by-Step Instructions:
  1. First you will need to cut out the "figure" of the Belznickle from a stiff piece of cardboard. The stiffer, the better. Some of you may even choose to use a thin piece of wood alternatively. 
  2. If you use cardboard, cover it completely with masking tape.
  3. Then you will need to acquire a press mold of St. Nick. These are very common in the United States in hobby shops. If you cannot find one of these you can make one of your own. Click here to see a video and get directions for press molds.
  4. I use Sculpey for making my Santa face molds, in part because Sculpey is very durable and waterproof. You do not need much for this project; a very small block of it will suffice.
  5. After baking the clay face in an ordinary oven, let is cool and then glue it to the cardboard cut-out figure. See pattern for positioning.
  6. Now mix your paper clay according to the directions from the manufacture. Spread this out around the face mask and over the entire surface of the cardboard cut-out, excluding a narrow strip at the bottom of St. Nick's coat. (see pattern) 
  7. After the front surface of your coat dries, turn it over and repeat the process on the backside of St. Nick's coat. Let it dry.
  8. Take your sharp nail or large eyed embroidery needle and make a series of small wholes across the bottom of the exposed cardboard strip so that you will be able to sew the figure of St. Nick into the top of the finished chimney stocking.
  9. Print, trace and cut the stocking pattern onto your brick, novelty cotton print, front sides facing together, because you will need two pieces exactly alike. Sticklers may wish to line up their bricks. Don't forget to add a half inch seam and to also position your pattern at the bottom of the folded fabric. This because you will need to determine how long your chimney stocking will be on your own. (see pattern)
  10. With right sides together, allow for the seam and sew a straight stitch by hand or machine around the stock foot and up. Leave an opening where St. Nick will be sewn into the top, peeking out from the chimney as he slides down it. 
  11. Sew a strong loop six or seven inches long and approximately 2 to 3 inches wide to attach to the backside of your stocking. This loop may be made from the brick fabric or the snowy white fabric. (whichever is stronger) Attach it the the backside of the finished stocking before sewing the Belznickle in place.
  12. I've included the curvy piece of pattern for a snowy top to add to the top edge of your chimney stocking opening. Cut this from a white felt or some other fuzzy white fabric.
  13. I used a blanket stitch to attach the snowy applique buy any stitching would be nice.
  14. Now sew through the backside of the finished stocking through the cardboard holes to attach St. Nick, leaving the front half of the stocking open to insert candies or nuts. Use a heavy thread, embroidery floss or even dental floss to do this with. The heavier the thread the better the wear of the stocking over time.
  15. You may also choose to reinforce St. Nick to the stocking with a bit of hot glue.
A Chimney Stocking pattern by kathy grimm. Free for personal craft use only.
 Property of https://belsnickle.blogspot.com/

The Befana Fair in Rome

       In Rome the season of making gifts corresponding to our Christmas comes twelve days later, and the gift-bringer would not be called Santa Claus or Saint Nicholas, but Befana, a gruff little old woman. Perhaps she is in some way connected with the old woman of whom the legend is told that she was sweeping out her house when the Three Kings rode by with gifts for the infant Christ. " Come," they said, " and see the Bambin Gesu." She said she would when she had finished her sweeping. But though she took her gifts and started, she was too late then, of course, so she gave the presents to good children and bits of charcoal to those who had been naughty. The name is really a short form of Epifania, the Feast of Epiphany, and it is given both to the gift-bringer and to one of the most extraordinary popular festivals ever invented to amuse children and to turn grown people into children. It is a night fair opened every Eve of Epiphany in the great square called Piazza Navona, where long, long ago one of the Roman emperors, Domitian, once had his race-course. In the days just after Christmas workmen begin to bring out from queer underground storerooms all the lumber and other material needed for setting up booths and decorating the square for the Befana. From year to year it lies somewhere, ready for use at a moment's notice, and when needed it is suddenly produced without confusion, marked and numbered, all ready to be put together and regilded, or repainted, or hung with acres of bright-colored draperies. The Romans are masters of the art of managing public displays and change the empty, windy square as if by magic suddenly into a great oval street of booths enclosing the whole circus-shaped space. At dark on the Eve of the Epiphany the Befana begins. The hundreds of booths are choked with toys, and gleam with thousands of little lights. In the open spaces the moving crowd of children, parents, and grandparents grows closer and closer between sunset and midnight, and every one is splitting the air with some sort of whistle, horn, or trumpet. Noise is the chief need of a successful Befana, and the first thing every one buys who comes must be a tin horn or one of the grotesque little figures made of painted clay, always with a whistle in some part of it. Their very ugliness is attractive, and they are daubed with a kind of bright and harmless paint of which every Roman child remembers the taste so long as he lives. Round and round the crowd moves in a stream of young, old, and middle-aged, all blowing horns and whistles with a ridiculously solemn persistency, bent on making all the noise it is possible to get out of one small toy. Now and then they stop to buy at some booth, or to greet a friend; one group attacks another with a specially strong burst of noise almost too much to stand when shrill whistles are brought close to ears, and there are shouts of laughter when the party which can make the most hideous noise drives off the other half deaf from the din.
       In one long-remembered year, in the old English Protestant church about a mile away, the organ was rebuilt and the organist, a practical Anglo-Saxon, had the useless old pipes sold at the night fair for the benefit of the church. The braying of the high cracked reeds was frightful and never to be forgotten.
       Thousands upon thousands of people throng the square; even under the clear winter sky it is not cold; the flaring, smoking, wind-blown torches throw strange shadows down upon the old women who behind the booths sit warming their skinny hands over earthen pots of glowing coals. They look on without a smile on their wrinkled faces while their sons and daughters sell little old women of clay, the very images of their mothers, to passing customers. And there is no confusion, no accident, no trouble, there are no drunken men and no pickpockets. But Romans are not like other people. J. C. Dier, 1911.

A little Italian girl talks about La Befana and visits 

Making Christmas Dolls in A French Factory

Doll making in a French factory, 1908.
       Does it seem to you that it would be a delightful business to make hundreds of thousands of dolls every year? H'm! Does this huge kettle of bad-smelling mush make you think of the dainty, smiling dolls in the toy-shop window? Dolly is made, though you would never guess it, of chopped up bits of old kid gloves and pieces of cardboard boiled to a pulp in a gum made from the horns of goats. And here is a man shoveling sawdust into a kettle half full of boiling water. Now he is turning the mass into a big mixing trough, adding one shovelful after another of the gluey mush. The machinery creaks and turns and cuts and slaps as this mixture is kneaded into a composition pulp. Now he is carrying some of it in a hod, for all the world like sticky mortar, to a weighing table! Sweep! it is spread out in an even thickness. Clip! down come the knives which part it into the right quantities, and it is swiftly pressed and molded to the shape of a body, an arm, or a leg. In one factory alone the parts of as many as forty thousand dolls are thus made in one day, and the ugly, greenish shapes set aside to harden. Another day they pass quickly under the brushes in the painters' hands after which they have the more familiar rosy pink color, and dolly can now be put together except for the head.
       Of these dolls the heads are to be of porcelain. Once for all, long ago, some artist made the model of which many duplicate molds stand ready. Into these molds liquid porcelain clay is poured; before it hardens the openings for the eyes are cut and tiny holes made by which it can be joined to a body. After the molds are opened, as the rows and rows of little heads stand in metal trays, a painter comes by, covers them with a glaze-wash, tints the cheeks and outlines the brows and lashes. Now into the oven goes the tray for hours of slow baking. But even with the head sewed on we have but a sad looking dolly, both blind and bald.
Crafting wigs for dolls, France, 1908.
       If all goes well, the eyes and the wig come next. The eyes are not made in this factory at all. They come from Germany, and it would probably give you a queer, scared feeling to see the making of them. Look into this long, dark room, and when your eyes are a little used to the strange shadowiness, you will see that down its sides there are rows of tables, before each of which sits a woman with a blue-flame gas lamp in front of her. At little distances are retorts of glowing molten glass, and each woman dips her short glass tube into the melted glass, and, keeping it soft by the help of that weird blue flame of the blowpipe jet, blows a little oblong globe which she colors white for the eyeball, and then upon it paints a pupil of blue, brown, or black, as the doll-makers may have ordered. The musical click which you hear all the time is the sharp stroke which breaks the finished and cooled eye from the glass rod, letting it drop into a box lined with cotton by her side. This boy coming out has been collecting them, and it makes us shiver to see those hundreds of eyes rolling uncannily at us from the bottom of his basket. Come away!
       A wig for an inexpensive doll is an easy matter; the chosen strands of hair are laid along a double thread, which passes below one strand and above the next. This thread makes the " part," and under it is stuck a bit of paste- board by which the wig is fastened on. A quick-fingered French woman can turn out over a hundred dozen such wigs in a day. And with the wig dolly is made at last.
       Her clothes, of course, are a separate matter, just as yours are ; there are dolls' shoemakers, and dolls' dress-makers, and the elaborate completeness of dolly's outfit depends only upon the price one is willing to pay. J. C. Dier, 1911.