Santa's job will be easier when you turn toymaker and lend a helping
hand to relieve the burden on his North Pole workshop. Among this collection of exciting toys, there’s at least one that will surely make
Christmas extra merry for some youngster. Construction of these, as well as the others, is apparent
from the drawings, which include patterns for the parts that require
jigsawing. Enlarging the patterns full size is easy. First, count the
number of squares given and rule on paper an equal number of 1-in.
squares unless otherwise stated on the graph itself.
Next, number the rows of squares 1, 2, 3, etc., across the top and
down one side of both the magazine pattern and the ruled paper. Now,
begin enlarging the pattern by drawing that portion of the outline which
is in square No. 1 in the magazine in the corresponding square on your
ruled paper. Then advance to the next square, and so on, until the
complete pattern is enlarged. With practice, you’ll find it easy to
enlarge any pattern by the square method.
With the exception of the table-and-chair set, which should be made
of plywood, common 3/4-in. white pine is ideal material for most of the wooden toys.
A Child's Table and Chair Set
 |
A child's table and chair set. Photo of finished project plus graph depicting the measurements of each part for the assembly of chairs and a table. Exceptionally sturdy but not especially fancy, this plywood table-and-chair set will appeal to the dad or big brother who works with little more than a handsaw, drill, screwdriver and paintbrush.
More Table and Chair Sets For Children:
Children's Toy Chest Plans:
Swinging Arm Dolls
|
|

Here is how to make these adorable swinging-arm dolls. With old wooden packing boxes laid out in 1/2″ squares as material,
mark the patterns according to the squared charts shown above. Before
cutting out the figures, bore a hole through the shoulders and up one
leg, as shown by dotted lines in diagrams at the right.
The sailor’s hat is made of thin wood cut in circular shape and
nailed to the head. Bore a hole through the under side of each arm about
%” deep and a 1″ hole lengthwise to take the wire which passes through
the shoulders.
Straight grained shingles or thin wood will do for paddles. Fasten
them by driving a small brad or wire pin through the joint. Set the
paddles at an angle (about 45 degrees) allowing easy turning by the
wind.
When assembly is made, be sure to leave a small space between the arms and the body to permit swelling of the wood.
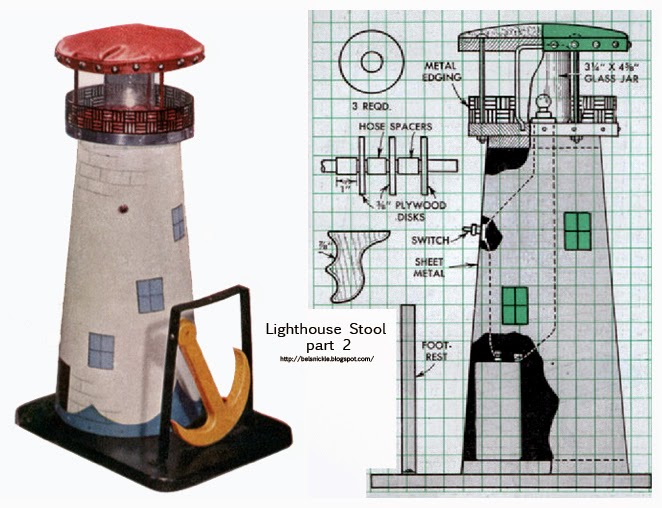
A Lighthouse Stool
The "beacon of the lighthouse stool, which is enclosed in an inverted glass jar, consists of a 1.5 volt flashlight bulb. This is inserted in a socket and wired to a push-button switch and dry cell. Removal of the screws at the base of the lighthouse permits renewal of the dry cell. Three 1/4 inch carriage bolts attach the padded top of the stool, lengths of tubing being slipped over the bolts to support the top slightly above the glass jar. The pattern for the sheet-metal base of the lighthouse is given at the right. The metal is lapped at the seam and fastened together with sheet-metal screws.
Any boy can build one of these mirror-scopes at a small expense, and
for his efforts see, when looking through the peephole, three miniature
objects increase to a multitude.
Here is the way it is done. Construct a wooden box about two feet long and five or six inches square.
Against the inside of the front fasten a mirror as illustrated in the
drawings above and drill a small peephole about two inches from the
bottom. Also scratch a similarly sized peephole in the silvering on the
back. Then cut a hole six or eight inches long in the top of the box and
fit into it a piece of ground glass to admit light.
The rear is built up of two pieces of wood as illustrated in the
accompanying drawings. Attach a second mirror to the inside of the end,
then hinge the latter as shown. Paint the inside of the box white and
you are ready to install the figures.
Many miniature images can be purchased at the five and ten store.
Arrange not over four figures in a nice grouping. Close the end and it
will seem as if hundreds of images inhabited the box when you look
through the peephole. Images of ships, men, animals, etc., are
recommended.
Toys Similar to a Mirror-Scope:
Wood Choppers
 |
The stock required is 1/4" thick. Two bodies, two arms with axes, and
two bars are needed for this toy. The upper bar has a place 5/8" from
its center which is widened to resemble a tree stump an inch high.
The pairs of parts are held together while holes are being bored thru
them. The shoulders of the men and arms should have small holes to
make a fixed joint while the men's legs and the bars should have holes
closely fitting 1" nails. Both bars are located on the side of the men on which the arms are
fastened. Color the coats, hats and sleeves blue, boots and axes black, arms,
fingers, faces pink, and trousers red, bars green, and stump brown.
Bucking Goats
|
 |
From 1/4" stock, saw out two bodies, as shown in the full-size
drawing, and two bars shown in the dimensioned drawing. Place the
two bodies together and bore holes in the hind legs, as shown, for
1" nails. Do likewise with the two bars. Color the goats white, with
large brown spots on their backs, necks and legs. Color the horns and
hoofs black, and the bars gray or brown. Fasten with movable joints,
one bar on each side of the goats, having them cross as indicated in
the assembled drawing.
Similar Hand-Held Toys:
A Bucking Bronco Rocker
This bucking bronco rocker requires plate casters for the footrest and a socket-type caster for the rear leg. The two sections of the toy are pivoted together with a carriage bolt and a small pillow-block bearing. A coil spring between the legs give the "cowboy" a bucking ride that bounces him up and down in the saddle.
|
 |
| Bucking bronco instructions and pattern. |
A Walking Turtle Pull Toy

When pulled, on a string, the wooden turtle illustrated below moves its
legs and draws its head in and out in a lifelike manner.
Turn the shell from a band-sawed pine blank. Hold it in a chuck for
recessing, and then fit the recess to another chuck for shaping the
outside. Groove the segment zones and divide them radially.
Bend the crankshaft from baling wire, the bearing from a strip of
sheet iron. The connecting rods are strips of sheet iron, pushed onto
the cranks before the wheels are added. The latter are keyed by bending
the shaft ends back on themselves and forcing them into small holes in
the wheels, where a drop of celluloid cement holds them. Screw the
bearing inside the recess, slit the ends to the bearing holes, and force
in the crankshaft.
Shape the head and neck semicircular on top. The neck slides in a
groove in the shell, being held with a metal plate. The connecting rod
enters a slot, where a nail holds it. The tail is a strip of inner-tube
rubber.
More Old-Fashioned Pull Toy Patterns:
An Organ Grinder Toy
 |
Front side, and open rear view of the animated organ-grinder toy.
The sand motor is "wound" by turning the house sidewise through a
complete revolution as shown at the far left. |
An everlasting sand motor provides the power to drive the mechanical
organ grinder illustrated. To “wind up” the mechanism, it is necessary
merely to give the box a complete turn in the direction indicated in the
drawings. This brings the sand back into the hopper ready to run down
and turn the small paddle wheel. Other adaptations will suggest
themselves, such as a woman pumping water or a hobo sawing wood.
For the box, plywood is used, the joints being well fitted to prevent
leakage of sand. The six-bladed paddle wheel is scroll-sawed from a
block of white pine. The axle is a piece of bicycle spoke turning in
glass-bead bearings, which are recessed into the wood as shown. Short
lengths of brass tubing will serve just as well as the beads.
The hole in the sand hopper should not be over 1/8″ in diameter for
beach sand. Incidentally, beach sand is the best because the grains are
smooth and pour more readily. Sand from a creek bed is also
satisfactory. To facilitate adjustment, the back panel with the window
is fastened with No. 3 screws.
The organ grinder is scroll-sawed from material and painted in bright
colors. The girl is painted on cardboard, together with the window
frame, and glued to the box, as is the hand organ.—L. R. Browne.
A Sand or Water Mill
This is an interesting beach toy as either fine sand or water may be
used to operate it. It is very simple to construct and is made as
follows: The base is constructed of 1/2 " pine, 7 1/2" wide and 7 1/2 "
long; and the four blocks which are glued and bradded to the corners,
are 1/2 "x1"x1". The two uprights are 3/4"x7/8"x8 1/4", and the two
cross supports at the tops measure 3/4"x7/8"x2 1/2".
- Two
holes are bored in the base for the screws that hold the uprights in place. These holes are 2y 4 "
from the end and 2^" from the
sides.
- Holes are bored in
the little top braces )A" from the
two ends and one just in the middle, or iy 4 " from the ends. These are for the screws that
hold the braces to the uprights
and to the top piece. All holes are bored
with a drill suitable to take iy 4 " No. 8 flat-head screws, and all are countersunk on the side
where the screw enters.
- The top piece is made
J/4"x5*4"x5*/>" with the two front corners slightly rounded, as shown.
- A hole is bored of a size to
receive the funnel used, \y 2
" from the front edge and 2^" from the sides.
- A hole is drilled in each upright
piece, 3 l / 2 " from the
lower end, of a size that will insure a driving fit to the wire used, in this case being a piece
of No. 12 copper- dipped,
4^4" long.
- A piece of
J4" dowel is cut off %" long and a similar hole is bored about two-thirds of the way through, as shown.
- Four holes are bored, as indicated on the drawing,
for the quills, which are later
glued in place. Feathers from the
poultry yard will furnish these.
- Sand all pieces with No. 1 sandpaper and first assemble the top, the two
uprights and the two cross supports.
Paint these two coats of red paint.
- Attach the cross blocks to the base with glue and •U" brads and paint two coats of
yellow. Paint the tun- nel two
coats of bright green.
- While
these are drying construct the paddle wheel. The piece through which the wire axle runs is
^4"x34"x 2J4". The
four blades are y 4 "x2y 4 "x2y 4 ".
- After these are sanded and a hole is bored through
the center piece, nail the blades
to the center piece, in the
position shown in the side view. Use y 4 " brads and glue for fastening the blades. Paint two
coats of yellow.
- When the
parts so far assembled are thoroughly dry, finish the assembly, using \y 4 " No. 8 flat-head
screws and glue. The toy is now ready to operate.
More Water and Sand Toy Ideas:
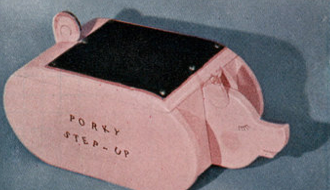
A Step-Up Stool
Little ones may need a bit of help in the washroom reaching the sink so
why not build a little helper? This little step-up stool features a
curly tail and a pink pig snout. Don't forget to tack on a non-skid
rubber mat to prevent slippery falls!
More Bath Related Toys:
A Toy Freighter
A colorful Toy Freighter for quantity production boats are among the
most fascinating toys for young children. If they can play with a boat
in the bathtub or in a wading box or pool, so much the better, but they
also get much enjoyment in playing with one on the floor if it is of a
flat-bottomed type.
The little freighter illustrated is adapted for either purpose, and
the design is especially well suited to quantity production because of
its simple construction and the small amount of materials required. The
capacious cargo hold will carry a large shipment of dummy boxes and
barrels made from scraps of wood.
White pine, redwood, or any fairly lightweight wood may be used. The
hull is built up as shown and fastened with casein glue to a waterproof
plywood bottom. The plywood should be of the outdoor type. Avoid using
nails or brads unless galvanized, because ordinary nails will eventually
cause rusty streaks.
Deck planking can be simulated by scoring the wood with a hard lead
pencil and then varnishing the surface. Take care to round off the tip
of the mast as well as that of the dowel behind the deck house. If the
toy is intended for a very small child, the mast should be eliminated so
that there would be no danger of his falling upon it.
Use the brightest reds and greens in painting, because the appeal of
this freighter lies principally in its coloring. Stenciled windows and
doors add to its appearance, but are not absolutely necessary. The cargo
hold is painted gray.
Craft Little Toy Cars, Boats and Trains:
Playing Make Believe at The Car Wash:
Road Rugs and Mats For Little Toy Cars:
Creative Playthings for Marbles:
Build A Child's Doll House:
Craft Your Own Math Toys:
Dress-Ups Aren't Just For Halloween, These Also Make Great Gifts For Christmas:
Tools and Workbenches for The Youngest Carpenters:
Homemade Toys for Little Campers:
Build Child Sized Markets:
Build Your Child a Durable Kitchen Play Set:
Make Your Own Play Food:
Instructions for this project from Cathie Filian and Steve Piacenza.
This kitchen is a recycled child's dresser.