Monday, January 5, 2015

Two Ways To Craft Dangling Valentine Ornaments

       Below are two variations of the same craft. One of the ornaments uses flat cardboard hearts with three dimensional stickers and the other uses three dimensional Styrofoam hearts and flat lace stickers. Either way, you can't go wrong with this simple process. Make endless decorative heart combinations to fill the branches of your Valentine tree!
Two dangling cardboard hearts including three dimensional cherubim stickers.
Supply List:
  • three dimensional cherubim stickers
  • cardboard hearts
  • decorative papers to cover the heart shapes
  • a small selection of glass beads
  • thin red rick-rack
  • hot glue gun and glue
  • tacky white glue
  • wire for hanging and a bit extra to shape U shaped hooks
Directions:
  1. Cut out a heart shape from a sturdy piece of card stock.
  2. Cut two small 1/2 inch pieces of thin wire. 
  3. Bend each wire into a U shape.
  4. Using hot glue attach one U shape bent wire to each end of the heart. Make sure the U shape tips are facing towards the center of the heart. 
  5. Bend a wire hook to thread through the top U shaped wire to hang the heart.
  6. Use a needle threaded with dental floss to string a few decorative glass beads through the U shaped hook suspended from the cardboard heart's bottom half.
  7. Cut two hearts the exact same size as your cardboard heart from decorative papers.
  8. Glue these onto the cardboard heart using white tacky glue.
  9. Paste a thin red rick-rack trim around the outside edge of the paper covered cardboard heart.
  10. Glue on three dimensional cherubim to both the front and back sides of the dangling cardboard heart so that the ornament will look nice when it spins on the branches of a Valentine tree.
A dangling Styrofoam heart ornament.
Supply List:
  • a three dimensional Styrofoam heart covered with red glitter
  • lace patterned heart stickers
  • gold chenille stem
  • a small assortment of red glass beads
  • dental floss
  • needle
  • white tacky craft glue
  • wire hook for hanging
  • gold rick-rack
Directions:
  1. Use tacky white glue to adhere a small piece of gold rick-rack around the outside edge of the Styrofoam heart.
  2. Glue on a selection of lace heart stickers.
  3. Cut two small 1/2 inch pieces of thin wire. 
  4. Bend each wire into a U shape.
  5. Push the U shaped wire ends into opposite ends of the Styrofoam heart. Pull these out and fill the holes with tacky white glue and then reinsert the U shaped wires.
  6. Let the hooks in the heart dry before stringing the top end of the Styrofoam heart with a wire for hanging. 
  7. Bend a tinsel chenille stem through the bottom wire hook of the Styrofoam heart and shape this stem into a heart shape. Hook the end tip into the beginning point of the stem.
  8. Use a needle threaded with dental floss to string a few decorative glass beads through the U shaped hook suspended from the Styrofoam heart's bottom half.

Little Ones Can Print Snowmen With Their Hands for Christmas

These hand printed snowmen were made by my nephew a few years ago.
Supply List:
  • Solid colored Christmas baubles, plastic or glass
  • acrylic white and black paints
  • sponge
  • paper plate
  • permanent black, blue and orange ink markers
Directions:
  1. Squirt out a bit of white acrylic paint onto a paper plate. Dip the sponge into it and paint both the palms and inside fingers of your child's hand.
  2. With the top of your bauble right side up, place the ornament into the painted palm of your child's hand. Carefully close his or her fingers around the bauble's round surface without letting their hand shift.
  3. Now ask them to gently remove their hand from the surface.
  4. Then hang the bauble in a place where the paint can dry without being disturbed.
  5. Wash your little ones hands.
  6. After the white acrylic paint has dried, paint black top hats on each of the printed white finger tips.
  7. Using your permanent markers, add details to each of the snowman's faces: eyes, noses, smiles and scarfs.
  8. Sign and date the ornament with a black permanent marker on the bottom of the palm print.
"Heidi demonstrates how to make a great holiday gift with 
your child's hand print. Great fun for the kids and a great gift idea."

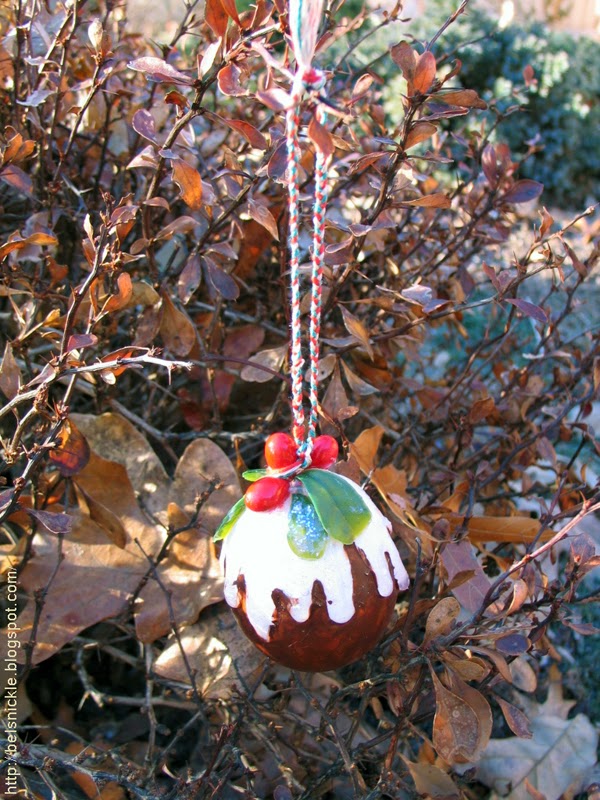
Craft a Plum Pudding Ornament from A Hollow Egg

Close up photographs of my Christmas plum pudding made from a hollow egg shell.
       This Christmas pudding is designed to hang from a tree. It is crafted from a hollow egg and it is so light weight that it may be hung from the most delicate of tree branches.

A very light weight plum pudding ornament for the tree.
Supply List:
  • sharp embroidery needle
  • fresh, uncooked egg
  • small bowl
  • white glitter
  • white puff paint
  • small red berries and green leaf for trim (artificial)
  • brown acrylic paint
  • tiny paint brush
  • twine for hanging
  • white tacky craft glue
  • rubbing alcohol
  • clear nail polish
Step-by-Step Instructions:
  1.  First you will need to blow the contents of an egg from it's shell. Use a sharp embroidery needle to poke two holes into the top and bottom of a raw egg. Dip a tissue into a bit of rubbing alcohol and wipe down the surface of the egg so that it is clean. Position your lips over the smaller of the two holes and blow the raw yolk out of the lower hole. You can watch a video here to see just how this may be done.
  2. After blowing out the yolk, shake the egg to listen and make sure that it is indeed empty. Set the egg out on top of paper towels to dry completely before painting it.
  3. Take your tacky craft glue and adhere your choice of berries and green leafs to the top narrow half of the egg. Let this application dry completely.
  4. use a generous amount of translucent or white puff paint to drip underneath the trims and to drip down the side of your egg. This is puff paint is the vanilla sauce of your Christmas pudding.
  5. Sprinkle white glitter on this puff paint before it dries. Let the egg dry.
  6. Using a delicate, small paint brush, apply a brown cinnamon looking layer of paint to the lower half of the egg. Carefully avoid painting into the faux vanilla sauce.
  7. After the paint dries apply a coat of clear nail polish to the painted surface areas.
  8. Strategically tie a braided cord to the tip of a berry in order to hang the Christmas pudding from a tree.
More Christmas Pudding Ornaments:

Sunday, December 21, 2014

Remembering Marshall Field's at Christmas Time

The famous clock at Marshall Field's State
Street store in Chicago.
       When my husband and I were dating, we lived in Chicago for a brief time. I have so many fond memories of that city, especially Christmas memories. The first time we visited downtown to look at window displays and purchase gifts we stopped at Marshall Fields to have a bite to eat. 
       Among the "firsts" by Marshall Field's was the concept of the department store tea room. In the 19th century, ladies shopping downtown returned home for lunch; having lunch at a downtown restaurant unescorted by a gentleman was not considered ladylike. But after a Marshall Field's clerk shared her lunch with a tired shopper (a chicken pot pie), Field's hit on the idea of opening a department store tea room, so that women shoppers would not feel the need to make two trips to complete their shopping. To this day, the Walnut Room serves the traditional Mrs. Herring's chicken pot pie.

The South Grill Room, Marshall Field & Co., Retail Chicago.
       That is just one among many innovations by Marshall Field's. Field's had the first European buying office, which was located in Manchester, England, and the first bridal registry. The company was the first to introduce the concept of the personal shopper, and that service was provided without charge in every Field's store, right up to the chain's last days under the Marshall Field's name. It was the first store to offer revolving credit and the first department store to use escalators. Marshall Field's book department in the State Street store was legendary; it pioneered the concept of the "book signing." Moreover, every year at Christmas, Marshall Field's downtown store windows were filled with animated displays as part of the downtown shopping district display; the "theme" window displays became famous for their ingenuity and beauty, and visiting the Marshall Field's windows at Christmas became a tradition for Chicagoans and visitors alike, as popular a local practice as visiting the Walnut Room with its equally famous Christmas tree or meeting "under the clock" on State Street.
       Marshall Field was famous for his slogan "Give the lady what she wants." He was also famous for his integrity, character, and community philanthropy and leadership. After his death, the company remained to the very end a major philanthropic contributor to its Chicago-area community.
Left, Marshall Field's Wholesale Store around 1890, Center, 1934 Marshall Field & CO. Store for men. Right, 1934 Narcissus Fountain Room at Marshall Field Co.
        Field, the store he created, and his successor John G. Shedd, helped establish Chicago's prominence throughout the world in business, art, culture, and education. The Art Institute of Chicago, the Field Museum of Natural History (as renamed in 1905 for its first major benefactor), the Museum of Science and Industry, the John G. Shedd Aquarium, and the University of Chicago all have been aided by the philanthropy of Marshall Field's. Marshall Field was also a major sponsor of the 1893 World's Columbian Exposition. Read more...


       "Marshall Fields and Christmas were practically synonymous. Generations of Chicagoans and out-of-towners made a pilgrimage to the legendary State Street department store to shop for gifts and enjoy Fields marvelous holiday ambiance and superb quality service. This video blends historical images and Christmas music from a bygone era with latter-day clips to recreate a whirlwind tour of the palatial building circa 1945-1955. Stroll down Candy Cane Lane, dine in the Walnut Room next to the Great Tree, and visit Santas Cozy Cloud Cottage. Fields became Macys in 2006. Macys has continued some of the holiday traditions, but the magic and soul of the old store are now just memories."

Saturday, December 20, 2014

Flying Kewpie Christmas Ornaments

       This Christmas ornament clip art by Rose O'Neill was cleaned and colorized by Kathy Grimm. Please read the Terms of Use before printing it out for personal crafts only.

We Want to Fly About Your Christmas Tree
Designed by Rose O'Neill

       Cut out the backs and fronts of the Flying Kewpies, join them together, inserting a loop of red string or ribbon in the topknot before it dries. Lay under a weight.
       Hang the Flying Kewpies by their loops from the twigs of your Christmas tree. Be sure to wait till the paste is perfectly dry or the strings will come out and Kewpies fall.


       The Kewpies love to fly in the green branches of a Christmas tree, among the glittering bells and the shiny tinsel and the children's legs. Pop! goes Kewpie Army's gun as he shoots at a Teddy Bear. Kewpie Cook feels gay, for he's seen some dolly cookies and he means to get the recipe for the Kewpies.
 
 
       The flying Kewpies never have such good times anywhere else as they have in a Christmas tree. They skip and caper, dance and prance, and gurgle and grin so gleefully that all little boys and girls, babies and grown ups who see them and even the stuffed animals and the jumping jacks who see them laugh too.

Have a question about the illustration? Just type it in the comment box and I'll get back to you as soon as possible. I only publish content that is closely related to the subject, folks.

Learn More About Rose O'Neill:

Friday, December 19, 2014

Christmas Clip Art by Ellen Clapsaddle

       Ellen Hattie Clapsaddle (January 8, 1865 - January 7, 1934) was an American illustrator/commercial artist in the late 19th and early 20th centuries. Not only is her style greatly admired and well recognized, today she is recognized as the most prolific souvenir/postcard and greeting card artist of her era.
Boy with Christmas candle by E. H. Clapsaddle.
        Ellen was born during the Civil War period in the small farming community of South Columbia in Herkimer County, New York, near Columbia, New York on January 8, 1865. She was the child of Dennis L. and Harriet (Beckwith) Clapsaddle. From an early age she loved to draw—she is said to have been a shy and delicate child who displayed artistic ability and was highly encouraged by her parents to develop her skills in art. Clapsaddle was the great-granddaughter of the American Revolutionary War hero, Major Dennis Clapsaddle.
       She attended a one-room school until the 8th grade and then graduated from Richfield Springs Seminary, a local academy (later known as high schools) in Richfield Springs that prepared young ladies for higher education, today known as a college in 1882.
       Ellen's parents and teachers highly encouraged her to pursue a career in art so she applied and received a scholarship to attend a selective private college for two years, the Cooper Institute known as the Cooper Union Institute for the Advancement of Science and Art in New York City. Only highly recognized individuals are chosen to attend this college and all attend on scholarship. Upon the completion of her studies, around 1884, she returned to her parents' home in South Columbia. She placed an ad in a local newspaper to offer private painting lessons and began her career of teaching art out of her home.
       Ellen started by giving art lessons in her home in South Columbia. At the same time she created her own landscapes and was commissioned to paint portraits of families in Richfield Springs. She also submitted her work to publishers in New York City and became a recognized commercial artist. Her illustrations were often used in advertising and on porcelain goods, calendars, paper fans, trade and greeting cards. Her greatest success was in the development of her artwork into single-faced cards that could be kept as souvenirs or mailed as postcards and she specialized in designing illustrations specifically for that purpose. She has been credited with over 3000 designs in the souvenir/post card field.

       The following Christmas designs by Clapsaddle have been restored and colorized by Kathy Grimm for the personal use of our visitors only. Read the Terms of Use here.

Clapsaddle's boy with violin.
Children under an umbrella by Clapsaddle.

Have a question about the illustration? Just type it in the comment box and I'll get back to you as soon as possible. I only publish content that is closely related to the subject, folks.

Child Elf Christmas Clip Art

      Please read the Terms of Use before using this elf clip art in your personal projects, Thank You.
Child elf clip art in full color.
Monochromatic blue child elf clip art.
Monochromatic green child elf clip art.
Monochromatic red child elf clip art.