Friday, December 5, 2014

Cardboard Tube Santa Claus Craft

Far left, you can see that I've sealed the bottom of my tube with a cardboard end and painted this black. Center, I also added a bit of faux fur trim to Santa's cuffs with a glue gun. Right, I dabbed on a couple of layers of different shades of red to mimic the red velvet texture of Santa's hat. I used grey, tan, ivory and white to drybrush his beard.
Supply List:
  • jingle-bell
  • cardboard tube
  • faux fur trim
  • acrylic paints: red, yellow, black, flesh, white, ivory, pale blue, brown
  • acrylic varnish
  • velvet fabric scrap
  • needle and red thread
  • hot glue and hot glue gun
  • scrap cardboard
  • scissors
  • pencil
  • cotton batting stuffing
  • wire or ribbon hook for hanging
Step-by-Step Instructions:
  1.  Trace around the end of your cardboard tube on top of a piece of scrap cardboard. Cut this circle out and glue it onto one end of your tube. Let dry.
  2. Draw and then paint a Santa figure onto the cardboard tube. Make sure that the sealed end is the base of the figure.
  3. Stuff the tube to the top with cotton batting stuffing.
  4. Measure the circumference of your tube by wrapping a piece of yarn or thread around it's end. Cut this to size. Now lay this piece of yarn out straight on top of your velvet fabric scrap. Cut out a tall narrow triangle adding approximately 1/4th for a seam allowance to it's circumference. This triangle should be about the length of your cardboard tube; it's measurement doesn't need to be exact. The triangle doesn't need to be perfectly drawn. It will look cute even if it is not perfect.
  5. Sew up the two longest sides of the velvet triangle with the two ends facing together. Leave the shorter end open. Turn the triangle inside out. Whip stitch a small bell the it's end.
  6. Glue the open end of the triangle to the open end of the tube with hot glue.
  7. Varnish the paper tube and let it dry.
  8. Now measure and glue the faux fur trim and hot glue this piece over the edge of Santa's hat.
  9. Attach a ribbon or wire hook through the velvet hat for hanging.
Santa's red velvet hat is simply a triangle with it's two longest sides sewn together. If you cut your triangle too large, simply gather it to fit around the end of your tube before using the hot glue to attach it. The edge of this cap will be covered eventually with faux fur trim and it won't be visible.
More Santas Made Using Cardboard Tubes:

Thursday, December 4, 2014

Make This Spun Cotton Antique Looking Wreath

This spun cotton wreath looks vintage but it's not folks. I made it yesterday!
      This little antique looking wreath is so easy to make and it can look very different depending upon the small embellishments that you have on hand to attach to it. 
      I picked up some wire mesh scouring pads in a dollar bin at my local grocery store in order to wrap some of my cotton batting ornaments economically. Dresden ornaments were often wrapped profusely with Bouillion wire and I wanted a similar look in some of my handmade crafts as well. But, how to save money on my ornaments was key. Then, I saw them, from across the isle; it was love at first glance. Oh scouring pads, how relieved my pocket book is gonna be this Christmas, hurrah!

Supply List:
  • white cotton balls
  • old recycled curtain ring 
  • wire mesh scouring pads (new in package)
  • tiny pine cones and red berries
  • tiny burned out Christmas light
  • white school glue
  • white tacky glue
  • silver wire for wrapping and hanging
  • silver beads
  • old dull scissors
Step-by-Step Instructions:
  1. Glue and wrap the curtain ring with unraveled, white cotton balls. Let this dry.
  2. Apply a thin outside coating of white  school glue to the surface of your wrapped curtain ring and let this layer dry before continuing.
  3. Use tacky white glue to paste down the tiny pine cones and red berries around a vintage Christmas light bulb. Yes, I really do collect and save these for projects.
  4. Make sure the all of the parts of your spun cotton wreath have dried. Then clip apart the wire mesh scouring pad. You will find that it unravels into a tube like shape. 
  5. I cut across this mesh wire tube so that I could wrap it once around my cotton wrapped wreath. I needed approximately 1 1/2 inches of wire mesh for my wreath. How much you will need largely depends upon the thickness of your cotton batting. If you don't use older dull scissors for cutting this mesh, your new scissors will become older dull scissors, no joke.
  6. Now wrap thin silver wire around the wire mesh in order to firmly attach it to the cotton batting surface. Twist the wire around itself to make firm connections that will not unravel. The wire mesh does unravel a bit while you are working with it but it still gives a lovely antique affect to the ornament if you will work with it. Be stubborn.
  7. You could purchase Bouillion Crinkle Wire if you would prefer this to my economical solution.
  8. Lastly, wrap more silver wire around the wreath and string this with silver beads to make an attractive hanger.
Fun Christmas Wreath Eye Candy:

Wednesday, December 3, 2014

DIY Jewelled Moorish Ornaments

Above, are glamorous ornaments for a Medieval Christmas tree!
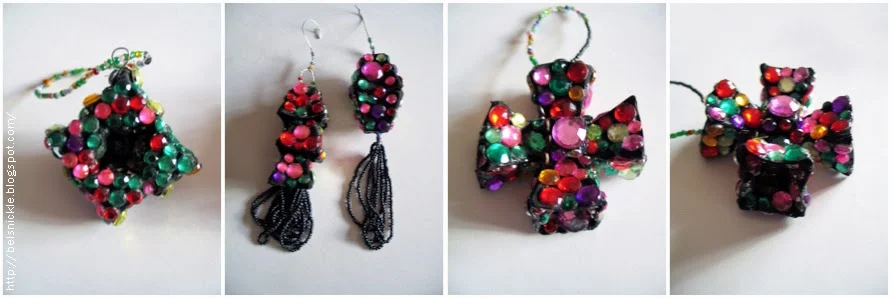
      These Moorish shaped ornaments remind me of the jewel encrusted covers found on Gothic manuscripts. My versions, however, will not cost you a king's ransom to create. These little beauties are made from recycled egg cartons, plastic gems and a bit of black paint. Use your imagination and take your time with this project. The more gems the better I think.

Above, are Easter eggs that I made using similar methods.
Supply List:
  • sharp scissors
  • clean egg cartons
  • black acrylic paint/brush
  • plastic, flat backed gems
  • tacky white glue
  • seed beads
  • wire
  • needle and thread
  • embroidery needle
Step-by-Step Instructions:
  1. Cut apart the geometric shapes used to protect eggs inside of their paper carton. Use your scissors to clean up the edges as well.
  2. Now you will be gluing these little shapes to create your own forms for the jewelry inspired ornaments. I used a very tacky white glue for this process in order to speed it up.
  3. Make sure that your forms are thoroughly dry before painting these with acrylic black paints. It is important that you use acrylics because these dry rapidly. Papier-mâché egg cartons will  slowly break down in water colors if their is too much water or in oil base paints because the oils and chemicals will "eat" through paper that has not been treated with Gesso.
  4. Paste on the plastic gems where ever you like.
  5. String seed bead tassels to dangle from the bottoms of some of your ornaments. Thread seed beads through some of the wire hangers on others.
Cut shapes from paper egg cartons to assemble these Medieval inspired Christmas ornaments.
Details of Christmas ornament craft using plastic gems and recycled egg cartons.
 Inspirational Medieval Design:
Medieval Christmas Ornament Crafts:
Learn More About The Medieval Christmas: 5th to 15th Century:

Tuesday, December 2, 2014

Craft a Golden Tassel Angel Ornament

This elegant Victorian angel ornament is made with a lovely golden tassel and cotton batting wings. Tassels were often used on ornaments during the Victorian Era.
Click to download largest file.
 Supply List:
  • prefabricated porcelain doll head with shoulders
  • gold tassel
  • short white feathers
  • white cotton balls
  • two ribbon types, wired edges
  • hot glue gun
  • white school glue
  • tiny embellishments: flowers, gems etc...
  • cardboard
  • scissors
  • white chenille stem
  • white or gold glitter
Left, here is a gold tassel. It is so shinny that I can hardly photograph it without a glare! The porcelain head is easy to find in a hobby shop. These kinds of items are popular around Christmas time. The cotton batting wings are not as easy to find. You can make these yourself though.

See how snug and finished the tassel skirted angel looks?
This is because all of the hot glue is hidden inside of the
doll's breast plate. Now all I need to do is wrap the out-
side of her bodice with a gold ribbon.
Step-by-Step Instructions:
  1. Cut one chenille stem in half and wrap each end with a bit of cotton batting; these will be the "hands" of the angel.
  2. Cut to fit two narrow pieces of wire edged ribbon to wrap around the chenille stem. The wired edges should be wrapped around the wrist's of the angel. Glue these ribbons into place.
  3. Fold the finished chenille stem arms in half and hot glue this stem up inside of the angel's shoulders. See photo right.
  4. Now hot glue the tassel up into place just underneath the chenille stem arms. There should be enough room behind the breast plate to accommodate the tassel neatly. Be generous with the hot glue. 
  5. Now wrap a gold ribbon around the breast plate all the way to the back of the angel's shoulder plate and clip off so that the ribbon is the size that you need to cover the top half of the angel's torso neatly. Hot glue this ribbon in place.
  6. Hot glue the angel's hands to hold whatever embellishments you have collected for her arms.
  7. Click and print out the wing pattern above to trace on top of your cardboard.
  8. Hot glue white feathers along the lower half of the wings.
  9. Unravel a few white cotton balls and glue a layer or two of cotton batting around the upper half of each wing covering the ends of the feathers. Repeat this step several times. Be sure to also wrap the batting around the edges of the wings.
  10. End with a final layer of white glue on top of the cotton batting and sprinkle the wings with a bit of white glitter. Let the wings dry.
  11. Hot glue the wings to the backside of the angel's breast plate at her shoulders.
Left, cut the chenille stem in half and glue a bit of cotton batting to the tips of the wire stem to create soft stubby hands. Center, the doll's head has a cavity and breast plate. I will fill this cavity with hot glue and push the wire armature inside it before I hot glue the tassel in place. Right, see I have measured the length of the arms to my own liking before wrapping these with a wire edged ribbon. Don't glue the arms into place until you have checked out the length of the stem and wrapped it in an attractive ribbon.

This little porcelain beauty is dressed; all she needs now is a set of cotton batting wings.

More Tassel Skirted Dolls:

How To Make A Tassel From Scratch.

Stitch a Sampler For Your Colonial Christmas Tree

My eldest child stitched this little Colonial sampler when she was a young teenager. This was her first cross-stitch project. I mounted it on heavy cardstock in order to hang the needlework on an Colonial American Christmas tree.
       When my girls were in their preteen years, my husband and I decided it was time to take them on a trip to visit both the Smithsonian Institute and Colonial Williamsburg. Although it was not an inexpensive adventure, we felt it to be one of the most educational vacations of their young lives.
       During their visit to Williamsburg, my girls were most fascinated with the lives of children, specifically girls, who lived in this recreated historical village. They wanted to know what the girls learned in school, what kinds of chores they were responsible for and what were their hopes and dreams.
      I backed my daughter's cross-stitch sampler with heavy cardstock and a lovely old piece of olive/ochre tapestry. I added braided ribbon and ivory tassels to the ornament as well. Contrary to popular opinions in America, design motifs in the Early American Colonial Era were not always rustic or primitive. In our Colonial Era, designs were sometimes very sophisticated and refined. Age does not always imply "lack" of knowledge or supply. Most of the ornaments that actually hung on the 20th century Williamsburg Christmas trees made by employees during the 1970s were from the pioneer era in America and were far more rustic than those that would have actually been designed by the English and German immigrants of the British colonies. (see 1rst volume of ornaments here) The later published Christmas ornament collection is designed to teach young students about American Folk Artists, some of these lived during the American Colonial times, some of them lived in the 20th century. (see 2nd volumes review here)
       This experience is what influenced my eldest to take up needlework for a brief time during her teen years. I purchased her a small sampler kit to reproduce, hence the ornament that you see at the top of the page.
Plate II.—Sampler by M. C. 
16th-17th Century.
       Colonial American samplers by young children often included alphabets, numerals and simple motifs; the letter motifs seem to be preferred by American Colonists in specific during the 1700s. Marcus B. Huish, author and collector writes, "Although a sampler without either alphabets or numerals would seem to be lacking in the very essence of its being, it is almost certain that the earliest forms did not contain either, but (like that in Plate II.) were merely sheets of decorative designs. For the need of pattern-books of designs would as certainly precede that of copy-books of alphabets and numerals, as the pleasure of embroidering designs upon garments preceded that of marking their ownership by names, and their quantity by figures. A sampler would seldom, if ever, be used as a text-book for children to learn letters or figures from, except with the needle, and the need for lettering and figuring upon them would, therefore, as we have said, only arise when garments or napery became sufficiently common and numerous to need marking. This period had clearly been reached when our earliest dated samplers were made, for, out of dated specimens of the seventeenth century that I have examined, two-thirds carry the alphabet upon them, and the majority have the numerals. It is rare to find later samplers without them, those of the eighteenth century containing assortments of every variety of lettering, Scottish ones especially laying themselves out for elaborately designed and florid alphabets. With the advent of the nineteenth century, however, the sampler began to lose its raison d’être, and quite one-half of those then made omit either the alphabet, or numerals, or both." Marcus B. Huish
       If you would like to make a similar sampler like the one Natalie stitched you can visit the shop at Colonial Williamsburg and order a sampler from their historic collection. These do change from year to year but there is always an assortment of them available.
      Learn more about "The oldest surviving samplers were constructed in the 15th and 16th centuries. Samplers often included the alphabet, figures, motifs, decorative borders and sometimes the name of the person who embroidered it and the date. The word sampler is derived from the Latin exemplum - an example. Expert Joy Jarrett shows us part of her rare collection and explains some of the history behind them."

Additional Sampler Videos:
Click to download the largest available free sampler patten from my blog.
Sampler Pictures, History and Patterns Online:

Monday, December 1, 2014

DIY Shabby Chic Scrap Piecework Baubles

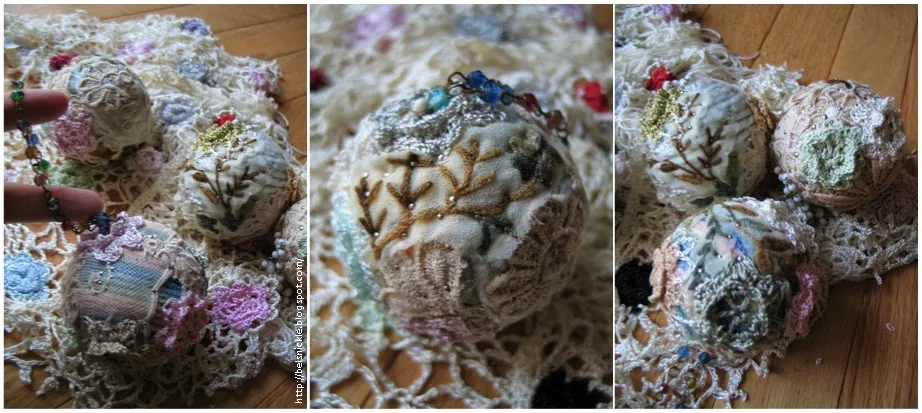
      These Shabby Chic baubles are definitely French Cottage. I pinned this set for my younger girl who happens to adore anything remotely French or Austrian that was produced during the Victorian Era. I wrapped my Styrofoam balls with white glue and variegated, pastel colored yarns. Then I snipped and clipped my way through several vintage shawls, table cloths and dollies yellow and stained with age and wear. Most of these items came to me via an elderly aunt who hadn't the heart to throw them away. I think Hannah will be quite pleased with the end result.
More examples of Shabby Chic Scrap Piecework Baubles. On the far left you can see the beaded chain that I added for hanging the baubles. These piecework baubles have scraps of lace built up on top of yarn covered Styrofoam balls in pastel shades. The color combinations are quite elaborate; not merely shades of white and ivory.
These pieces are fun to work on; it's difficult to know when to stop though.
Details of embroidery and lacework pinned to the Shabby Chic Baubles.
Left, vintage shawls, antique lace and old table linens are the kinds of supplies you will need to acquire for this craft.
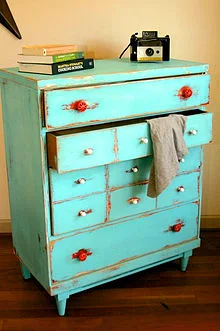
A dresser with a distressed
finish and mismatched
drawer knobs, in
Shabby chic style.
      The "Shabby Chic Style" started in Great Britain and evokes the type of decoration found in large country houses where there are worn and faded old chintz sofas and curtains, old paintwork and unassuming 'good' taste. The end result of shabby chic is to achieve an elegant overall effect, as opposed to the sentimentally cute Pop-Victorian. Recycling old furniture and fabrics is an important aspect of the look and was especially popular with modern Bohemians and artisans that made up a sidelined counter-culture movement during the 1980s when expensive quality decor became very fashionable with the upper middle classes. The original shabby chic interiors were usually considered in themselves works of art.
 More painted and layered Shabby Chic Christmas Baubles

Sunday, November 30, 2014

Reproducing a Vintage Christmas Stocking

A new stocking for baby in blue or pink felt; how sweet!
      This little drawing of  a blue felt sock is of an actual vintage stocking that once belonged to my husband when he was a baby. It is so tattered and worn but somehow it makes it's way onto our Christmas tree every year. It is far too fragile to fill with gifts however. The stocking was made by some loving grandmother in the late 1950s I'm sure. My husband's sister had a similar one in pink I believe. During the 1950s pastel colored ornaments and stockings on shimmering silver tinsel trees were all the rage. I've redrawn and included a pattern similar to this homemade stocking for those of you who would like to reproduce it. 
       A pair of pinking shears was used to cut the felt stocking out originally. Use a pair of ordinary sharp scissors to cut the marked openings on the sides of two identical felt stockings so that you can weave a pale pink ribbon through the center of the stocking. If you are making a pink felt stocking for a girl, use a blue ribbon instead of the pink. The Christmas trees are also cut from white felt and tiny sequins and silver beads are sewn on to give them sparkle. The "Hello" on the bottom of the stocking is made from silver rick-rack. This word is stitched into place with silver thread. This little felt stocking would be a charming addition to any tree for a new baby.
Click to download the largest possible file.

Free stocking with the purchase of Ivory Snow.