Tuesday, November 25, 2014

This Year, Join In Our Affordable Christmas!

"A friend loves at all times, and a brother is born for adversity." Proverbs 17 : 17

      The angels' song, "On Earth Peace, Good Will Toward Men," can also be translated "peace to men of good will." This version is timely, as well as correct for the Greek. For peace can and shall come to men of good will, and it cannot come to men of bad will.
      Who is the man of good will? It is he who has a choice of happiness, of righteousness, of goodness for all men. It is he who desires that men may be blessed, and who tries to make the desire effective. The man of good will does not hate. Neither does he incarnate hate in any weapon offensive or defensive. He is free from revenge, and is full of forgiveness for the penitent, He may not forget injuries, but, what is more important, he is eager to make injury the occasion for helping the offender to overcome the evil within the heart or will out of which the injury sprung. He is capable of mighty indignations, but he does not suffer himself to be conquered by them. Without being impassive, he is calm in the face of wrong, and he is very patient, being more willing to be the victim than the agent of evil. His hatred of all sin and his love for the man who, despite his manhood, is guilty of sin, are alike strong and lasting. He is free from suspicion, he thinketh no evil. He loves his neighbor, not only as himself, but even more, being more eager to do justice then to receive justice.
      The qualities and elements which constitute the man of good will also constitute the commonwealth of good will.
      Such a commonwealth is a commonwealth peace. Willing good to others, others will good also to it. Armaments in such condition have no longer any function to play, and they melt away. The battle flags are furled. Wars cease and rumors of wars are not heard. Men become brothers in mutual service and happiness, as they are brothers in origin and destiny. Charles F. Thwing

      Every year Journey Church, St. Louis gives to Mission St. Louis' Affordable Christmas. What a happy celebration these parents are given through the ever expanding hearts of the volunteers and contributors of this program. Come share God's joy with the children of St. Louis this year by visiting Mission St. Louis here and at their website here.

Every year we learn more and more about our neighbors and friends. We learn how to encourage, prosper and invest in others through kindness, education and joy.

Monday, November 24, 2014

Tutorial for Weaving Christmas Stars With Yarn/String

Left, my ten pointed, woven Christmas star. Right, a traditional eight pointed woven star ornament in reds and greens.
      This Christmas star ornament craft reminds me of a flat Japanese temari. It's origins are, however, most likely in Scandinavian culture. Nordic peoples have been weaving with straw by similar methods for centuries.
       I remember my art teacher showing me how to wrap these same stars when I was a school girl in the 1970s. It is an excellent introduction to simple weaving for older elementary students.
      The process can be made more or less complicated depending upon the age and or experience of the person producing the ornament. I took the idea a step further and invented a star wrap pattern of my own as well. The nice "how to" video below was made by an art teacher for her classroom students. Given the detailed nature of the weaving, I recommend that you watch the video while you craft your own star versions. Although the process is simple, it seems more complex when reading instructions for the method. For this reason alone, I'm going to recommend that you watch the video before attempt to follow any instructions that I include here.

Ms. Gentry made this nice weaving video for her 6th, 7th and 8th grade students.

Supply List For Both Star String Projects:
  • multiple skeins yarn, spools of string and embroidery floss
  • cardboard
  • tacky white glue
  • ruler
  • scissors
  • large sharp embroidery needle (for 2nd star version)
Left, 10 pointed, original star template but I made modifications
to it so that crafters only need to poke a needle through one
 layer. Right, the square template glued together for the eight
 pointed star version.
      Cut out 2 squares of equal size from the cardboard and glue these together, one on top of the other, to form an eight pointed star. (Left)
      If you are making the second star pattern version depicted below, I have provided a pattern for you to print out and trace around below. The second star only requires one piece of cardboard per ornament. You will also need a sharp embroidery needle to poke holes into the cardboard.
      Once your eight pointed cardboard shape is dry, you may proceed to wrap it with the first selection of yarn/string.
      Keep in mind that this weaving project has only a finished front side for young students who have limited experience in sewing or weaving. For every wrap that these students make, they will need to "tie off" their yarn strands on the back of their cardboard templates. However, if you are making these stars and have more experience with a needle, you can make your woven stars two sided. Simply snip, tuck, glue and hide the ends of your wrapped design as you proceed through the steps. I used a large embroidery needle and a bit of tacky white glue to hide my yarn ends as I wrapped.
First wrap step for both woven string stars.
      Above I have included a photo of the first wrap around each of the cardboard star patterns. On the left you can see that the floss is wrapped between each of the ten points on my own version of this craft. On the right I have completed the first wrap for the six pointed star described in the teacher's video above.
Above you can see me weaving a large embroidery needle in and out of the holes made just beneath my star tips.
      After wrapping the 10 point star with blue embroidery floss, I simply repeated the same wrap with yellow. Then I proceeded to make two sets of holes using the sharp tip of my embroidery needle beneath each of the ten points of my star. I wrapped multiple colors of floss in a herringbone stitch through the lowest hole. Then I used a whip stitch to create the feather like tips of the outer points of my star by threading through the upper hole.
The second wrap of the eight pointed star, back and front photographed.
      The second wrapping of the eight pointed star is photographed above. On the left, I show the back side of my work. Note how I have added tacky glue to hold the center crossing ends in place while I work. Also, see in the second wrapping how I have a strand of floss crossing in the back. I will cut this away after I wrap a third and fourth time over the green floss. This will not harm my weave because it is trapped beneath top layers. Keeping the backside clean of crossing strings will make it attractive enough to be a two sided pattern. Just right, above in the photo you can also see traces of tacky glue on the edges of my cardboard template. This glue helps to keep my weaving in place over time and it will also dry transparent.
Left, third wrap. Next, fourth wrap. Middle, fifth wrap. Far Right, sixth wrap.
      The photograph above depicts the 3rd through 6th wrapping sequence for the eight pointed star. After completing these steps, I threaded a finer needle and stitched a cross stitch pattern in green over last top square of my design. I attached a green tassel to the bottom to finish the look.
My tassels for these ornaments were made from embroidery floss. I have also included a simple video below that demonstrates the basic method that I used.
Click to download the largest file, 10 point star shape template.

Friday, November 21, 2014

Victorian Snowball Garland Tutorial

Craft a playful snowball garland for your own Christmas tree. Garlands like the one shown above were hung on Christmas trees in American homes during the Victorian era.

Unravel white cotton balls before wrapping the
egg carton cups.
 Supply List:
  • white cotton balls
  • paper egg cartons
  • white school glue
  • white tacky glue
  • dental floss
  • needle
  • scissors
  • white or translucent beads/bugle beads
  • two hooks
  • translucent glitter
Step-by-Step Instructions:
  1. Collect and cut apart the cup shapes from paper egg cartons. I used 13 for this particular garland but it doesn't really matter how many of these your choose to include. 
  2. Pull out a relatively long piece of dental floss and thread it onto a needle. Make sure that this needle is thin enough to thread floss through your bugle beads. It is important to use dental floss instead of thread for this process. It is by far more resilient.
  3. Thread two or three extra long bugle beads and then one larger white bead before centering a portion of the dental floss across the egg cup. 
  4. The egg cup should have a continuous beading of tacky white glue squeezed around the top edge of cups lip. See the pictures below.
  5. Now gingerly take a second paper egg cup and press it on top of the glued edge. You can add a bit of white cotton batting to help seal this uneven seam around the two egg cups. 
  6. It take only a few seconds for this seam to bond well enough for you to keep working. String another few bugle beads onto the other side of the finished snowball shape and repeat this process until you have the number of egg carton "snowballs" that you want on your garland. See pictures below.
  7. Wrap the remaining ends of the dental floss around a wire hook for each end of the garland. 
  8. Glue approximately half of the wire hook to the inside of each end paper egg cup before gluing together the end snowballs of the garland. Let the garland dry thoroughly.
  9. Unravel white cotton balls before wrapping the egg carton cups.
  10. Spread white school glue with your finger tips over the surface of each cup and wrap cotton batting onto the surface. Repeat the process until you are happy with how the snowball looks.
  11. Coat the last layer with white school glue and sprinkle translucent glitter onto the wet surface. Let the garland dry.
Detailed photographs of the snowball garland craft. Far Right, see how the garland is threaded and assembled at the same time.
The egg cups do not need to fit together perfectly. Making snowballs is not an exacting process. Have fun, it will stick.
Here is the end result. I think this garland looks best on a silver and white tree. It is also an authentic inclusion to a Victorian tree. The garland is so light weight that it may even be hung on a feather tree!

More Snowball Ornaments: 

Tuesday, November 18, 2014

DIY White Feathered Angel Ornament

       I crafted this silver and white angel from a single porcelain head, one pipe cleaner and a fistful of white downy feathers. She would look marvelous on a Victorian tree!
Supply List:
  • white feathers
  • silver beaded thread
  • silver tinsel ruffle
  • silver gems
  • silver wired ribbon
  • silver cross charm
  • small porcelain doll head/breastplate
  • one white chenille stem
  • scissors
  • hot glue gun
  • toothpicks
Step-by-Step Instructions:
  1. Cut the chenille stem in half.
  2. Position the pipe cleaner or chenille stem in the center of the wired ribbon. Then wrap the stem while hot gluing the edges of the ribbon into shape. I did not use the full length of this ribbon to wrap my stem; I only used approximately 1/3 of the ribbon. See picture below.
  3. Now bend the covered stem in half and hot glue this up inside the breastplate of the doll. There should still be plenty of room left there for you to hot glue the feathers and silver tinsel.
  4. Hot glue the silver beaded thread around the outside of the angel's breastplate. (shown below)
  5. Hot glue multiple white feathers stacked on top of one another then hot glue the silver tinsel on top of the feathers.
  6. Hot glue the stack of feathers and tinsel to the inside cavity of the porcelain doll's breastplate just beneath the chenille stem arms.
  7. Bend the arms to the front and hot glue a small charm between the angel's hands; I chose a silver cross.
  8. Finally hot glue a selection of shorter white feathers to her backside; stacking and gluing until you are satisfied with the results. It's that easy!
  9. Hot glue the silver beaded thread on top of her head to make a halo. Use the tip of a toothpick to clean away excess glue while you are working. This will greatly improve the quality of the angel's appearance.
Position the pipe cleaner or chenille stem in the center of the wired ribbon.
 Then wrap the stem while hot gluing the edges of the ribbon into shape.
 I did not use the full length of this ribbon to wrap my stem; I only used
approximately 1/3 of the ribbon.
Left, you can see that I have wrapped and hot glued some tiny silver beads around the outside
 of the breast plate of my angel. Left, here I have hot glued the ribbon wrapped chenille stem
 to the inside shell of my porcelain doll's breast plate.
An angel crafted almost entirely with white feathers.
The angel's backside.
More Angels Made with Feathers:

How to Make a Paper Doily Angel

My version of a paper doily angel includes also a metallic
cupcake liner and accordion shaped wings. I left the face
blank because I thought it fitting for a stylized angelic
countenance.
Supply List:
  • (2) 4inch white paper lace doilies
  • tacky white glue
  • white school glue
  • hot glue gun
  • approx. 1/2 inch spun cotton head (white cotton balls to make)
  • tooth picks
  • metallic thread for hanger/hair
  • 1 metallic cupcake liner
Step-by-Step Instructions:
  1. Cut one paper doily in half.
  2. Shape one of these clippings into a cone and glue it along it's edge overlapping the two sides slightly. Set this cone aside to dry.
  3. Cut from the second clipping two sleeves. You will need to shorten these a bit in order to keep the arms in proportion with the skirt. Shorten the sleeves by cutting off the pointed half of each cutting. Use a toothpick to help you roll and shape the sleeves. Glue the edges together with white tacky glue. Set these tiny cone shaped sleeves aside to dry.
  4. Shape the cotton batting head by breaking a toothpick in half and wrapping a wad of cotton batting around it's tip. Add white school glue as you wrap the head shape. Set this piece aside to dry as well.
  5. Cut out the center of one metallic cupcake liner. Cut 3/4 of the accordion strip for the bottom ruffle of the angel's skirt and save the shorter ruffle for the top half of the angel's dress.
  6. Glue the longer metallic ruffle to the inside of the cone shaped skirt using a hot glue gun.
  7. Hot glue the second shorter ruffle around the top of the cone shaped skirting.
  8. Now use the white tacky glue to add a sleeve to either side of the angel's dress.
  9. Snip off a very small point of the cone dress to insert the cotton batting head.
  10. Use white tacky glue to adhere the head to the top of the cone shaped dress. It also helps to secure the head with glue on the inside of the cone shaped dress.
  11. Now finish the front of the dress by adding another clipping of the lace doily at the angel's collar.
  12. Hot glue a gold metallic loop to the backside of the angel's dress to hang the angel with.
  13. Cut a second doily in half and accordion fold each clipping. 
  14. Hot glue the wings to the backside of the paper doily angel covering the end tip of the metallic hanger.
  15. Wrap neatly a piece of gold twine in a circular fashion around the top of the angel's head using tiny amounts of hot glue as you go.
  16. I did not prefer to add a face to this stylized paper angel but you can add a few simple features if you wish.
Far left, my 4" doilies. Next, you will need two doilies cut in half for the project. Center, see how the sleeve sections are cut. Right, the simple cotton batting head is easy to wrap and shape from a cotton ball, half a toothpick and some white school glue.
Left, half of the paper doily folded into a cone shaped skirt. Center, tiny sleeves for the paper angel's arms. Right, it only takes one metallic cup cake liner to jazz this paper angel up a bit.
This is how the paper doily looks in the round before I have added the wings and hair/halo.
Watch these creative sisters craft a similar version on video. This angel includes a wooden bead for her head and yarn for her hair instead of my cotton batting head with gold twine for my angel's hair. Their version also excludes the foil cupcake liner.

Wrap a Rainbow Colored Wreath for Your Tree

A rainbow colored wreath made from an old-fashioned curtain ring, a turned wooden ornament and yarn.
      This rainbow colored Christmas wreath is so easy to make, even the kids will enjoy putting it together.
      Variegated yarns come in a wide selection of color combinations so, you can customize this ornament to match virtually any color scheme that you choose.
      I chose a bright pinks, yellows, blues and red to match the painted colors of my angelic skier. The wooden figure really dresses up this simple craft.

wooden curtain ring
Supply List:
  • old wooden curtain ring
  • some variegated rainbow yarn
  • white glue
  • hot glue (adult use only)
  • colorful ribbon
  • scissors
  • a tiny wooden figure 
Step-by-Step Directions:
  1. Spread white glue over small portions of the ring's surface as you wrap the variegated yarn around and through the wooden curtain ring. Cover the surface completely. Let the project dry.
  2. An adult can hot glue the figure at the top and/or bottom of the inside of your yarn covered wreath.
  3. Tie a bright bow and how glue this to the top of the curtain ring near the metal hook.
  4. I also added a bit of white glue to the edges of my bow to prevent it from further unraveling over time.
25 More Cute Curtain Ring Christmas Wreaths:
  1. Sparkly curtain ring wreath ornaments by Tuula
  2. Mini wreath tutorial by Katie Brown
  3. Red and white mini Christmas wreaths by Mellywood's Mansion
  4. Divine Twine Christmas Wreath Garland
  5. Curtain Ring Ornaments at the Little Pink Studio
  6. Simple Statement Ornament by Lisa Gutierrez
  7. DIY/ Do it yourself crochet curtain ring ornaments
  8. Homemade Christmas Ornaments made from Curtain Rings
  9. Christmas in September
  10. Curtain Ring Snowman Ornament
  11. Bobble Wheel Ornament Pattern by Made In K-Town
  12. Peppermint Snowflake Ring Ornament by Doni Speigle
  13. Tulle covered curtain ring ornament
  14. Curtain ring covered with buttons, beads, and things
  15. Curtain rings wrapped in yarn by Wee Wonderfuls
  16. Christmas ornament star by Zita de Wilde 
  17. Christmas Ball Ring Ornament by Whiskers and Wool and Rudolph the Red Nose Ring
  18. Star Christmas Ring Ornament by Doni Speigle
  19. Dorset Button Christmas Decoration
  20. Peppermint Candy Ring Ornament
  21. Small Angel Girl 'Jackie'
  22. mini wreaths with sequins and Santas
  23. Mini Monogram Wreaths
  24. A tape dispenser ring Christmas Tree Ornament!
  25. Easy ornamental mobile

Monday, November 17, 2014

DIY Sea Shell Star Ornament

This sea shell ornament is as light as a feather, no really!
Supply List:
  • metallic beads
  • quilter's thread (white)
  • plastic chocolate shell mold
  • sheet of cotton batting (quilt liner)
  • paper clay
  • light weight beading wire
  • star shaped cookie cutter
  • white tacky glue
Step-by-Step Instructions:
  1.  String metallic beads on a thin wire.
  2.  Shape the length of this beaded wire around a star shaped cookie cutter and twist together the joined ends.
  3. Thread your needle with quilter's thread.
  4.  Position your beaded star on top of a sheet of cotton batting used for lining quilts. Now whip stitch together the beaded wire and batting. Follow the entire outline of the beaded star.
  5.  Cut out your cotton star shape and repeat the process again with an additional layer of cotton batting liner. Cut around the second layer again.
  6.  Now whip stitch around the parameter of of the star attaching a random selection of metallic silver and gold beads.
  7.  Open your paper clay and quickly mold shells from your plastic chocolate mold. Let these light weight shell shapes dry.
  8. You can trim the edges of the paper clay if you need to after the shells dry.
  9. Use super tacky glue to attach the paper clay shells to the cotton batting star ornament.
More Textile Sea Shell Ornaments:

Children's Alphabet Block Ornaments

A toy soldier, sailboat and wooden zebra will make an adorable menagerie on my Christmas tree this year!
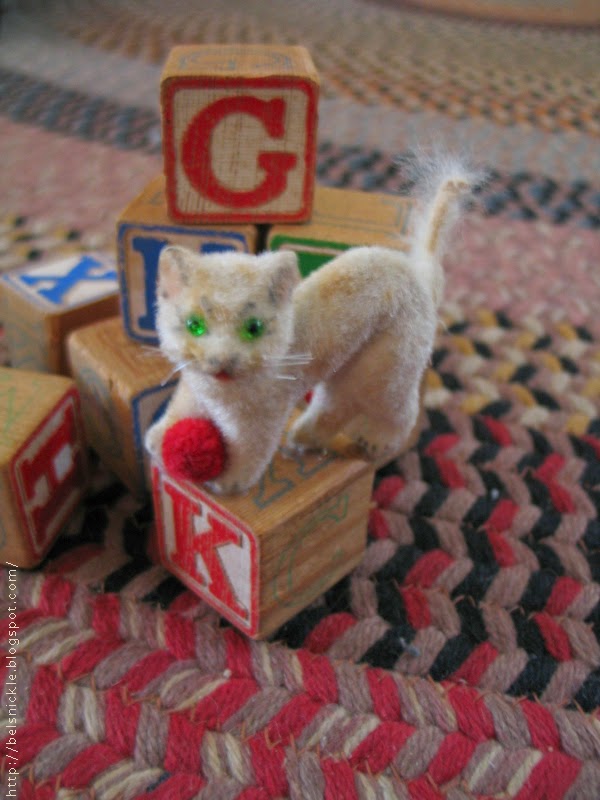
A flocked cat with bright green eyes plays with a
ball on top of the letter K alphabet block.
       There are so many tiny toys that small chubby hands have stuffed into drawers here and there throughout my home. These little creatures are too charming to throw away and yet they are of little to no use to anyone since our children have grown. So, I decided to glue them to a set of children's alphabet blocks I purchased for pennies from a resale shop.
      I used a tacky white glue to adhere the toys to the wooden surfaces. I will wire them on the bottom so that I can attach them to branches differently from hanging ornaments. I like to have several attachment options when it comes to decorating my Christmas trees.

More Alphabet Block Christmas Tree Ornaments:
My husband's little dog chewed on these tiny, wooden German toys when he was young. I hadn't the heart to throw them out.
Here I have attached some odd assortment of miniature china animals to a few of the alphabet blocks.
A small wood turned Santa Claus figure along with a bottle brush tree and wool tree skirt finish off the top of my letter G alphabet block.

Thursday, November 13, 2014

Paper Pulp, Silver Foil Belznickle Ornaments

These papier-mâché ornaments look much older than they
really are.
Supply List:
  • silver foil spray paint
  • acrylic paints: red, green, black, blue, white, flesh tone and brown
  • masking tape
  • paper pulp (Celluclay)
  • newspaper, newsprint
  • permanent ink marker
  • Acrylic varnish
Step-by-Step Instructions:
  1. Crush newsprint into the rough shapes of standing figures. You needn't add any detail as of yet. The details are made with the Celluclay after the newsprint has been covered completely with masking tape.
  2. Mask with tape the entire figure.
  3. Now take a permanent ink pin and roughly mark on your figures where the face, arms, tree and hoods should be. You can also rough in the features of your Belznickle.
  4. Add a wire hook to the backside of each figure with glue and masking tape. Make sure this sticks out a bit after you have added pulp around it.
  5. Mix together the Celluclay with a bit of warm water. If the mixture is too loose add more pulp; if the mixture is too dry add more water.
  6. Add a couple of Tablespoons of glue to the mixture to make it extra tacky.
  7. Shape the features of your Belznickle with the Celluclay. It will stick to the surface of the masking tape quite easily. You will need to let the front side of your Belznickle dry in a warm place for a few days before sculpting on the backside of the figures. As you may have guessed these ornaments are best made during the warmer times of the year.
  8. After the Belznickles have dried, you may spray paint them with silver foil paint. Do this in a well ventilated area, like a garage. Also put the figures inside of a large box while you spray. This will prevent the paint from floating onto the surface of something that you do not intend to cover with silver foil paint.
  9. When these little guys have dried, paint them with acrylic paints. Let them dry again.
  10. Varnish the figures with acrylic varnish and string them with a wire or ribbon for hanging.
This is what Celluclay looks like before and after you mix it with water and a bit of glue.

Wrap a Pipe-Cleaner Wreath Ornament

My finished pipe-cleaner wreath ornament.
Supply List:
  • tiny red pom poms
  • Green chenille stems (pipe cleaners)
  • a hexagonal pattern
  • cardboard
  • scratch paper
  • pencil
  • scissors
  • white glue
  • green ribbon
Step-by-Step Directions:
  1. Cut a hexagon from a then piece of sturdy cardboard. Use a pencil to draw a smaller hexagon on the inside of the shape in the exact center of the cardboard. 
  2. Cut out the smaller interior hexagon carefully.
  3. Now carefully wrap green chenille stems around the cardboard shaped wreath. You may choose to use a little white glue to help the chenille adhere to the cardboard surface as you work.
  4. Let the wreath dry. 
  5. Glue on tiny red pom poms to both sides.
  6. Tie on a lovely green silk ribbon to hang your ornament on the tree.
Hexagonal shaped wreath ornament. Left, paper template. Center, cardboard cut-out. Right, shape wrapped in chenille stems.
More Chenille Stem Wreath Ornaments:

Christmas Penny Peppermint Ornaments

      I used left over scrap wool for this Christmas ornament project. Little girls used to practice their sewing skills making decorative penny rugs during the mid 1800s for their homes. These little "rugs" as they called them were used to protect the surfaces of trunks, tables and dressers from scratches. 
      Traditional penny rugs use only round wool felt clippings for their designs but modern crafters often incorporate these simple shapes with more complicated motifs in their rug designs.
      I made these penny peppermints using two stitches: the straight stitch and a blanket stitch. However, you may use the embroidery stitches that you prefer to make similar versions.

Supply List:
  • red and white threads
  • red and white wool scraps
  • circle template or coins to trace around
  • plastic sandwich bags
  • white glue
  • wire hooks for hanging
  • scissors
  • needle
Step-by-Step Instructions:
  1. Draw circular shapes to layer on top of each other by tracing around objects like coins or use a circle template if you like.
  2. Then alternate red and white penny shaped wool scraps to suggest peppermint candies.
  3. Knot the red thread and work from the back to the front all around the wool felt shapes.Sew using a straight stitch the first four layers of penny shapes together.
  4. Then blanket stitch the fourth layer on top of the fifth using white thread.
  5. Cut two more white felt circles to sandwich between two identical finished penny peppermints to give the wool candies thickness. Blanket stitch around the outside of these layers with red thread.
  6. Cut the sandwich bags into rectangles. Wrap the wool peppermints by twisting either end together just like real peppermint candies are packaged. I wound white thread and added a bit of white glue to the threads in order to hold the plastic in place.
  7. Twist on a wire hook at one end to hang your wool peppermint candies on the tree.
Left, Steps for layering the peppermint penny ornaments. Right the finished result before wrapping these in plastic candy wrappers.
Penny rug sample
      In the 1800s, starting around the time of the Civil War, thrifty homemakers would use scraps of wool or felted wool from old clothing, blankets and hats to create designs for mats or rugs. Using coins as templates, they created circles and each piece was then stitched in blanket stitch fashion. (Thus, the name "penny" rug). Sometimes, the mats or rugs were backed with old burlap bags or feed sacks. Sometimes a penny was stitched inside the mat to make it lie flat.
      Penny rugs are not actual rugs for the floor, but decorative coverings for beds, tables and dressers and mantles. Sometimes they are used as wall hangings or pillows. Most designs include circles and some include images from everyday life such as cats, flowers, birds and shapes such as stars and hearts.
       Penny rugs are made by selecting good quality 100% wool. It must not be too thick. It may be hand-dyed or overdyed to give the piece dimension. The wool is felted then circles are cut from the wool in varying sizes and then stitched together concentrically using complementary colors. The circles are stitched to a wool backing in a pleasing design. When finished the entire piece should have a backing to cover the stitches and to protect it. The backing may be wool, linen or burlap.

More Penny Rug Inspired Christmas Ornaments:

Craft a Cotton Batting, Birch Yule Log Ornament

The front and back views of my Birch Yule Log Christmas ornament.
Birch trees click to read more about this species.
Supply List:
  • two toilet paper rolls
  • scissors
  • white school glue
  • grey dryer lint
  • white cotton balls
  • black thread
  • holly and berry trims
  • tiny mushroom bird
  • masking tape
  • cotton covered wire
Step-by-Step Directions:
  1.  Cut and shape the two toilet paper rolls or any paper tubes to resemble a cut log. I choose to make this birch log shape a little narrower than the original circumference of an average toilet paper roll. I cut my two rolls length wise and curled them tighter before masking them with tape. 
  2. I cut down the size of one of the rolls and added a bit of glue to it's edge, then used masking tape to firmly attach the appendage to one end of my log.
  3. Mask the entire form with tape before gluing on the dryer lint and cotton batting.
  4. Unravel your cotton balls several at a time so that you can work quickly.
  5. Apply white glue to sections of the log's surface as you layer the lint and cotton onto the cardboard tubes. 
  6. Give your Yule log time to dry between applications. I also layered dryer lint on the end interior surfaces of my log. I left parts of the log open however, in order to insert a letter or small money gift into the ornament later.
  7. Once the log looks the way you wish it to, wrap black thread around it randomly to enhance the total realistic look of Birch bark. 
  8. Use the tip of your scissors to poke a hole in either end of your finished log and insert a cotton covered wire to shape a handle for the ornament. 
  9. I also wrapped a few vintage wired holly leaves/berries around this handle.
  10. Glue on a little prefabricated mushroom bird to the top of your Yule log ornament too.
  11. Now add a final thin coat of white glue to the finished piece and you are finished.
A few odd angles of the Yule log.
More About Yule Logs:

Monday, November 10, 2014

Kids Can Cut and Paste A Heart-Shaped Christmas Tree

Left, finished Christmas tree. Center, backside of construction paper tree. See the different colors of tissue paper pasted over each hole. Right, the finished heart-shaped, Christmas tree craft.
      Here is a simple little Christmas craft that any young child may enjoy making on a snowy Winter's day. You will need the following supplies: colored tissue papers, brown and green construction paper, scissors, white glue and round objects to use as stencils. 
      Cut out one very large heart from dark green construction paper. Turn this upside down and glue a large brown square to the backside of the heart leaving a few inches of it showing beneath the heart to represent the tree's trunk. Then cut a slightly smaller heart using a lighter shade of green construction paper and glue this on top of the larger heart shape. Continue cutting and gluing additional hearts in the same fashion. Look above at the photos to see the placement of these heart shapes. 
      Next use round objects or stencils to trace Christmas baubles on top of each section of your construction paper tree. Poke through each circle with the point of a pair of scissors and carefully cut away the circular shapes. Turn your Christmas tree over to it's backside and then paste small squares of tissue to cover each hole entirely. Let the surface dry.
      Now you are ready to hang your decorated, construction paper tree on to any window. The light shining through each circular shape will look like stained glass.

More Tissue Paper Christmas Tree Crafts:

Friday, November 7, 2014

Enhance a Christmas Stocking With Costume Jewelry

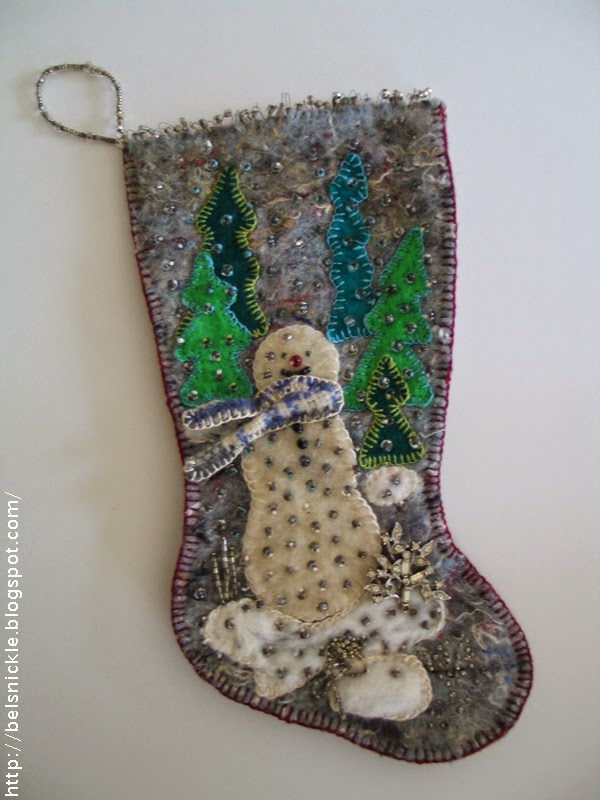
 I used a grey felt, silver and crystal seed beads and a simple
 scene depicting a snowman to create this small stocking that
 now hangs on my youngest child's Christmas tree every year.
      When my mother-in-law passed away many years ago, I was given a few pieces of her costume jewelry. I did not frequently wear rhinestones nor did my little ones at that time, for they were quite young.
      I did, however, have a mind to use these vintage pins in some way so that my children could have some sentimental memory associated with them. So I incorporated this glittery costume jewelry into a couple of beaded Christmas stockings. Then I gifted these to my girls on the Christmas following their grandmother's death.
      Now every year I see these charming little socks hanging on their trees and think of her. She would have liked for her granddaughter's to remember her most at Christmas, for she was quite the Christmas fanatic herself. It was one of the happiest common interests that we shared together before her passing.
      The pins can also be removed for wearing should my daughters care to use them for that purpose some day.
      I will also post photos of my older girl's version as soon as she unpacks her ornaments for the season.
My appliqued snowman is made from white wool and he
sports a wooly scrap scarf as well.
Photographed here is one of the little rhinestone twig pins
that once belonged to my mother-in-law.
I finished the top edge of these stockings with wire and glass
seed beads. The sides of the stockings are finished with
embroidery floss using the blanket stitch.

Sculpt Miniature Cotton Batting Pumpkin Ornaments

      You don't need much money to craft Thanksgiving heirloom treasures from recycled egg cartons and cotton batting. All it takes is a bit of imagination, glue and confidence to shape and paste cotton batting pumpkins like these.  My miniature pumpkin ornaments are also hollow so that I can include a small token, scripture or money gift inside of each of them for my guests and family members.
      From October through November I decorate my Blessing Tree with small delicate ornaments like these little cotton batting pumpkins.  

Left, a finished cotton batting pumpkin. It's hollow so that I may add a message.
Right, Here you can see it hanging from a very delicate branch. Cotton batting
ornaments are very light weight!
Supply List:
  • egg cartons
  • white cotton balls
  • white school glue
  • thin wire
  • scissors
  • pencil
  • acrylic paints: red, orange, yellow, white, gold and green

Step-by-Step Instructions:
  1. Cut dome shapes from paper egg cartons to use in this Thanksgiving Tree craft. You will need two dome shapes per pumpkin.
  2. Glue the two halves together to shape a round pumpkin. Use tacky glue for this process and also add a bit of white cotton around the seam to give it strength. Brush the surface again with white glue and then let these forms dry over night. 
  3. Cut out a shape at the top of each pumpkin with a small pair of very sharp scissors. I cut out a cross shape at the top of my pumpkins.
  4. Now you will need to roll in the palms of your hands some log-like shapes from your cotton batting in order to form the ribs of your pumpkins. Pinch down on either side of the log shapes  to taper off the ribs at both the top and the bottom of the pumpkin. Glue these to the sides of your egg carton shapes. Let them dry.
  5. Now brush on a layer of white glue and let this dry.
  6. Pull of more cotton from your cotton balls and gently add this with another coat of glue to the surface of your pumpkin in order to shape a final layer of the batting. Let this dry.
  7. Add a final coat of white glue and stick a pencil into the bottom half of your pumpkin. Pushing and twisting gently in order to give the pumpkin a more organic shape. 
  8. Glue a whole clove into this indention and let the pumpkin dry. 
  9. Now you may paint the surface of your pumpkin using gold, orange and red acrylic paints. I mix these together roughly while applying paint to the surface of my ornament. Paint the crevices with darker shades and the ribs with lighter ones.
  10. Take your sharp scissor points and make two small hole on either side of the opening at the top of the pumpkin.
  11. Insert a cotton coated wire and shape a handle. Paint this handle green to mimic a "vine."
  12. I will insert a scripture in each of my hollow pumpkins for every guest I treat this year. I've listed a few popular blessing scriptures below.
Egg cartons make excellent craft material.
Left, I've cut out the cup shapes of an egg carton in order to shape my miniature pumpkins. Middle, Glue two of the egg cups together to form a hollow pumpkin shell. Cut a hole at the top so that you can insert a little treat, gift or message inside the pumpkin shell. Right, Glue a thin layer of cotton batting around the seam to conceal it and make your ornament stronger.
In these photos you can see how I shaped the cotton batting to form an organic looking pumpkin. A small clove is glued to the bottom of each miniature shell where the blossom end would normally be on a real pumpkin.
Here I have added handles to each pumpkin so that these may be hung from my Blessing Tree.
I used acrylic paints to color these old fashioned, hand sculpted ornaments.
Just a Few Blessing Scriptures to Include Inside The Pumpkin Ornaments: NIV versions
  • Do not repay evil with evil or insult with insult. On the contrary, repay evil with blessing, because to this you were called so that you may inherit a blessing. 1 Peter 3:9
  • Blessed are the peacemakers, for they will be called children of God. Matthew 5:9
  • Whoever gives heed to instruction prospers, and blessed is the one who trusts in the Lord. Proverbs: 16:20
  • A good man brings good things out of the good stored up in his heart, and an evil man brings evil things out of the evil stored up in his heart. For the mouth speaks what the heart is full of. Luke 6:45
  • Blessed are those who hunger and thirst for righteousness, for they will be filled. Matthew 5:6
  • But to you who are listening I say: Love your enemies, do good to those who hate you, bless those who curse you, pray for those who mistreat you. Luke 6:27-28
  • Taste and see that the Lord is good; blessed is the one who takes refuge in him. Psalms 34:8
  • Worship the Lord your God, and his blessing will be on your food and water. I will take away sickness from among you. Exodus 23:25
More Pumpkin Crafts for Your Thanksgiving Table: