Friday, August 1, 2014

DIY Miniature Toothpick Nativity

      Although you do not need a great deal of experience to craft a Nativity ornament like this, you will need an abundance of time. The stable alone will take several hours to construct and it must be allowed plenty of time to dry. It is an ideal craft project for fourth and fifth graders and the amount of time it takes to complete is dictated by the size of the box you select to use as your stable. 

Supply List:
  • stalks of wheat
  • small cardboard box, about the size of a soap box
  • both flat sided toothpicks and round toothpicks, natural, unstained colors
  • decorative printed papers (very small designs, plain or striped)
  • flesh colored acrylic paints
  • cotton balls
  • wire for hanger and shepherd's staffs
  • white glue
  • tacky glue
  • wood glue
  • small sized cupcake foil liner (gold)
Step-by-Step Instructions For The Stable:
  1. Choose a small box for a stable. I chose a soap box.
  2. Reinforce this box with masking tape and glue. Tape down all the flaps.
  3. Cut away one whole side of the box. 
  4. I cut extra cardboard from another recycled cereal box to bend a narrow strip into the A shaped roof.
  5. I left the loft space above my stable open and also cut an additional rectangular window at the backside of this cardboard stable. (pictured below)
  6. Cover every surface of the box with masking tape and tape on a wire hook to the roof top for hanging as well.
  7. Now you are ready to start gluing flat sided toothpicks over the surface of your small cardboard stable. I cut my toothpicks with scissors to fit the sides of the stable in advance. This can be time consuming if you do not cut the toothpicks in groups of six or seven at once. Flat sided tooth picks are very fragile so this method of cutting is easier than you may think. 
  8. Glue the toothpicks directly onto the masked surface with Elmer's wood glue. This type of glue will allow you to work quickly. Decide in advance which direction your tooth picks should be glued. 
  9. I chose to glue heads of wheat to the surface of my loft floor and also to trim the outside of the box with as well.
  10. I bent a singular wheat grass stem into a star shape and twisted thin pieces of cotton around the star points to hold it into place. I then glued the star to my ornaments hook.
  11. Let your stable dry completely over night. Now you are ready to fashion the Nativity characters from the round-sided toothpicks.
Above is the little soap box that I covered with masking tape for this Nativity craft.
      The second half of this project involves the crafting of the Nativity figures. I chose to focus upon the shepherds, angel, and Holy Family from the book of Luke, chapter 2. Below I have shown photos of the process of gluing a toothpick angel. However, all of the tiny figures in my Nativity are made by the same process.

Adjust this little paper pattern to fit your own toothpick figures.
Step-by-Step Instructions For The Toothpick Figures:
  1. Depending upon the size of your stable, you may need to trim away a bit of the height of your figures. When I made my figure of Mary, I cut away half of the toothpick's length so that she would look as though she were knelling beside the manger of Jesus. I used only one small end of a toothpick to craft the baby with. (shown below)
  2. Hold two round toothpicks together between your finger tips. Put a bit of glue on top of the spiked tips and wrap a fine bit of cotton batting around the two toothpicks to shape all of the figure's heads. 
  3. Add also a little glue down the length of the toothpicks where they share a common side. Set these little shapes aside to dry.
  4. I then painted my figures heads a tannish color with acrylic paints and let them dry again.
  5. As you can see from the photographs below, the clothing on the tiny angel was made by: cutting out tiny templates, tracing around these on top of my selected decorative paper and then cutting these to fit my toothpick figure. 
  6. First wrap the paper around the neck of each figure to measure it's proper length. Trim off enough of your cone shaped cloak so that the bottom edge of the figure's gown is level to the stable's floor. In the case of my angel, I clipped off enough paper to expose her feet. She was to be floating above the stall and I wanted to expose the toothpick stubs for preference sake.
  7. Next you will use one round-sided toothpick to shape the adult figure's arms. Twist a cone shaped sleeve to fit this single toothpick. Add a bit of glue between the paper sleeve and the single tooth pick as you twist it into place. Clip off the toothpick end to finish the arm. Make two and glue these to opposite sides of your figures.
  8. I dabbed a bit of glue to the top of my angel's head to add a cotton batting halo. 
  9. For my shepherds, I dabbed glue to the top and backsides of their heads and also underneath their chins. Then I wrapped small pieces of cotton batting around their heads to imitate the head covering most commonly worn by Bible characters often portrayed in the Nativity. The baby Jesus was wrapped entirely with cotton batting to imply swaddling.
  10. Then I bent a couple of wire stems, covered in cotton batting, into shepherd's crooks.
  11. The angel figure was given an additional trim. I shaped a small, gold cupcake liner into a halo and/or wings and glued this piece to her back before gluing her onto my stable vignette.
Left, the tiny toothpick figures are compared here to the size of a penny. Center, the cloak of my toothpick angel is shaped like a cone. Right, press the paper cloak firmly at the neck while the tacky glue dries.
Left, twist the cone shaped sleeve around just one toothpick to create the angel's arms. Center, you can see the blunt end of the rounded toothpick underneath the sleeve. Right, leave a tiny amount of the toothpick tip showing so that your angel will look as though she has tiny hands.
Left, see a detailed photo of how my toothpick angel looks from beneath the skirt. It helps to stuff a very tiny amount of cotton under the skirt with the tip of your scissors and a small amount of glue in order to help the cone retain it's shape. Center, my toothpick angel is finished! Right, a detailed photo of the angel from the backside.
Details from my toothpick Nativity Vignette. Left, the star bent from a single wheat grass stem. Center, the Nativity figures: Mary, Joseph, the baby Jesus, two shepherds and an angel bringing glad tidings of great joy. The floor of the Nativity is also covered with wheat grains. These figures are glued in place. Right, see how all of the sides are covered with flat sided toothpicks.
Left, the angel is suspended above the peaceful scene watching over the tiny figure of baby Jesus. The baby is wrapped in cotton batting and so are the heads of all the adults watching over him. Right, I switched the direction of the toothpicks on the backside of my stable to imply a "doorway."
      There are some amazing toothpick structures built by people across the internet. My stable is quite humble by comparison to be sure!
More Toothpick Crafts:

Thursday, July 31, 2014

Craft Gourd Snowman Ornaments

Children always enjoy crafting these gourd snowmen during the holidays.
      You will need to plan ahead for this particular ornament craft. It requires that gourds be dried several months in advance. Drying gourds is not an exact science. There are always a few that don't make it to an acceptable stage and mold must be roughly sanded off before applying paint.

Supply List:
  • baby socks for the snowman's stocking hat
  • plaid paper
  • black seed beads
  • orange oven-dry clay
  • paper face mask (to prevent the inhaling of mold spores)
  • white school glue
  • white tacky glue
  • either white acrylic paints or Gesso
  • scissors
  • dried gourds
  • wire for hanging the ornament
  • translucent glitter 
Step-by-Step Instructions:
  1. You will need to prepare your gourds by hanging them in a sunny dry spot. They will get a little moldy, however.
  2. Where a paper mask while you remove most of the mold with a fine grade sandpaper. 
  3. Then apply either a bit of Gesso or white acrylic paint with a sponge. I let some of the original patina of my gourds show through because I prefer the look.
  4. Now fold and trim a few baby socks for your gourds stocking caps. Glue these on top of the gourds with tacky white glue.
  5. Cut a few strips of plaid scrapbook paper and snip the ends to create a fringed edge. Glue these scarfs directly onto the surface of the gourds.
  6. Use tiny, black seed beads for each snowman's eyes and mouth.
  7. Roll out a carrot shaped nose from orange oven-fire clay. Bake according to the package's instructions. Glue the carrot nose to the center of each snowman's face.
  8. Brush a thin wash of white glue onto the gourds and sprinkle a bit of translucent glitter wherever you wish.
  9. Hook a wire hanger through the stocking hat for hanging.
This is just part 1. follow the links at youtube to view additional video.

See More Gourd Crafts:
Make more little snowmen for Christmas:
  1. Multiple snowman crafts from Kid Activities
  2. DIY duct tape/bottle cap snowmen (video)
  3. Simple shapes snowman paper bag puppet
  4. Frosty collection of snowman crafts
  5. Winter snowman crafts at DLTK
  6. Toilet-Paper Tube Snowman Craft
  7. How to make a snowman hair clippie
  8. How to make a balloon snowman (video)

Hand Color Laser-Cut Balsa Wood Ornaments


Coloring intricate lazor-cut Christmas ornaments is a fun family craft.

       I purchased these laser cut, wooden ornaments from a local hobby shop and colored them with permanent ink pens. You can find some truely intricate designs to decorate for just a few pennies.
 laser-cutting Christmas snowflakes

Pierrot Cotton Batting Figure Ornament

Left, Pierrot porcelain heads found in a resale shop.
Right, a detailed photo of my finished cotton batting version of Pierrot.
      I found these little china doll parts of Pierrot in a resale shop not far from my house. I thought that it would be a good exercise to "dress" them in cotton batting instead of the predictable cloth body and costume. 
      Pierrot is a stock character of pantomime and Commedia dell'Arte whose origins are in the late seventeenth-century Italian troupe of players performing in Paris and known as the Comédie-Italienne; the name is a hypocorism of Pierre (Peter), via the suffix -ot. His character in postmodern popular culture—in poetry, fiction, the visual arts, as well as works for the stage, screen, and concert hall—is that of the sad clown, pining for love of Columbine, who usually breaks his heart and leaves him for Harlequin. Read more . . .

The chenille stem body of my
 Pierrot character.
Supply List:
  • Pierrot China Heads
  • chenille stems
  • cotton balls
  • tacky glue
  • white school glue
  • silver cupcake liners
  • red pom-poms
  • black acrylic paint
  • wire for hanging
  • recycled egg carton parts for his hat
  • gold thread
  • neddle
Step-by-Step Instructions:
  1.  Twist together several chenille stems to create two arms, a short torso, a neck and two legs for your pantomime figure (pictured right)
  2. Use very tacky glue to paste the neck of this chenille stem body inside the hollow porcelain head. Let it dry over night.
  3. Unravel several cotton balls so that the cotton resembles thin strips of batting to work with. I used many cotton balls to layer with white glue in order to dress these dolls. 
  4. First I twist the cotton with a bit of glue onto the tips of my wire body's hands and feet. 
  5. Then I proceed to wrap the entire figure with layers of cotton batting and white glue, always ending with a generous layer of glue so that the figure must dry over night after several applications.
  6. Pierrot wears a traditional long skirted shirt over his white pantaloons. His black skull cap and large pleated collar are unmistakeable costume features. I switched out the traditional white or black pom-poms with red in order to add a little color. However, Pierrot is most usually dressed in only black and white.
  7. After the batting has dried completely, paint the dolls gloves and shoes black. 
  8. Glue on a silver cupcake liner to serve as a dramatic collar.
  9. I covered some small recycled egg carton parts that reminded me of hats with cotton batting and glue. Then I took a needle and punched a tiny hole on opposite sides of the hat in order to string a thin gold twine through. I hung this paper mache hat around my Pierrot's neck.
  10. At last I wrapped an long piece of wire with cotton batting and white glue before twisting it around my clown's waist. I will attach the small doll to tree branches with this wire instead of hanging the Pierrot from a traditional hook. This small doll is just a little too heavy to attach it otherwise.
My three completed cotton batting figures of the popular pantomime character, Pierrot. Dolls are often too heavy to hang from fragile branches via a hook and so they must be attached by alternative means. I frequently twist a wire around the torso of a small doll in order to hang it securely to a tree branch.
I gave this Pierrot figure a hat similar to one painted by Paul Cezanne.

Wednesday, July 30, 2014

Print and Assemble Old-Fashioned Ice Skates

Four different variations of paper ice skate ornaments; red, brown, green and blue. You can make these look different by trimming them with all kinds of lace, fur, ribbon flowers and three dimensional stickers.
Use this patter for a cardboard reinforcement
on the inside of the ornament.
      These paper Victorian ice skate ornaments would look great on a Christmas tree or on gift packages as either extra decorative elements or tags.
      They are fun to embellish with all kinds of small recycled sewing notions and scrapbook stickers too!

Supply List:
  • ice skate graphics, front and back sides
  • recycle cardboard 
  • ribbon or wire for hanging
  • printer
  • sharp scissors
  • white school glue
  • silver papers for the skate blades or silver glitter
  • a few Christmas trims for pasting across the top of the skates: ribbons, flowers, stickers etc...
  • white, fuzzy fur for cuffs or cotton batting
Step-by-Step Instructions:
  1. Download, print, and cut out your choice of ice skate graphics.
  2. Cut an additional ice skate with blades from cardboard. (pattern on the right, above) You will need to cut this slightly smaller than the graphic so that it will not show. Sandwich this cardboard ice skate between the front and back graphic with a bit of white glue.
  3. Next, you will need to add glue to both the front and back sides of your ice skate ornament and pour a bit of glitter into the glue to make the skate part of the boot silver. Let each side dry completely before moving on to the next step.
  4. Glue across the top of your Victorian ice skate a bit of cotton batting or fur trim along with additional wire or ribbon in order to hang the ornament. 
  5. Glue also a fancy ribbon flower, 3D sticker or lace for additional flourish across the cuff.
Left, printed graphics of Victorian boots. Center, the graphics have both a front and back side. Glue the cardboard cut out including the ice skate blade between these front and back graphics. Right, finished ornaments.
Blue boot graphic for Victorian ice skate ornament
 Green boot graphic for Victorian ice skate ornament.
Red boot graphic for Victorian ice skate ornament.
Brown boot graphic for Victorian ice skate ornament.
More Lovely Ice Skate Ornament Crafts:

Tuesday, July 29, 2014

Make a Jingle Bell Snowman Ornament

Finished Jingle Bell Snowman
 Supply List:
  • jingle bells 
  • white paint
  • black permanent ink marker (fine tip)
  • red chenille stem
  • two red pom-poms
  • orange toothpick
  • soft paint brush 
  • sandpaper
  • white glue
  • wire for hanger and for stringing together the jingle bells (approx. 2 ft.)
  • white twine or cotton batting for wrapping the wire between the bells.
Step-by-Step Directions:
  1. Sand the surfaces of the silver jingle bells so that the white acrylic paint may adhere to the smooth surfaces properly.
  2. String a wire around the first jingle bell hook and then pass it up through the bottom of the next. Feed the wire through the inside of the bell's hook, wrap it around the hook and then feed it up through the bottom of the third bell through the next hook from the inside. Now wrap the wire around the top third bell's outside hook firmly. The bells should look stacked.
  3. Wrap twine or a bit of cotton dipped in white glue around the wires sandwiched between the stacked bells. This will keep them lined up better and prevent small fingers from getting nicked by the wire ends.
  4. Now paint the jingle bells white with a soft brush and hang the snowman from a hook until it is finished drying.
  5. Wrap and cut a bit of the chenille stem to glue onto the top head of the snowman. This will be his "earmuffs." Attach on either end a red pom-pom.
  6. Glue on a clipping from an orange toothpick for his nose.
  7. Draw on black dots for coal colored eyes and buttons.
These bells have been both sanded and strung together with wire.
The sanding helps the white paint to adhere to the otherwise slick surface.

More Jingle Bell Snowmen:

Craft a Pear From Spun Cotton Batting

My hand sculpted, "spun" (wrapped) cotton pear. Most cotton batting fruits are in fact spun in factories with machines. You can see how this is done in the video posted here. It is very rare to find antique spun cotton fruit that is actually handmade.
      My pear picture above, measures approximately four inches from top to bottom. However, I suggest that inexperienced students craft one of these much smaller than my own. The smaller you make your fruit the less difficult it will be to paint and sculpt it realistically. This is because covering smaller surface areas with cotton and glue is by far a less lumpy affair. Lumps and imperfections can lend a certain realistic charm to your ornament. But I can imagine that this process will drive perfectionists crazy before they are satisfied with the results.

Supply List:
  • cotton balls
  • newsprint
  • masking tape
  • German glass glitter (optional)
  • acrylic paints: yellow, gold, orange, white, green and brown
  • white school glue
  • tacky glue
  • thin wire
  • small soft paint brush for applying the acrylic paints
  • light mixture of cornstarch and water (1 cup water, 1 teaspoon of cornstarch, mixed)
  • acrylic matte gel medium
Step-by-Step Directions:
  1. Crush newsprint into a pear shape and cover this in masking tape. (pictured below)
  2. Unravel many cotton balls so that these resemble fine, thin layers of batting. 
  3. Layer this cotton with white glue onto the surface of your masked pear shape. This will take much time and patience. You will do many layers, perhaps five or six until the pear is wrapped well. Always end with a coat of glue. 
  4. Use your fingers to lightly smear the glue over the surface of the cotton. I have found that your fingers are the best tools when working with these materials instead of using brushes for the glue.
  5. Dipping your cotton or fingers into a light mixture of water and cornstarch may help the process a bit. This mixture helps to smooth out lumps while you work. I only use it when I am working surfaces that measure over three inches across.
  6. Set aside the pear to dry between layers. (Note, this may take several days)
  7. Twist a couple of leaf shapes with wire. (pictured below)
  8. Now cover the inside of the leaf shapes with masking tape. Snip off ends that you do not wrap around the edges. 
  9. Cover the leaves with a layer of cotton and glue.
  10. Shape the veins of the leaves by rolling out long thin pieces of cotton with glue in the palms of your hands. Use tacky glue to paste these to the surface of your leaves. Cover and coat with a final layer of cotton and glue.
  11. Twist stems and vines after covering thin wire with cotton and glue, and allow these to dry.
  12. Dry your pear and it's leaves for several days before painting the ornament pieces with acrylic paints.
  13. Use a hook and a wire to hang the pear while painting it.
  14. I brushed the majority of my pear with yellows and golds. Then I worked in a bit of lime green and orange at either end of the pear. 
  15. Paint the stem brown.
  16. Then I painted the leaves dark green and the veins of the leaves lighter green. Let the pear dry over night.
  17. Cover the leaves and stem with an acrylic, matte gel medium.
  18. Brush on a last, thick layer of white glue and roll the pear into a dish of glass beads. Hang the pear to dry over night.
  19. Hook on the pear leaves and add a cotton covered wire to finish the ornament.
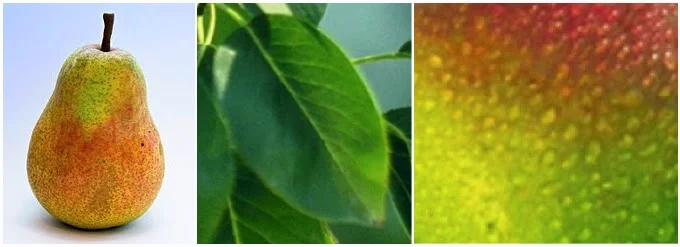
Left a pear often has many colors in the surface of it's skin. It is not merely yellow. Center, look carefully at the shapes of your pears leaves. Do a little research before beginning this project. You may even wish to purchase a few pears from your local market to work from. Right, the water beading on the surface of this pear may be duplicated with German glass glitter.
Pictured above are two close up photos of my pear shape after I have masked the surface completely. (Step 1.)
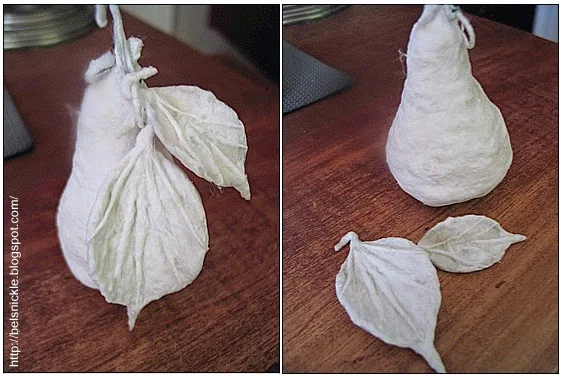
Left, twist wire into pear leaf shapes. Center, cover these shapes with a thin layer of masking tape. Right, now cover the leaf shapes with cotton and glue. Add the vein details using rolled fine pieces of cotton and glue. Apply these veins with tacky glue. (Steps 7. and 8.)
Above is how my pear looked before painting it with acrylics. (I removed the leaves before painting the pear, then reattached them permanently after the final layer of German glass glitter had dried. )
Craft More Pears For The Christmas Tree: