Sunday, June 22, 2014

7 Basic Methods for Crafting With Papier-Mâché

This hollow shape was made by layering
newsprint with wheat paste and then an
additional layer of CelluClay was
then layered on top to add strength to
the project. 
There are many different methods used in order to transform paper into small decorative ornaments. I have listed here the seven that I will include among the Christmas ornament projects for this blog.

1. Covering balloons with newsprint and wheat paste. This is one of the oldest methods for creating hollow papier-mâché ornaments. It is a method best suited to the crafting of very large, light weight ornaments. However, it is a bit fussy. Many school children learn to craft with papier-mâché using this method. Whenever I am speaking with students about papier-mâché, this is the method of working that they believe I am referring to. However, I rarely use this type of process. 

Examples of Christmas Ornaments Made from different combinations of newsprint strips and wheat paste:
2. Mass produce detailed mâché ornaments by first casting old-fashioned Plaster of Paris molds of your own clay sculptures. Pour a liquid papier mache mixture/ casting compound into prepared molds to duplicate your original clay sculpted ornaments. 
3. Mix and layer paper pulp directly to the surface of styrofoam or cardboard parts, skipping the old newsprint and wheat paste steps altogether.
4. Crush and mask paper sculpture forms and then layer paper pulps directly onto these light weight armatures. This is a very old process using newer products. It is my preferred method for working with papier-mâché and I will continue to post many ornament tutorials using this specific method.
These paper armatures are ready to have layers of paper pulp smoothed out over them. Far left, German lovebirds,. Center, Early American Lion. Right, Apple.
These are different types of stoneware molds that can be used to cast papier-mâché ornament.
5. Cast papier-mâché ornaments from cookie molds. After perfecting this method, I proceeded to acquire a large collection of cookie molds for teaching classes in crafting Christmas ornaments to adults.

Examples of Christmas Ornaments made from casting paper into molds, cookie cutters and also from sculpting with paper clay :
Prefabricated papier-mâché Christmas ornaments perfect for
decoupage techniques.
6. Decoupage with paper or fabric over a mass produced papier-mâché forms. By means of layering fancy papers and Mod Podge onto surfaces already cast in a factory, most people can craft some relatively sophisticated Christmas ornaments. 

7. Sculpt with papier-mâché, paper clay.

Friday, June 20, 2014

A Tutorial for a Hornet's Nest Ornament

I photographed my hornet's nest ornament outside in the crab apple tree. I think it looks pretty convincing. The next time I see it, it will be hanging on a pine tree instead.
A European hornet or a "bell hornet" nest
under construction. To read more about 
this type of hornet go here.
       Many years ago when my husband and I were first dating, we took a fall walk in the woods and came upon a large, abandoned hornets' nest. We were so excited to find one and in such marvelous condition too. My husband pulled down the branch the nest was hanging from and plucked off the nest to take home to his mother. She was absolutely over-joyed to see it!
      This is the memory I thought of when I found a large, dead hornet on my front walk last year. It was perfectly preserved and I believe that it may have been a queen because of it's size. I carefully removed it and tucked it into a drawer for later use. In our family, ornaments are frequently given to remind each other of a particular event. The event doesn't need to seem special to anyone other than ourselves. Today, I made a hornets' nest from paper, dryer lint, a twig and the hornet that I collected last year. I think Doug will enjoy the memory that it brings to mind.

Supply List:
  • old egg carton
  • twig
  • dryer lint (or cotton batting dyed grey)
  • a hornet or two (You can purchase fake ones from a silk flower supply.)
  • A bronze colored Sharpie
  • white school glue and super tacky glue
  • masking tape
  • newsprint, any kind
  • thin wire
Step-by-Step Instructions:
  1. Select a strong twig from outdoors to "hang" your hornets' nest from.
  2. Twist a piece of newsprint and a couple of thin wires around the center of the twig. Leave a good quantity of the paper to dangle below the twig. Set this aside.
  3. Cut up an old egg carton and tape a few pieced together to serve as the walls of the hornet's nest.
  4. glue and tape the tail ends of newsprint inside the egg cup and then wrap the whole form together as one shape in masking tape.
  5. Lay out flat a thin sheet of dryer lint. Coat half of the "hive" with white school glue and lay the lint sheet, randomly gathered onto the tacky surface. Repeat the same for the remaining backside of the hive.
  6. Now glue into the layered lint, shredded egg carton scraps. Let the hive dry. This may take a day. I didn't cover the entire surface of my hive with paper shreds; I wanted to expose some of the nice textures and colors of the dryer lint.
  7. Use a bronze colored Sharpie to draw horizontal lines on top of the shredded egg carton scraps.
  8. Glue your wasps down firmly anywhere about the hive with tacky glue. 
  9. Fill in cracks where the insects meet the hive so that these will attach well.
  10. Coat the finished ornament with a watery glue layer.
Steps 1 - 4. The inside of the hornet's nest will be covered entirely with masking tape when completed.
After you have completed step 5., your hornets' nest should look something like the one pictured above.
Here you can see how I have added shredded egg carton to my hive in order to make it look more realistic. I also use a tacky white glue to attach my real hornet to the hive before drawing stripes onto the paper pieces with the bronze colored Sharpie. I found this hornet on the front walkway of my home, a dead queen bell hornet perfectly preserved, very curious.
Here is my completed hornet's nest. It looks so lifelike. Perhaps my husband will be startled when he unwraps his gift? I hope he doesn't throw it!
     "Watch a European hornet nest with the founding queen in the center of the video. Notice the size difference from the working hornets"

    A Craft Tutorial for A Cotton Batting Squirrel Ornament

    This little squirrel ornament is made with a combination of cotton batting and dryer lint.
    Top, dryer lint and cotton balls.
    Center, cotton unrolled is easy
    to "spin" around pasty surfaces.
    Bottom, thinning out cotton or
    lint before applying it to surfaces
    will help you to craft a smoother
    surface, free from odd lumpy
     bits.

    Supply List:
    • newpaper, or newsprint, or old telephone book pages
    • masking tape
    • white school glue and tacky white glue
    • tiny beads for eyes
    • dryer lint (greyish or whatever)
    • white cotton balls
    • acorn cap (real one)
    • a bit of fur or natural looking feathers
    Step-by-step Instructions:
    1.  Begin this little squirrel ornament by crushing newsprint into three basic shapes. These are pictured below alongside a penny. Mask each one with tape as you go so that the pieces will hold their shape.
    2. Then tape the three shapes together the way that I have shown them below.
    3. Now you are ready to begin to glue and layer tiny bits of cotton onto the squirrel body. I used dryer lint for the grey body and white cotton for the belly, cheeks, and tiny tufts of fur inside my critter's ears. You will find that it is necessary to let sections of your creature's body dry before advanced to another portion or side of the ornament. Take your time and set the piece to dry in a warm place as you proceed. Making cotton batting ornaments is not a fast process.
    4. To make the acorn, I collected a small acorn cap from my back yard and rolled a piece of dryer lint between my fingers with a bit of white glue. Then I attached my little lint ball to the inside of the acorn cap with tacky glue.
    5. Eventually, I snipped the arms of my squirrel into shorter stubs. You will find that it is often necessary to make adjustments to your masked, paper crushed armature as you proceed through a method. 
    6. Also, as you proceed to glue down the lint or cotton with the tips of your fingers, you will discover a variety of tricks: the thinner the layers and the more of them create smoother surfaces, it's easy to build up areas to create muscle mass, using tools like tweezers, needles, toothpicks and a magnifying glass come in handy! Clamping is also useful at different junctures of the process. I only used my hands to make this ornament but, I have also been crafting these kinds of projects for many years. You will improve as well if you persist!
    7. After covering my squirrel's body with the grey lint, I then added a nice padding of white cotton for his belly area, cheeks and the tiny tufts inside his ears.
    8. Then I also pricked two holes with the sharp end of a pair of scissors where I wanted to add glass beads for eyes.
    9. I glued a wire hook to his back leaving a little to show as I applied very tacky glue to a swatch of fur for his great swishy tail.
          Crushing paper armatures is an art in and of itself, so to speak. Once you get the hang of it; you should be able to crush these rapidly and with a great deal more certainty. Stick with it and you'll soon be on your way to discovering "how" to accomplish many old crafts on your own.
          As you begin to add layers of watery glue and lint/cotton, the surfaces of you cotton batting ornaments will improve greatly. I chose not to paint the surface of my squirrel's fur. This is because I loved the natural modeling of grey shades in the lint. However, if you want to paint your squirrel, you should end your process with a last layer of white glue. Use your fingers to apply the glue and cotton; brushes will only serve to get in the way. It will take time for your touch to become just gentle enough to cut down on the amounts of layers through the application process. Give yourself room to grow in confidence. Persistence pays off when learning to craft with cotton batting.
          Some close-up photos of my cotton batting ornament. Remember to tuck in edges as you go using the tip of a needle/toothpick. This makes your work look professional and clean.
    More Articles About Cotton Batting Ornaments:

    Wednesday, June 18, 2014

    Holiday Lighting Magic

    Daytime appearance of this display is improved
     by using evergreen roping, concealed wiring, to
    outline the home.
     
    Here are some original suggestions for attractive home Christmas displays. by Earle Gage

         This holiday season, as never before, homes and communities throughout the land will burst forth into magical greeting, as home craftsmen fabricate and illuminate new and brilliant displays. The festive spirit of the season and the gay atmosphere of gala events will live in sparkling, colorful lights.
          Holiday lighting presents unlimited opportunities for the home craftsman to exercise his imagination and ingenuity. Standard wired materials and lamps lend themselves to many combinations to give new designs and arrangements of displays, both inside and outside homes.


    Left, Homes with light trim are made distinctive at night through the holidays by simple floodlighting. One floodlight concealed behind evergreen in foreground does the trick. Right, this multiplane "Merry Christmas" design with the Holy Family makes a colorful and impressive greeting for outdoor use. It may be made any desired size.

    Details of displays shown above. Numbers. correspond to the numbers given on the photographs.

    Left, (1.) Luminous multiplane candle used for entrance display. Right, (2.) Simple decorative treatment of porch and gables. Arcs of close-set lamps attached to wire frames are interspersed with more widely spaced lamps here. The zeppelin, suspended on cable is floodlighted from a nearby tree. No details for zeppelin are given as it is a specialized and somewhat complicated display.

    Left, (3.) Two multiplane flat trees made of composition board are used effectively on either side of the mantel, low voltage lamps are concealed between the planes. Eight candles in the center are operated in series on a single circuit. Right, (4.) The light- colored wall (stucco) provides excellent background for silhouette  displays, which are easily made and installed, using a single cutout of wallboard.

    (5.) An unusual cutout decorative scheme
    for a doorway of a private home.
     The snow is real.
           Many useful materials, such as composition board, metal foils, metal sheets, translucent fabrics, plastic sheets and shapes, natural and artificial materials, plexiglass, color mediums and floodlights may be used to create modest or elaborate displays.
          One of the easiest and most effective greetings is the glowing cutout of “Merry Christmas” or “Yuletide Greetings,” cut from wallboard, the openings covered with translucent fabric which is illuminated from behind by a row of 25-watt lamps mounted on wooden or metal light trough painted white on the inside.
          The style of letters used, or the words spelled, may be varied to meet the taste of the craftsman, while the length and height of the cutout may be made to fill any desired space, distance from the street determining the size of letters to insure clearness.


    Left, "three-lane" silhouette arrangement is shown above.
    A display of this type gives the same 3-dimensional il-
    lusion as does a diorama. Right, Cardboard candles
     of proportions to fill requirements are illuminated in-
    directly by electric strings of lights hidden behind the 
    "wax" shield.
          It is easy to make a cutout scene of a Christmas picture, which may be silhouetted against a light-colored background, the house serving as the background, making the cutout of wallboard, painting the back of the cutout white. The three camels of the Wise Men crossing the desert makes an ideal scene, the effectiveness of which is attractive, because it is both simple and beautiful.
          A novel use of the cutout is to make a tree-shaped cutout of wallboard of desired proportions. Where the doorway is light colored, or there is a light-toned surface to provide a background for projected shadow effects, a small floodlight of 200-watts, using a clear lamp bulb, may be set back of the cutout of the tree and the shadow cast on the doorway or surface. You may make the shadow fit the desired space by simply adjusting the distance between the cutout and the floodlight.
          Multiple silhouette displays are readily adaptable to indoor and outdoor use. The multiplane Christmas tree is an example. One idea is to use three of these on your lawn, build in three planes, lighted in red, blue and green, located at advantageous points to set off the remainder of the display. Or you can use a multiplane tree built in three planes, placed behind a front window. An ingenious method of showing a candle-light effect is to cut slits in the wallboard in the shape of candles. The light from concealed lamps will shine through, giving the impression that luminous candles are mounted on the tree.
          A multiplane star, built in three planes, can be placed before a front window of the second floor of the house. The size of the star may be varied to meet the need, using either 25- or 40-watt lamps of any color between the second and third planes.

    Assembly of stylized lighted tree.
          Two-plane trees make excellent indoor decorations for the fireplace mantel. Each three contains three low-wattage lamps concealed between the planes. The trees may be of any desired height to fit the scheme of architecture or decorative plan. These trees are also effective when used in windows, lighted by stronger wattage lamps.
          Luminous candles, with multiplane flames make attractive and appropriate decorations for the doorway. The candles are made of wooden frames covered with celloglass. The candles may be made in half or full cylinders, with a light socket at the top and bottom for lamps and a small reflector made of sheet tin. The flame-shaped lamp candle droppings at the top complete the candle, and a cover of cellophane gives a shiny, frosty appearance. These candles may be made of any size . required to light indoor or outdoor backgrounds.
          Corners of rooms may be dark, serving as excellent spots to place large luminous candles. These may be combined with garlands of evergreen draped around the room at the ceiling, or . for interesting lighted decorations. Colored lamps of not more than 25 watts may be used to light decorations on the Christmas tree.
          You will find it easy to make shields to cover sidewall lamps, or to hang on brackets, using cardboard and a pot of paste. These may be designed to suit the taste.
           Creating a snow scene in the living room is a unique way of decoration. This is done by use of strong white cords which are stretched near the ceiling from the four corners to a point in the center of the room, or diagonally from corner to corner. To make the”storm” dense, place intermediate strings. Suspend from the cords at six-inch intervals, “snow flakes” made of small cotton puffs. The strings of the puffs, suspended from the cords, are of different lengths and as close together as possible. When these puffs are lighted by use of concealed lights, the general effect is that of falling snow.
          Spotlights may be made of old coffee cans, with shiny surfaces and regular natural colored lamps. These are placed above the line of vision. The “snow” is most effective if lighted from the corners of the room with a different color from each corner. Flashes, as used on the tree, help bring out a weird effect.
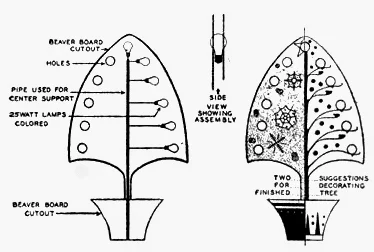
    Beaverboard tree in pot lighted through holes in
    surface. Cutout is double with bulbs between.
          Using this storm scene as a background, the dining table may be decorated with candles, or small Christmas trees lighted with the new candle type series lamps, or with various Christmas scenes which are made of crepe paper, artificial snow and lights.
          Now we are ready to decorate the Christmas tree, which should be well proportioned, and if one side is better than the other, put that side out and the poor side toward the corner. The base of the tree should be draped with green cloth or tissue paper and the larger gifts piled close to it. If the tree is set in a dish of water, it will keep green longer.
          The branches may receive a frosted effect by touching them with liquid glue and sprinkling diamond dust on. Cotton, fluffed and sprinkled with dust may be used to make drifts of snow on some of the branches, while cotton-flakes may be suspended from the twigs. Cranberries and popcorn kernels may be fastened to the ends of twigs by use of invisible hairpins.
          A tree decorated entirely with silver makes a pretty scene. Silver tinsel balls, draped of tinsel, ropes and a silver star at the top is the only trim needed This makes a breath-taking scene, with its branches drenched with tinsel snow gleaming under the light of a powerful concealed bulb.
          A beautiful tree is one on which nothing but silver-blue tinsel ornaments are used. Peeping out of the branches are bright red miniature electric bulbs, sparsely used with sufficient light only to cause the tinsel decorations to glitter. Too much light would spoil the effect.

    More Ways To Light Up The Night:

    The Amazing Holdman Light Display. Wow, I am
     amazed at the lengths some folks go to in order to give
     a good witness! Can I get an Amen?

    Tuesday, June 17, 2014

    Handcraft Classic Wooden Game Boards for Christmas

    Tilt-A-Ball game board.
          Now for a gift that will appeal to adults as well as youngsters. It’s called Tilt-A-Ball and it will keep a gathering amused for hours. It is a circular board of twenty inches diameter with a “pen” in the center to hold five marbles, and a number of holes scattered over the remainder. The board is held on the lap or placed on a table, the object being to tilt it and roll one of the marbles from the “pen” into a hole with a high number.
          This would be easy except for the fact that holes with high numbers are shallow, while the holes of less value are deep. Unless the player is especially patient and skillful he will find, when all five marbles are placed, that they rest in the holes of smallest value.
          Make the board with heavy plywood cut out on the scroll or band saw. The holes are best cut with a router bit, of half-inch diameter; those that are to be numbered from 700 to 4,000 must be made very shallow, according to value, so that not much tilting is required to make them roll out. The other holes may be deep so that once a ball enters it will stay. A suitable arrangement of numbered holes is shown.


          It's fun to play this indoor football game. Played by two to six persons, this game provides endless fun for members of your family or your party guests. The object of the game is to drive a table-tennis ball into one of the two goal baskets at opposite ends of the box. This is done by hitting the ball with wooden paddles attached to dowel rods, which are turned and pushed back and forth by hand. There are eight rods; the two center ones have four paddles each, the next two toward each goal have three each, while the next pair have two paddles each and the last two next to the goals have only one paddle each. The last two rods are equipped with stop collars or pins, which prevent pulling the rods out of the holes. Alternate rods have paddles facing in the same direction. With four persons playing, opposing teams on either side of the box, each player grasps two rods having the paddles facing toward his goal. To play, a ball is dropped at the center of the field and both teams engage in driving the ball. More than four people can play by having some of them, or all of them, operate only one rod each. The goals are simply wire baskets, hooked to small screw eyes. The paddles are pieces of quarter-round molding, lattice strips or other material.
    Build this early version of table tennis from 1941.
    Nine Men's Mill game board.
          Nine Men's Mill is a game that is played by two persons and is as fascinating as it is old. The upper part of the board is 3/8" thick and has 24 holes bored thru it, as shown in the drawing. The lower board is 7-1/2" square and 1/4" thick, and extends 1/4" beyond the top board on all sides. The grain in the two boards should run at right angles when fastened together. The 18 pegs are 3/8" in diameter and 1" long. Each player has a set of 9 pegs, the sets being differently colored. In starting a game, each player takes his turn in putting a peg into a hole till all the pegs are put down. Then they take turns in moving the pegs. A peg may be moved from one hole to the next and only along rows parallel with the edges of the board, not along the rows that run from corners of the board to its center. That is, along rows 1, 2, 3 or 2, 5, 8, but not along rows 1, 4, 7. The object of a player in putting down pegs and in moving is to get a Mill; that is, get 3 pegs in a row parallel with the edges of the board. For example: Pegs in holes 4, 5, 6 or 2, 5, 8 makes a Mill, but not 3, 6, 9. When a player gets a Mill, he can take one of his opponent's pegs that is not in a Mill. Another aim of a player is to place his pegs so that he prevents his opponent from getting a Mill. When the pegs of one of the players have all been taken except 3, then he is allowed to jump anywhere on the board. When the pegs are all gone but two, then the game is lost. When a player can get 5 pegs into holes situated as 7, 8, 9 and 4, 6, then he has a double Mill by moving from 8 to 5 and from 5 to 8, etc., and pick one of his opponent's pegs for each move. 
          In order to make a similar croquet set to the one illustrated just right, you will need to acquire a large flat box, a dowel, wire, skewers, and button molds and marbles.
    1.    From the end of a large " dowel" or small curtain rod, saw pieces for the heads of the mal- lets. Whittle a groove around the middle of each. 
    2.   Bend a piece of wire or a very long hairpin  around each piece ; pinch it into the groove ; wind  string, gummed cloth tape or adhesive plaster  around the projecting wires to form the handle.  
    3.   Bend nine hairpins into arches.  
    4.   Turn the box bottom up; draw lines and  measure to locate places for the wickets; prick  eighteen holes.  
    5.    Turn the box right side up and push the  ends of the wickets down through pricked holes ;  bend one end of each wicket wire toward one end  of box and the other end toward the opposite  end of the box.  
    6.   Press the box into its cover; fasten them  through their sides. The loose wickets will  stand rigidly upright.  
    7.   Force the skewers into the button molds.  Be sure the bottoms are flat ; then glue the molds  to the "lawn."  
    8.   Paint the "lawn" green; stripe the stakes,  mallets and balls to match.

    Fox-And-Geese game board.
           Fox-And-Goose game is played by two people on a board with 33 holes, as shown in the drawing. The board may be made either square or octagonal. The octagon is made from a square by placing one point of the compass at a corner and the other point at the center of the board. With each corner in turn as a center, draw arcs intersecting the edges of the board. Connect these points of intersection across the corners of the board; saw off the four triangles. Smooth the edges and chamfer. Lay out and bore the holes. Make 26 pegs to fit loose. Leave 24 white for the geese and color 2 red for the foxes.
          In playing the game, all the pegs are put in their places. The foxes at Nos. 9 and 11; the geese at 7, 8, 12, 13, and consecutively up to 33. The foxes and geese can move on the lines only, in any direction from one hole to the next. A fox can also jump over a goose and take it, provided the hole just beyond it is vacant. In fact, the fox can jump and take several geese in various directions if conditions permit. The geese can not jump, but they can move so as to hem in the foxes and make it impossible for them to move. This means that the foxes have lost the game. In starting the game, the player having the foxes gets the first move. His aim is to jump and capture all the geese and win the game. Each player takes turn in moving. When crowding a goose in on a fox, the player always has another goose behind it so that the fox can not jump it. This game is one of the kind that requires foresight and study. It is highly interesting and entertaining, and by experience, players may become quite expert at the game.
          Solitaire—This same board may also be used for the solitaire game. However, that requires 32 pegs. They are put in all the holes except No. 17. The object is to jump and take all the pegs but one, and it must land in hole 17. Unaided, this is difficult to do, and it would take a long time for a person to discover a solution. For this reason, the reader is presented with the following "Key": 5 jumps to 17 and takes 10, 12 to 10 and takes 11, etc.; 3 to 11, 1-3, 18-6, 3-11, 30-18, 27-25, 13-27, 24-26, 27-25, 22-24, 31-23, 33-31, 16-28, 31-23, 4-16, 7-9, 21-7, 10-8, 7-9, 24-22, 22-8, 8-10, 10-12, 12-26, 26-24, 17-15, 29-17, 18-16, 15-17.

    More Classic Board Game Ideas:
    "Building a portable, collapsible Mancala game board is much more easy after seeing someone else make one. It is a simple game to learn how to play too. With this design, you won't lose your marbles after you are done playing. The whole project took about 4 hours."

    Springerle Cookies Made With Molds

    Top, Raw springerle dough, just out of the
     wooden wedding-carriage mold Center,
    Springerle dough after drying for a day.
    Bottom, Baked springerle, showing
    typical "foot".
          Springerle is a type of German biscuit with an embossed design made by pressing a mold onto rolled dough and allowing the impression to dry before baking. This preserves the detail of the surface pattern. They are most commonly seen during the Christmas season.
          The name springerle means "little jumper" or "little knight". Their origin can be traced back to at least the 14th century in southwestern Germany and surrounding areas, mostly in Swabia.
          The major ingredients of Springerle are eggs, white (wheat) flour, and very fine or powdered sugar. The biscuits are traditionally anise-flavored, although the anise is not usually mixed into the dough; instead it is dusted onto the baking sheets so that the biscuit sits on top of the crushed anise seeds.
    Traditional Springerle recipes use hartshorn salt (ammonium carbonate, or baker's ammonia) as a leavening agent. Since hartshorn salt can be difficult to find, many modern recipes use baking powder as the leavening agent. Springerle made with hartshorn salt are lighter and softer than those made with baking powder. The hartshorn salt also imparts a crisper design and longer shelf-life to the Springerle. To make Springerle, very cold, stiff dough is rolled thin and pressed into a mold, or impressed by a specialized, carved rolling pin. The dough is unmolded and then left to dry for about 24 hours before being baked at a low temperature on greased, anise-dusted baking sheets.
          The leavening causes the biscuit to at least double in height during baking. This "pop-up" effect may be the source of the name in German, and produces the characteristic "foot" along the edges, below the molded surface.
          The baked biscuits are hard, and are packed away to ripen for two or three weeks. During this time, they become tender.

    "Connie Meisinger of House on the Hill Cookie Molds 
    shows how to make the perfect Springerle cookie

          Molds are traditionally carved from wood, although plastic and pottery molds are also available. Pear wood is prized for its density and durability. Older handmade molds are folk art and are typically unsigned and undated.
          The stamping technique may be derived from the molds used in some Christian traditions to mark sacramental bread, and the earliest molds featured religious motifs, including scenes from Bible stories and Christian symbols. Later, in the 17th and 18th century, heraldic themes of knights and fashionably dressed ladies became popular. Themes of happiness, love, weddings, and fertility remained popular through the 19th century.
    Springerle cookies originally displayed biblical scenes and were used to teach the illiterate about the Bible. Eventually, the cookies were decorated with secular scenes depicting images of life events, such as marriages and births Left, Springerle mold from the Landesmuseum Württemberg and Right, This mold shows a wedding carriage and many figures.

    Monday, June 16, 2014

    Exploring Christmas Craft Books by Folks at Colonial Williamsburg

    cover.
          "The Art-Full Tree" is a lovely compilation of ornamental folk art crafts for the decorating of your Christmas tree. For every small handcraft, authors also include a brief history behind the folk art that influenced the design of each ornament. Great care was given to the photography and general presentation of each miniature assignment. The book was obviously organized and written by educators and I would recommend it to both professional educators and homeschooling parents for this reason. Teach your young students "how" folk artists see their world and encourage them to do the same through the completion of 33 simple object lessons. For ages 10 and up.

    "Christmas Decorations from Williamsburg's Folk Art Collection: Step-By-Step Illustrated Instructions for Christmas Ornaments That Can Be Made at Home" by Colonial Williamsburg Foundation" is strictly a craft methods manual for children with drawn illustrations in black and white. It is primarily the kind of book that educators use in order to help students visualize how something is put together without over interpreting the way the item "should" look. It does include a few notes at the back of the book describing the reasons for the development of the ornaments.
          Both volumes were compiled by staff at Colonial Williamsburg who decorate their Christmas trees annually with handmade items made from natural materials. These items were and still are inspired by the folk art collections from the Abby Aldrich Rockefeller Folk Art Museum. A museum that is located within the ground of Colonial Williamsburg.
          I find this little workbook helpful in that it enables me to build a substantial collection of methods lessons for young students. However, I can understand why most people purchasing craft books would find it's contents too unsophisticated when compared with craft books published today. The newer volume, "The Art-Full Tree." is by far superior, both in content and visual information. It is not the same material, however, and that is why I chose to purchase both books. The projects are not repeated in either book.
     
    More Articles Relating To Christmas in The American Colonies:
    See the many Christmas trees of Colonial Williamsburg.
     Learn how the decorations are chosen for each tree and the
    meanings behind them. For more information on Colonial
    Williamsburg's holiday events,
    visit www.colonialwilliamsburg.com/holidays.