Saturday, November 9, 2024

Turn Popsicle sticks and wooden skewers into winter skis...

       To make winter skies like ours for your Christmas tree you will need the following craft supplies: metal snaps (sewing notions), twine, masking tape, white school glue, hot glue gun and glue, acrylic paints, figurative tissue paper, wooden skewers, fine sandpaper and large Popsicle sticks or tongue depressors.

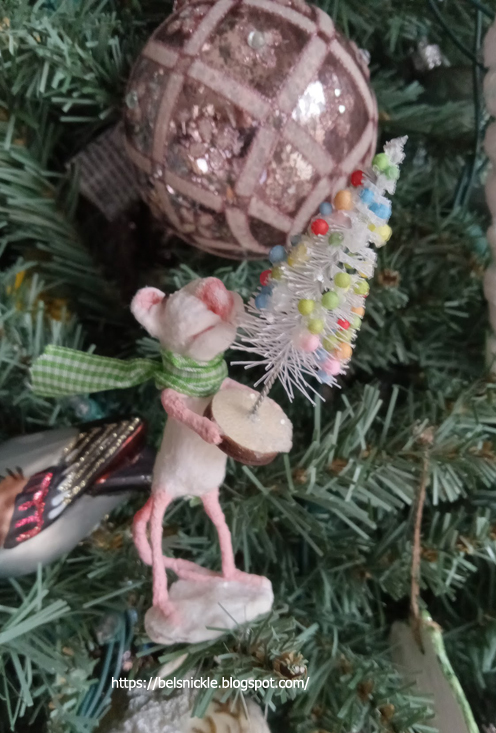
Above, see two different methods for decorating your skis and ski poles.
Step-by-Step Instructions:

  1. Cut the skewers to 4 1/4 inch lengths.
  2. Clip off the curved ends of the Popsicle sticks at the bottom of each ski only. With white school glue stick one on top of the other in an 'X' shape. Let dry.
  3. Cross the two ski poles, one on top of the other. Glue these together securing them in an 'X' formation with a bit of twine or masking tape. This shape will follow the shape of the crossed Popsicle stick skies.
  4. You can twist the twine at the top of each ski pole to make the handles and/or use folded masking tape for handles to later paint.
  5. Glue silver sewing snaps to the bottom of each ski pole using the hot glue gun and hot glue.
  6. Either paint or decoupage the skis in the colors of your choice. Above the photograph shows both possibilities.
  7. Once the skis have been decorated, hot glue the ski poles on top of the Popsicle skis. 
  8. Tape a wire hanger to the backside of your wooden skis and cover this with paint or additional decoupaged tissue.

Friday, November 8, 2024

Make a Flexible Flyer for The Tree

Left, is the sled from underneath. 
Right is the sled from above.

        This Flexible Flyer is a child's sled intended for recreation only. But, when it is only six inches long like these, you can only hang it on a tree... 
       Samuel Allen patented his Flexible Flyer in 1889. While his factory normally produced farm equipment, the sleds gave his workers something to build during slower times of the year, during the winter months.

Supply List:

  • tacky white glue
  • 8 Popsicle sticks - medium ones
  • red acrylic paint
  • utility scissors or handsaw
  • masking tape (optional)
  • fine sandpaper
Step-by-Step Instructions:
  1. Make sure the wooden Popsicle sticks are clean and freshly sanded. This will insure that the tacky glue will adhere the pieces.
  2. You will need masking tape to hold the sticks in place as these dry. Stick the first two Popsicle sticks in the center of a length of tape very close together with just a slight bit of separation. Then stick two more, one on either side of the center two, after the tips have been sliced off at an angle using a hack saw or utility scissors.
  3. Now turn the group over and cut down the sticks for the underside of the sled to fit. These will be glued down on their edges. Use more masking tape to hold these in place while they dry.
  4. Once the sleds are dry and firmly glued in place, remove the masking tape.
  5. Paint the sled a traditional red or green for the Christmas tree.
  6. Tie on a piece of twine for hanging the ornament.
  7. If this sled is too simple for your tastes, hot glue a few Christmas garnishes and presents to the top of the sled.

Craft yarn covered mountains for the tree!

This yarn mountain has yarn snow too.
       For some of our visitors, snow topped mountains, lodges and skying are all apart of winter fun. This year I will be posting more ornaments with sports themes. The first few being related to the mountains: the people who live there, the sports they practice and the landscapes in winter. 

Supply List:

  • heavy paper or thin flexible cardboard
  • decorative yarn (colorful for the mountain)
  • hot glue gun and hot glue
  • white school glue or tacky white glue
  • masking tape
  • thin flexible wire for the hanger
  • five or six cotton balls
  • white or cream yarn (for the snow toped mountain)
  • felt to compliment the color of the yarn for the bottom of the mountain.
Step-by-Step Instructions:
  1. Cut out the circle from cardboard that has at least a five inch diameter across it's center.
  2. Cut this circle exactly in half.
  3. Bent the half circle shape around it's self to form a cone. Tape the cone in place.
  4. Cut off the tip of the cone to thread a fine wire up and through. On the inside of the cone bunch up the wire just a bit to sink it into a bit of hot glue. This will hold the wire in place.
  5. Wrap the outside of the cone first, starting from the bottom, with the colorful yarn. Squeeze the tacky craft glue around the cone as you do this. Try to keep the wrap as clean as possible.
  6. Stop a 1/2 inch from the top, peak of the cone mountain.
  7. Continue on using white or cream yarn to represent the snow-caped mountain.
  8. Wrap the remaining wire with cotton batting and shape this into a fancy hook.
  9. After the yarn applications have dried, stuff the interior with cotton balls to help the mountain ornaments keep their shape.
  10. Next using the tacky white glue, spread some generously onto a scrap piece of cardboard and press the mountain's bottom opening on top. Let dry before trimming off the excess cardboard.
  11. Cover the bottom of the mountain using scrap felt and glue to finish the ornament.
Left, cut and wrap a cone from cardboard. Center wrap the yarn mountain.
Right, a cotton batting snow cap in this version of the ornament.

Draft and color a paper log cabin for the Christmas tree

        Below is an illustrated model of how a log cabin, made from paper, may be cut and fashioned in such a way as to store it flat until needed. It is "a cabin home'' with pull strings and presto! the walls come together. Make free standing trees too and craft a small frontier display to assemble beneath a table-top tree if you like...

Other types of homes may be made following the above working plan.

Thursday, November 7, 2024

How to sculpt mice using cotton batting and dryer lint...

I've added the whiskers here to the mice.
       Learn to handcraft a few little mice for a Christmas tree or for play in a mouse house if you prefer. Children love them no matter what color they are or from what materials you choose to make them with. Every mouse has it's own character and you will enjoy dressing them for the holidays as well.
Supply List:

  • chenille stems
  • cotton balls
  • dryer lint
  • white school glue
  • acrylic paint: black and white
  • Sculpey oven-bake clay
  • thread for whiskers

Step-by-Step Instructions:

  1. Shred white cotton balls into fluff and layer this with white glue onto the chenille stems, winding the cotton around the stems. Once the cotton batting and glue is evenly distributed, you can roll the wire between the palms of your hands to adhere it to the chenille better. This process will also 'even out' the application.
  2. Now cut and bend the cotton coated wires into basic mouse armature. See and copy the photos below.
  3. Don't forget to twist the mice tails to the armature from behind. 
  4. Now layer cotton batting and white glue on top of the armature in order to 'flesh out' the delicate little mouse bodies.
  5. Glue on large round ears and eyeballs made from Sculpey oven-bake clay.
  6. Once you have fleshed out the bodies to the most believable shapes, dab on white glue and dryer lint to color the white fur further.
  7. After the mice have dried completely next to a heating duct, ideally, paint the eyes and thread a needle with white or transparent thread to weave in and out of the mice cheeks. Clip the whiskers to a shorter length at the end.

More Makers of Mice Online:

Left, standing mouse, wire armature. Center, sitting mice, wire armature. Right, 'fleshed-out' mice
 before adding painted eyes and dryer lint for colorful fur.


Above you can see the grey mouse from different angles.

Above is my spotted mouse from different angles.

Detailed photos of seated mice posed together.

See the dryer lint in a bag. I collected multiple greys, black and browns over time.

White mouse, standing version, holds bottle brush tree.

Sunday, October 27, 2024

Paint a wooden flat squirrel ornament

Painted wooden squirrel flat.

       This little wooden flat of a squirrel is painted in a very abstract way using a dry brush and sponge technique. You could just as easily choose to paint him by the same methods using grey colors instead.

Supply List:

  • orange, white, red, yellow acrylic paints
  • tiny acorn and cap
  • hot glue gun and hot glue
  • a wooden squirrel flat, unpainted
  • soft sponge, tiny brush, medium sized brush all three for application of paint

Step-by-Step Instructions:

  1. Sponge the entire front face of the wooden squirrel one color; a rusty brown is good, if you're squirrel is to be a red squirrel.
  2. While the paint is still wet, dry brush in some lighter oranges, reds and yellows.
  3. After the surface is dry, paint eye and nose details in black. 
  4. Go back with a liquid of soft, pale whites for the high-lighted areas.
  5. Hot glue on the real acorn and cap just beneath your squirrel's paws.
  6. Use the tip of a pin to add a high-light in the critter's eye.
  7. Mod Podge the finished surface once you are satisfied with the results.

Assemble a pipe cleaner doll for your vintage Christmas tree...

A vintage girl shaped using chenille stems
and felt scraps.

        You can assemble this adorable little Christmas Miss using felt and tacky fabric glue. I believe she dates back to the 1960s or 70s. Make a whole series in any color to match your tree trimmings...

Supply List:

  • two sheets of craft felt, one navy and the other teal
  • gold braid rick-rack
  • olive green velvet ribbon
  • velvet pink flowers
  • tacky glue for fabric
  • white lace
  • gold embossed paper trim
  • a wooden bead for the head
  • acrylic paints
  • two chenille stems
  • gold twine for the hanger
Step-by-Step Instructions:
  1. Cut two lengths from the chenille stems: one five inches long and the second, seven inches long.
  2. Cut and roll felt rectangles to cover both the arm stem, five inches and the leg stem, seven inches. Glue down the edges using tacky fabric glue. let dry
  3. Twist the dry arm and leg stems together at the center of both. Pull the longer legs down and the shorter arms lengths above the legs.
  4. Pinch the arm lengths in the center up approximately 1/2 inch up and glue inside the hole of the wooden bead for the doll's head.
  5. Paint this wooden ''head'' bead using acrylics. Paint the hair, and facial features using a tiny brush for details. let dry.
  6. Now cut a half circle for the doll's dress from felt. The half circle should measure approximately ten inches across it's length.
  7. Next cut two more circles from the felt. The first smaller circle should be 1 3/4 inches in diameter to shape the doll's hat. The second circle should measure 2 inches in diameter to shape the doll's collar.
  8. Decorate the right side of the largest felt half circle prior to attaching it with tacky fabric glue just below the wire arm stems. Use notions like: lace, rick-rack and other gold trims seen in the photo above.
  9. Attach the felt skirt beneath the wire arms using tacky fabric glue, also gluing the shorter sides of the felt skirt together.
  10. Loop a hanger for the doll from twine and thread it up through the backside of the circular hat. 
  11. Glue this to the wooden head with the knot underneath and the loop for hanging above. This hat should be allowed to dry before proceeding to the next step.
  12. For the collar, cut a slit through the felt only to the center of the circle. Then twist the collar beneath the wooden chin of the doll, covering the arms and skirt waist and glue it in place.
  13. Tie a green velvet ribbon above the collar.
  14. Now glue flower trims to the hat and additional felt boots and gloves if you like!