Tuesday, December 2, 2014

Stitch a Sampler For Your Colonial Christmas Tree

My eldest child stitched this little Colonial sampler when she was a young teenager. This was her first cross-stitch project. I mounted it on heavy cardstock in order to hang the needlework on an Colonial American Christmas tree.
       When my girls were in their preteen years, my husband and I decided it was time to take them on a trip to visit both the Smithsonian Institute and Colonial Williamsburg. Although it was not an inexpensive adventure, we felt it to be one of the most educational vacations of their young lives.
       During their visit to Williamsburg, my girls were most fascinated with the lives of children, specifically girls, who lived in this recreated historical village. They wanted to know what the girls learned in school, what kinds of chores they were responsible for and what were their hopes and dreams.
      I backed my daughter's cross-stitch sampler with heavy cardstock and a lovely old piece of olive/ochre tapestry. I added braided ribbon and ivory tassels to the ornament as well. Contrary to popular opinions in America, design motifs in the Early American Colonial Era were not always rustic or primitive. In our Colonial Era, designs were sometimes very sophisticated and refined. Age does not always imply "lack" of knowledge or supply. Most of the ornaments that actually hung on the 20th century Williamsburg Christmas trees made by employees during the 1970s were from the pioneer era in America and were far more rustic than those that would have actually been designed by the English and German immigrants of the British colonies. (see 1rst volume of ornaments here) The later published Christmas ornament collection is designed to teach young students about American Folk Artists, some of these lived during the American Colonial times, some of them lived in the 20th century. (see 2nd volumes review here)
       This experience is what influenced my eldest to take up needlework for a brief time during her teen years. I purchased her a small sampler kit to reproduce, hence the ornament that you see at the top of the page.
Plate II.—Sampler by M. C. 
16th-17th Century.
       Colonial American samplers by young children often included alphabets, numerals and simple motifs; the letter motifs seem to be preferred by American Colonists in specific during the 1700s. Marcus B. Huish, author and collector writes, "Although a sampler without either alphabets or numerals would seem to be lacking in the very essence of its being, it is almost certain that the earliest forms did not contain either, but (like that in Plate II.) were merely sheets of decorative designs. For the need of pattern-books of designs would as certainly precede that of copy-books of alphabets and numerals, as the pleasure of embroidering designs upon garments preceded that of marking their ownership by names, and their quantity by figures. A sampler would seldom, if ever, be used as a text-book for children to learn letters or figures from, except with the needle, and the need for lettering and figuring upon them would, therefore, as we have said, only arise when garments or napery became sufficiently common and numerous to need marking. This period had clearly been reached when our earliest dated samplers were made, for, out of dated specimens of the seventeenth century that I have examined, two-thirds carry the alphabet upon them, and the majority have the numerals. It is rare to find later samplers without them, those of the eighteenth century containing assortments of every variety of lettering, Scottish ones especially laying themselves out for elaborately designed and florid alphabets. With the advent of the nineteenth century, however, the sampler began to lose its raison d’ĂȘtre, and quite one-half of those then made omit either the alphabet, or numerals, or both." Marcus B. Huish
       If you would like to make a similar sampler like the one Natalie stitched you can visit the shop at Colonial Williamsburg and order a sampler from their historic collection. These do change from year to year but there is always an assortment of them available.
      Learn more about "The oldest surviving samplers were constructed in the 15th and 16th centuries. Samplers often included the alphabet, figures, motifs, decorative borders and sometimes the name of the person who embroidered it and the date. The word sampler is derived from the Latin exemplum - an example. Expert Joy Jarrett shows us part of her rare collection and explains some of the history behind them."

Additional Sampler Videos:
Click to download the largest available free sampler patten from my blog.
Sampler Pictures, History and Patterns Online:

Monday, December 1, 2014

DIY Shabby Chic Scrap Piecework Baubles

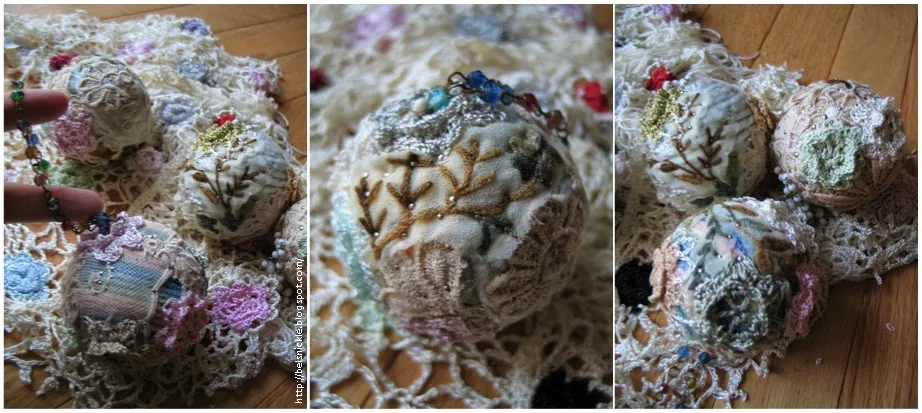
      These Shabby Chic baubles are definitely French Cottage. I pinned this set for my younger girl who happens to adore anything remotely French or Austrian that was produced during the Victorian Era. I wrapped my Styrofoam balls with white glue and variegated, pastel colored yarns. Then I snipped and clipped my way through several vintage shawls, table cloths and dollies yellow and stained with age and wear. Most of these items came to me via an elderly aunt who hadn't the heart to throw them away. I think Hannah will be quite pleased with the end result.
More examples of Shabby Chic Scrap Piecework Baubles. On the far left you can see the beaded chain that I added for hanging the baubles. These piecework baubles have scraps of lace built up on top of yarn covered Styrofoam balls in pastel shades. The color combinations are quite elaborate; not merely shades of white and ivory.
These pieces are fun to work on; it's difficult to know when to stop though.
Details of embroidery and lacework pinned to the Shabby Chic Baubles.
Left, vintage shawls, antique lace and old table linens are the kinds of supplies you will need to acquire for this craft.
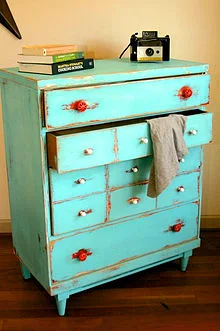
A dresser with a distressed
finish and mismatched
drawer knobs, in
Shabby chic style.
      The "Shabby Chic Style" started in Great Britain and evokes the type of decoration found in large country houses where there are worn and faded old chintz sofas and curtains, old paintwork and unassuming 'good' taste. The end result of shabby chic is to achieve an elegant overall effect, as opposed to the sentimentally cute Pop-Victorian. Recycling old furniture and fabrics is an important aspect of the look and was especially popular with modern Bohemians and artisans that made up a sidelined counter-culture movement during the 1980s when expensive quality decor became very fashionable with the upper middle classes. The original shabby chic interiors were usually considered in themselves works of art.
 More painted and layered Shabby Chic Christmas Baubles

Sunday, November 30, 2014

Reproducing a Vintage Christmas Stocking

A new stocking for baby in blue or pink felt; how sweet!
      This little drawing of  a blue felt sock is of an actual vintage stocking that once belonged to my husband when he was a baby. It is so tattered and worn but somehow it makes it's way onto our Christmas tree every year. It is far too fragile to fill with gifts however. The stocking was made by some loving grandmother in the late 1950s I'm sure. My husband's sister had a similar one in pink I believe. During the 1950s pastel colored ornaments and stockings on shimmering silver tinsel trees were all the rage. I've redrawn and included a pattern similar to this homemade stocking for those of you who would like to reproduce it. 
       A pair of pinking shears was used to cut the felt stocking out originally. Use a pair of ordinary sharp scissors to cut the marked openings on the sides of two identical felt stockings so that you can weave a pale pink ribbon through the center of the stocking. If you are making a pink felt stocking for a girl, use a blue ribbon instead of the pink. The Christmas trees are also cut from white felt and tiny sequins and silver beads are sewn on to give them sparkle. The "Hello" on the bottom of the stocking is made from silver rick-rack. This word is stitched into place with silver thread. This little felt stocking would be a charming addition to any tree for a new baby.

Free stocking with the purchase of Ivory Snow.

Saturday, November 29, 2014

Handcraft Marbleized Baubles for Your Christmas Tree

This tiny glass bauble would look nice on a Shabby Chic Christmas tree.
     People have been marbleizing glass baubles for years and why not? It is both a fun and a simple way to add a bit of pizzazz to ordinary glass baubles.

 Supply List:
  • acrylic paints: one very light color combined with one or two very bright colors
  • clear glass bauble with detachable metal catche and hook
  • disposable paper cup
  • Ribbon or fancy wire for hanging
  • tacky white glue
Step-by-Step Directions:
  1.  For this peppermint swirled, glass bauble I dripped red and white acrylic paints into my glass bauble and swirled these two colors around inside the ornament. 
  2. Then I turned the glass bauble upside down and stood it inside of a disposable paper cup. I let this drain for an hour or so.
  3. Then I removed the bauble and turned it right side up, cleaned off the lip of the glass and replaced the metal catche.
  4. I twisted an old sprig of winter white berries around the metal catch adding tacky glue to the old vintage wire.
  5. I looped a piece of matching winter berry spring through the bauble's hook and twisted it to make a fancy hoop in order to hang my marbleized bauble from my feather tree.
      You can also make similar marbleized ornaments with alcohol inks and
 compressed air. Ranger Ink has a video here to show you how to do this.

A Quilted Colonial American Christmas Angel Ornament

Left, you can see the store bought, angel stamp that I purchased for the ornament project. Right, the finished quilted Colonial American Christmas Angel ornament, trimmed in white eyelet lace.
       I made these foam stamped angel ornaments several years ago for family and friends. Although I purchased this little Colonial American angel stamp ahead of time, crafters may decide to manufacture their own versions by using a die cut stamp making technique. I've included a video below by Michelle Joy Wecksler that shows how to make these.
      You don't really need fancy inks or paints to stamp nice images onto cotton fabric; I used ordinary acrylic, red, paint for my stamped ornament version above. I backed the printed fabric with a layer of cotton batting plus an additional cotton backing using the same muslin. Then I quilted the three layers together. I followed the outline of the angel with my needle and quilter's thread until I reached the oval's edge of the muslin medallion. Then I repeated the same process for the backside of the ornament. 
       Choose the nicest of the two quilted medallions for the front of your ornament. Sew with a straight stitch around the edge of the medallion perimeter a piece of white eyelet lace. Turn this lace to the inside of the medallion's center and sew the back medallion piece face down on top of the front side, leaving a one inch opening for stuffing. Turn the oval medallion inside out and stuff it with a soft cotton batting. 
      Turn under the one inch opening with your needle as you close up the opening you used to stuff your ornament with a whip stitch. Clean up the puckered edges using a slip stitch with additional quilter's thread.
      Cut a simple white ribbon and tack this onto the outside of your cotton muslin medallion using quilter's thread.
I printed my Colonial American angel on top of white cotton, using a red acrylic paint that I purchased from my local hobby store. Right, you can see a detailed shot of the quilted stitches up close.
 Make your own die cut foam stamps.

      I've included examples of angels below that can be found carved into Early Colonial American tombstones. Sometimes similar primitive angels can by found in Pennsylvania Dutch frakturs. However, not all angels were illustrate so primitively on those manuscripts. Some folk artists preferred naive looking angels and others preferred angels that looked more realistic. Frakturs drawn during the Colonial American era depict both styles because they were produced by artists of various degrees of talent and/or taste. Personally, I prefer the primitive fraktur and tombstone angel designs.

Winged skull & winged soul effigies on Phebe (1757) and Timothy Peck
 (1790) gravestones, Morristown, NJ
Granite tombstone of Josiah Leavitt (1679–1717), Hingham Center
 Cemetery, Hingham, Plymouth County, Massachusetts
Captain Andrew Drake (1684–1743) sandstone tombstone from 
the Stelton Baptist Church Edison, New Jersey
See More Early American Tombstones Depicting Angels:

Wednesday, November 26, 2014

Craft a Juggling Snowman Ornament

      This charming little snowman ornament has always been a favorite on our family tree. I made him when my adult kids were very young. This was back when I had lots of little mismatched socks floating around the dresser drawers, under beds and stuffed between cushions in my living room! So the supplies needed for my snowball juggler will be easy for young parents to acquire.

This snowman juggles snowballs on my Christmas tree every year!
 Supply List:
  • white or ivory felt
  • red and stripped children's socks
  • plaid wool scraps for snowman's scarf
  • pom pom to match the sock for your snowman's stocking hat
  • papier-mĂąchĂ© pulp (Celluclay)
  • brown embroidery floss and needle
  • thin wire
  • cotton batting (stuffing)
  • Sculpey (white, oven bake clay)
  • black, white and  orange acrylic paints
  • white, translucent glitter
  • miniature cookie cutter for the button 
  • tacky white glue
Step-by-Step Instructions:
  1. Draw and cut a snowman's body in any size that you like. You can trace the general shape of my snowman from the photo above. I did not really use a pattern of any kind to make my juggler; snowmen can be just about any lumpy shape and they will look cute.
  2. Trace around the pattern with a soft pencil on top of your white felt. I used ivory colored felt for my snowman but that is what I had on hand at the time.
  3. Leave the bottom end of the felt snowman open. Turn the felt sewing inside out and stuff the snowman's body with cotton batting.
  4. Sew the opening of his body shut using a slip stitch. 
  5. After this step, I used brown embroidery floss to embellish the seams of my snowman with a blanket stitch. Then I also added the words, "Let It Snow" with a back stitch across the lower half of his body. 
  6. Then I took a child's red sock and cut off it's cuffs and toe in order to wrap the remaining tube around my snowman's torso. Then I cut the remaining cuff of the sock in half and wrapped these around the snowman's arms, whip stitching the sides together with red thread. I also turned under all of my sock seams and whip stitched these shut so that my knit sock sweater would not unravel with use over time.
  7. Cut a thin piece of plaid wool and wrap it around the snowman's neck to give him a scarf. 
  8. Cut the toe from a second baby sock, roll it's edges a bit and fit this over your snowman's head. Whip stitch around this stocking cap in order to keep it in place. Sew on a matching pom pom.
  9. Unwrap your Sculpey, roll out a carrot shape for his nose and cut out a tiny snowman using a miniature cookie cutter. Take your embroidery needle and add two button holes through the clay before backing everything at 170 degrees in the oven for ten minutes. 
  10. Let the clay cool and paint the nose bright orange. Paint the button as you please.
  11. Glue the carrot nose onto the snowman's face. 
  12. Paint a few black dots for eyes and a mouth to imitate coal.
  13. Sew on the clay button to the snowman's sweater.
  14. Clip and bend you wire and poke this with a bit of tacky glue on it's tips, through the felt hands of your snowman. It helps for the end tips to be bent a bit so that the wire will not work it's way out of the felt over time. You will need to wrestle with this a little but it is not as hard to insert as it sounds.
  15. Take a bit of Celluclay from it's package and add a very small amount of water to the mixture. Stir and form snowballs over the wire armature. Let this dry hard overnight.
  16. Paint the snowballs with white acrylics and then glue on the translucent glitter to finish your juggling snowman ornament.
Close up shots of my juggling snowman.
See more little crafted felt snowmen:
How to craft more snow people for Christmas:
  1. Snowman crafts from favecrafts
  2. Claypot snowman craft for Kids
  3. Laughing snowman paper bag craft
  4. Snowman craft idea using white chrysanthemums
  5. Cute pom pom snowman craft
  6. Glass block snowmen (video)
  7. A wooden melted snowman craft
  8. Snowglobe Snowman
  9. Craft a Paper Snowman Wreath
Snowman juggler and audience.

Tuesday, November 25, 2014

Christmas Quatrains

     These quatrains would be lovely to include in a church bulletin for parishioners to recite during a Christmas service. You don't need to write to ask for permission to use them. George Creel's work is in the public domain folks.

Christmas Quatrains 
by George Creel

Again the star dawns in the eastern sky;
Again we hear the shepherd's startled cry
As waking from his midnight sleep he sees
The camels of the wise men sweeping by.

The years have worked their measure of decay.
Where are the inn and stable? Who can say
"This is the spot" or "There the very place
Where the Lord Christ came into the light of day?"

No more chants Caiphas his vengeful song,
And scattered to the winds are all the throng
That clamored for Barabbas, only held
In memory by reason of their wrong.

The weak souled Pilate long has passed away;
Great Caesar, too, is now at one with clay,
Their mighty Rome forgotten save as theme
To keep the grumbling schoolboy from his play.

But still the scent of frankincense and myrhh
Steals down the centuries, and as it were
But yesterday, so sweet and now it seems,
Did Virgin Mary bear the Harbinger.

Let fools with much pretense of wisdom scout
The truth and wag their heads in owlish doubt
Of Great Jehovah's all embracing scheme
Because there is a door they stand without.

Content are we, the children of his hand,
To wait, nor insolently demand,
Assured that in God's own good time he will
Unlock the door and let us understand.

Of all thy gracious gifts, O God Most High,
The dearest of them all is this clear eye
Of faith with which we shrine the miracle
Of far off Bethlehem and time defy.

O Virgin, wert thine eyes less unafraid
Or didst thou shrink, sore startled and dismayed,
When first thou felt that life within and learned
On thee God's precious burden had been laid?

What must have been thy happy, sweet amaze
To see the aureate halo blaze
And from the wide flung gates of paradise
To hear the mighty harmonies of praise!

Loud sang the golden throated cherubim
And all the wheeling hosts of seraphim,
Whose snowy pinions changed to canopy
Of virgin white the heaven's sapphire rim.

Hosanna! Glory to the Son of Man!
O happy moments ere his work began
Of lifting from the world its weight of sin
And making straight salvation's tender plan!

No hint of Pontius Pilate's last decree,
The lonely horror of Gethsemane;
No prescience of thorny diadem
Or shadow from the hill of Calvary.

Humility divine! A manger birth--
The humble stable bathed in holy light--
The Babe upon a truss of straw--the mild
Eyed kine awaked to wonder at the sight!

Alas, still lingers issue of that kine,
The thick of wit, who can detect no sign
Of God in Christ's dear birth nor understand
The marvel of the holy bread and wine.

And sons of doubting Thomas still abide
With us on earth and still the truth deride
Because they cannot grasp his nail torn hands
And see the blood gush from his pierced side.

O shame of shames! The wise men saw on high
God's guiding star gleam in the eastern sky
And straightway journeyed forth across the world,
With ne'er a question of where or why.

They place within the heavens ever hold,
O blessed star, and like those men of old,
May we have faith and hope to follow on
And at our journey's end the Christ behold!