
 |
| Little girl playing with a home-made kaleidoscope. |
By HARRY WALTON
Photographs by WILLIAM MORRIS and ROBERT SMITH
Visitors to London about 1816 were amazed to see people in the streets gazing skyward through pasteboard tubes. But these watchers were peering at no eclipse or comet. They were fascinated by a scientific novelty that had taken London by storm the kaleidoscope, invented by Sir David Brewster. First regarded only as a toy, it was soon adopted by artists as an aid in originating new designs. Sir David named his invention by combining three Greek words: kalos, meaning beautiful; eidos, form; and skopeo, I see. Almost anyone who has looked through a kaleidoscope will agree that the name is appropriate.
Two mirrors on facing walls create the familiar illusion of an endless
succession of walls. Multiple reflection also produces the patterns in a
kaleidoscope, but the mirrors are joined at one edge, so that the
reflections form a circle. Their number depends upon the angle between
the mirrors.
Because of the angle at which reflection occurs in a kaleidoscope,
ordinary mirrors will produce a blurred double image both the silver
backing and the glass surface reflect light. The mirrors must be of the
front-surface type. Unsilvered glass acts as such a mirror, particularly
if its back surface is blackened with paint or enamel. Small
kaleidoscopes can be bought at toy counters, but you can assemble one
from common materials, and learn much about this fascinating device.
Pictures on the following pages show step by step how to build a
two-mirror kaleidoscope that will form twelve-unit patterns similar to
those above. Three mirrors of the same size arranged triangle fashion
will form six-unit designs and multiply each into an allover pattern.
 |
| Make your own kaleidoscope, detailed instructions are below. |
 |
| 1: The kaleidoscope on page 110 was made from these parts: a 2″ by 9″
mailing tube, two glass strips 1-7/8″ by 8″, a frosted and a clear glass
disk, black paint, tape, cement, cardboard, plastic scraps, and
covering paper 2: Sizes are not critical if correct proportions are maintained. Any tube can be used, provided the glass strips are cut to fit inside at an angle of 30 deg. They should be about four times as long as they are wide. Coat one side of each with black paint or enamel |
 |
| 3: While the painted glass is drying, cut a disk out of stiff
cardboard, making it a close fit inside one end of the tube. At the
center punch a 1/4″ peephole. If no punch is available, use a sharp
knife to cut a triangular hole 3/8″ on a side, as shown above 4: When the paint is dry, join the mirrors at one edge with adhesive tape, the unpainted sides facing. Set them on a drawn angle of 30. deg. or on the diagram below. Cut a cardboard spacer to fit closely within the outer edges |
 |
| 5: Tape the spacing strip in place to hold the mirrors 30 deg. apart.
Be sure the painted surfaces are outside; then slide the mirrors into
the tube as in the photo below. If they fit loosely, wrap a sheet of
paper about them 6: Push the mirrors 1/8″ inside the end of the tube. So placed, they should reach to within about 7/8″ of the other end. This will leave ample room for the load. Apply cement thinly inside the 1/8″ space and to the edge of the eyepiece, and press this into place |
 |
| 7: Turn the tube around and push the clear glass disk into it right
against the ends of the mirrors. A little cement may be spread around
the edge. Now cut a cardboard strip 5/8″ wide and long enough to overlap
inside the tube. Cement it fast as in the photo 8: You are now ready to add the load. Bits of colored plastic, broken glass, beads, and scraps of celluloid are suitable. All should be translucent or transparent. Carved pieces, notched edges, and saw cuts yield odd effects |
 |
| 9: It is interesting to experiment by varying the amount of the load
and using scraps of different colors. To view the patterns, press the
frosted disk into place. When the load is satisfactory, secure the disk
by cementing it 10: You can improve the outward appearance of your kaleidoscope by wrapping the tube in some gaily colored decorative paper. The kind used for Christmas packages is ideal. Clear model-airplane dope, lacquer, or varnish will prevent injury from frequent handling |
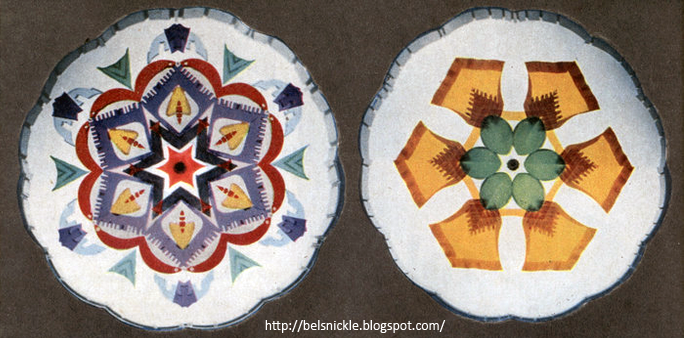
That beauty is in the eye of the beholder is literally true of these kaleidoscope patterns, for only one twelfth of each is real, a jumble of bits of plastic and glass. Eleven twelfths are reflections, blended by repetition into a symmetrical whole. These designs were photographed in a kaleidoscope built especially for P. S. M. To minimize the loss of light in successive reflections, special mirrors are used. They consist of plate glass on which vaporized aluminum has been deposited in a vacuum to form the reflecting surface. For these photos, the kaleidoscope was illuminated by two 2,000-watt spotlights shining through a sheet of opal glass. One-second exposures were made on Kodochrome film at lens openings of from f/8 to f/16. Oct, 1944
 |
| What's in a kaleidoscope? |
No comments:
Post a Comment
Constructive comments are appreciated. All comments are moderated and do not immediately appear after publishing. I don't publish spam folks. Thanks and have a nice day!
Note: Only a member of this blog may post a comment.