 |
| Left, my ten pointed, woven Christmas star. Right, a traditional eight pointed woven star ornament in reds and greens. |
I remember my art teacher showing me how to wrap these same stars when I was a school girl in the 1970s. It is an excellent introduction to simple weaving for older elementary students.
The process can be made more or less complicated depending upon the age and or experience of the person producing the ornament. I took the idea a step further and invented a star wrap pattern of my own as well. The nice "how to" video below was made by an art teacher for her classroom students. Given the detailed nature of the weaving, I recommend that you watch the video while you craft your own star versions. Although the process is simple, it seems more complex when reading instructions for the method. For this reason alone, I'm going to recommend that you watch the video before attempt to follow any instructions that I include here.
Ms. Gentry made this nice weaving video for her 6th, 7th and 8th grade students.
Supply List For Both Star String Projects:
- multiple skeins yarn, spools of string and embroidery floss
- cardboard
- tacky white glue
- ruler
- scissors
- large sharp embroidery needle (for 2nd star version)
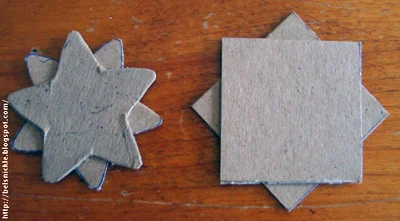
If you are making the second star pattern version depicted below, I have provided a pattern for you to print out and trace around below. The second star only requires one piece of cardboard per ornament. You will also need a sharp embroidery needle to poke holes into the cardboard.
Once your eight pointed cardboard shape is dry, you may proceed to wrap it with the first selection of yarn/string.
Keep in mind that this weaving project has only a finished front side for young students who have limited experience in sewing or weaving. For every wrap that these students make, they will need to "tie off" their yarn strands on the back of their cardboard templates. However, if you are making these stars and have more experience with a needle, you can make your woven stars two sided. Simply snip, tuck, glue and hide the ends of your wrapped design as you proceed through the steps. I used a large embroidery needle and a bit of tacky white glue to hide my yarn ends as I wrapped.
 |
| First wrap step for both woven string stars. |
 |
| Above you can see me weaving a large embroidery needle in and out of the holes made just beneath my star tips. |
After wrapping the 10 point star with blue embroidery floss, I simply repeated the same wrap with yellow. Then I proceeded to make two sets of holes using the sharp tip of my embroidery needle beneath each of the ten points of my star. I wrapped multiple colors of floss in a herringbone stitch through the lowest hole. Then I used a whip stitch to create the feather like tips of the outer points of my star by threading through the upper hole.
 |
| The second wrap of the eight pointed star, back and front photographed. |
The second wrapping of the eight pointed star is photographed above. On the left, I show the back side of my work. Note how I have added tacky glue to hold the center crossing ends in place while I work. Also, see in the second wrapping how I have a strand of floss crossing in the back. I will cut this away after I wrap a third and fourth time over the green floss. This will not harm my weave because it is trapped beneath top layers. Keeping the backside clean of crossing strings will make it attractive enough to be a two sided pattern. Just right, above in the photo you can also see traces of tacky glue on the edges of my cardboard template. This glue helps to keep my weaving in place over time and it will also dry transparent.
 |
| Left, third wrap. Next, fourth wrap. Middle, fifth wrap. Far Right, sixth wrap. |
The photograph above depicts the 3rd through 6th wrapping sequence for the eight pointed star. After completing these steps, I threaded a finer needle and stitched a cross stitch pattern in green over last top square of my design. I attached a green tassel to the bottom to finish the look.
 |
| My tassels for these ornaments were made from embroidery floss. I have also included a simple video below that demonstrates the basic method that I used. |
 |
| Click to download the largest file, 10 point star shape template. |
More Christmas Star Crafts for Children:


No comments:
Post a Comment
Constructive comments are appreciated. All comments are moderated and do not immediately appear after publishing. I don't publish spam folks. Thanks and have a nice day!