 Nobody will deny that a Christmas tree has plenty of backbone, but somehow it doesn't seem to have intelligence enough to use it. Or else it resents the taking away of its roots and the substitution of a shop-made standard that it considers inadequate. As a matter of fact the standards that you can buy in the shops are inadequate for a tree of any size. And so, if the boy of the family is handy with tools, it is up to him to make one.
A very good standard for a Christmas tree - strong, durable, and ornamental as well - may be made from a strip of one-by-two-inch-dressed" lumber 12 ft. long (which costs about a cent and a half a foot), and some pieces of an old dry goods box.
First, saw off from your one-by-two-inch strip four pieces twelve inches long and four pieces eleven inches. These are to make Figs, i, 2, and 4. Make four pieces like Fig. i and two pieces like Fig. 2 ; the notch at the end is cut with a saw across the grain, and then saw out with a chisel.
When these are done, join two of the twelve-inch pieces and two of the eleven inch to form a square frame. The joint is shown in Fig. 3, and it should be glued or nailed, or both, which is safer.
Next make the other two eleven-inch pieces like Fig. 4. These are just like Fig. 2 except that a groove four inches wide and one inch deep is cut in the middle of each. Then they are joined with the other twelve-inch pieces to form a frame similar to the first. The first frame is to go at the bottom of the standard, and the second frame, placed with the grooves tip, is for the top.
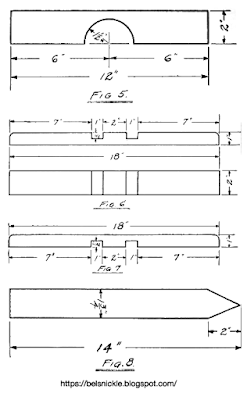
Now cut from the remainder of the strip two more pieces twelve inches long. With a compass set at an inch-and-a-half radius, and the center in the exact middle of one edge, draw a half circle on each, and chip it out with a chisel like Fig. 5. The use of these will be described later.
The remainder of the strip will make four pieces eighteen inches long, with a bit left over. These are to stand on their two-inch faces, and the upper edges of each end should be rounded off with a ''block'' plane. Then two grooves are cut in each piece, two of the pieces having the grooves on the upper side and two on the under side, like Figs. 6 and 7.
Now cut from your packing box sixteen strips or pickets one and three-quarters inches wide and fourteen inches long, like Fig. 8. These may be "ripped out" with a saw and smoothed up with a plane and sandpaper.
To "assemble" the standard join
first the two Fig. 6 strips and two Fig. 7. This leaves a hole two
inches square in the center and two strips projecting from each of the
four sides. Place the first square frame that you made on this, so that
its sides will be equally distant from the center, and nail in position.
Next nail the pickets in position so that the lower end of the pickets
will be "flush" with the lower side of the frame. Next, hold the upper
frame, with the grooves up, in position, eight inches above the lower
frame and nail the pickets to that. Fig. 9 shows the complete assembly.
Now give the frame, and the two pieces like Fig. 5 a coat of dark green
paint, and the standard is ready for use. Slip the tree into the square
hole in the base. If the trunk is a bit too large, whittle it to fit.
Then place the two pieces like Fig. 5 around the trunk at the top of the
frame for a clamp, and slip them into the grooves in the upper frame,
and you will find your tree quite ready to stand up and behave.
 |
| The finished picket tree stand. |
Build a Christmas Tree Stand Box by Gray House Studio.


No comments:
Post a Comment
Constructive comments are appreciated. All comments are moderated and do not immediately appear after publishing. I don't publish spam folks. Thanks and have a nice day!