Thursday, July 3, 2014

Tall And Thin, Old-World Belznickles by Kathy Grimm

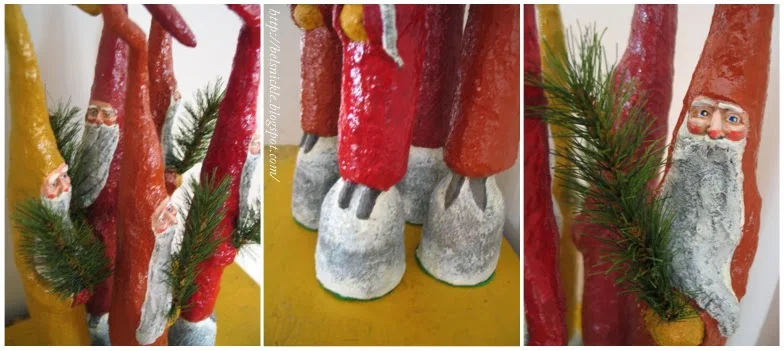
These paper mache Belznickes by Kathy Grimm stand measure approximately 18 inches tall. Each Belznickle carries a pine branch tree.
Limited edition Belznickles are painted in popular primitive colors: gold, brick, cinnamon and adobe shades of red.
Each Belsnickle stands on top of a dome shaped snowy pedestal.

Sculpted Belznickles in Gold, Blue and Brick Red Winter Coats

These hand sculpted, limited edition Belznickles by Kathy Grimm come in a traditional selection of Early American colors: gold, brick red, cardinal red, and a lovely bluish-grey.
Each face is individually sculpted and painted so no two Santas look exactly alike. Editions are determined by coat design.
These Santa folk art figures average approximately 12 inches tall.

Belznickle Candy Box by Kathy Grimm

I made this belznickle candy box for my husband one Christmas long ago. The Belznickle's face and hands were cast from a mold. The rest of this figure was sculpted using paper mache pulp. I then glued on a few trims including: a rabbit fur beard, miniature jingle bells and a leather strap for the pig and toys/packages added beneath the pig's feet were either individually crafted or purchased from a miniature hobby shop.
I stuffed this Christmas candy box with chocolate covered caramels.
A closer look at some of the detailed work on the candy box.
More Fancy Christmas Candy Boxes:

Tuesday, July 1, 2014

Some Christmas Thoughts and Inspiration from Dr. Helen Roseveare

"For verily I say unto you, That whosoever shall say unto this mountain, Be removed, and be cast into the sea; and shall not doubt in his heart, but shall believe that those things which he said shall come to pass; he shall have whatsoever he said." Mark 11:23

cover
      At the coming of the Christmas time, we are apt to give much thought to the likes and dislikes of those about us. We want to please, and we do not spare ourselves in the endeavor to bring into other lives a moment of happiness. We are even happy because of the happiness we bestow. Yet how often, when the occasion is past, do we sink back into our selfish selves, and shut out the needs of another, forgetting that the whole world is crying for comfort every hour in the year. A letter comes to me this morning, in which the writer says: "Let us plead for kindness to the living, and the loving. If we would only feel and act and speak tenderly and lovingly every day of the year, all the bitterness, the petty fault-finding, and the censuring and the selfishness would cease to dwell in our hearts. Today, all the tenderness wells up in our hearts; we are considerate and kind, and we breathe nothing but gentle affectionate greetings. If we could only forgive the living, as we forgive the dead, forgetting everything but the kindness, how much happier we should be! If only the whole year, the Christmas lesson of "goodwill to men" could be stirring out hearts, how much less sorrowful regrets and memories would be a part of out lives!


"O, friends, I pray tonight--
Keep not your kisses for my cold, 
dead brow,
The way is lonely; I am travel-
worn;
My faltering feet are pierced with
many a thorn;
Forgive, O, hearts estranged, for-
give, I plead;
When dreamless sleep is mine, I
shall not need
The tenderness for which I long
tonight!"

      Kind words to the living are better than kisses to the dead. One fragrant blossom of loving appreciation pressed in the trembling hand of the living is infinitely better than banks of flowers for the bier. --by S. H. H.
      Today dear reader I put before the life of Dr. Helen Roseveare; a saint who has fought the good fight; a saint who's life should inspire us all to give our all while there is still time yet to live in this world for Christ.
      Dr. Helen Roseveare was an English Christian missionary to the Congo from 1953 to 1973. She went to the Congo through WEC International and practiced medicine and also trained others in medical work. She stayed through the hostile and dangerous political instability in the early 1960s.

"Moira Brown speaks with Dr. Helen Roseveare about her life and missionary work in the Congo even through the dangerous political instability which lead to her abuse and rape." Dr. Helen Roseveare: Missionary, Medical Doctor, Author: Book: "Give Me This Mountain"http://www.wec-canada.org  Listen to more chapters: Part 2, Part 3, Part 4

      Helen Roseveare was born in England in 1925. She became a Christian as a medical student in Cambridge University in 1945. She continued to have strong links with the Cambridge Inter-Collegiate Christian Union and was designated as the "CICCU missionary" during the 1950s and 1960s. She built a combination hospital/ training center in Ibambi in the early 1950s, then relocated to in Nebobongo, living in an old leprosy camp, where she built another hospital. After conflict with other staff at the hospital, she returned to England in 1958.
      She returned to the Congo in 1960. In 1964 she was taken prisoner of rebel forces and she remained a prisoner for five months, enduring beatings and rapings. She left the Congo and headed back to England after her release but returned to the Congo in 1966 to assist in the rebuilding of the nation. She helped establish a new medical school and hospital (the other hospitals that she built were destroyed) and served there until she left in 1973. She helped many people from different countries, and helped them when needing food, and drink.
      Since her return from Africa, she has had a worldwide ministry in speaking and writing. She was a plenary speaker at the Urbana Missions Convention three times. She is now retired and lives in Northern Ireland. Her life of service was portrayed in the 1989 film Mama Luka Comes Home. Her touching story about how the prayer of Ruth, 10-year-old African girl, for a hot water bottle to save a premature newborn baby after its mother had died has been widely forwarded by email. She survived rape and trial during the Congolese civil war in 1964 because of the intervention of the villagers she had helped previously.
More Related Articles:

Thursday, June 26, 2014

Color & Draw Old-Fashioned Christmas Toys

Color these toy bowling pins and a canine pull toy.

Description of Coloring Page: bowling pins or skittles, toy dog, mechanical dog, ribbon, leash

Don't forget to drag the png. or jpg into a Word Document and enlarge the image as much as possible before printing it folks. If you have a question about this coloring page, just type into the comment box located directly below this post and I'll try to get back to you as soon as I can.

More Coloring Pages of Old-Fashioned Toys for Children:

 As soon as you have finished coloring the toys above, try drawing the toy drum below!

Left, the little boy said as he lit the tree and went to bed, "I hope that Santa Comes." Center, "And sure enough, next Christmas morn, tied to his tree he found a horn." Right, "A wagon, skates, some puzzles too, and this nice drum that you see here."


City of Auckland Pipe Band perform "The Little Drummer Boy"

Sunday, June 22, 2014

7 Basic Methods for Crafting With Papier-Mâché

This hollow shape was made by layering
newsprint with wheat paste and then an
additional layer of CelluClay was
then layered on top to add strength to
the project. 
There are many different methods used in order to transform paper into small decorative ornaments. I have listed here the seven that I will include among the Christmas ornament projects for this blog.

1. Covering balloons with newsprint and wheat paste. This is one of the oldest methods for creating hollow papier-mâché ornaments. It is a method best suited to the crafting of very large, light weight ornaments. However, it is a bit fussy. Many school children learn to craft with papier-mâché using this method. Whenever I am speaking with students about papier-mâché, this is the method of working that they believe I am referring to. However, I rarely use this type of process. 

Examples of Christmas Ornaments Made from different combinations of newsprint strips and wheat paste:
2. Mass produce detailed mâché ornaments by first casting old-fashioned Plaster of Paris molds of your own clay sculptures. Pour a liquid papier mache mixture/ casting compound into prepared molds to duplicate your original clay sculpted ornaments. 
3. Mix and layer paper pulp directly to the surface of styrofoam or cardboard parts, skipping the old newsprint and wheat paste steps altogether.
4. Crush and mask paper sculpture forms and then layer paper pulps directly onto these light weight armatures. This is a very old process using newer products. It is my preferred method for working with papier-mâché and I will continue to post many ornament tutorials using this specific method.
These paper armatures are ready to have layers of paper pulp smoothed out over them. Far left, German lovebirds,. Center, Early American Lion. Right, Apple.
These are different types of stoneware molds that can be used to cast papier-mâché ornament.
5. Cast papier-mâché ornaments from cookie molds. After perfecting this method, I proceeded to acquire a large collection of cookie molds for teaching classes in crafting Christmas ornaments to adults.

Examples of Christmas Ornaments made from casting paper into molds, cookie cutters and also from sculpting with paper clay :
Prefabricated papier-mâché Christmas ornaments perfect for
decoupage techniques.
6. Decoupage with paper or fabric over a mass produced papier-mâché forms. By means of layering fancy papers and Mod Podge onto surfaces already cast in a factory, most people can craft some relatively sophisticated Christmas ornaments. 

7. Sculpt with papier-mâché, paper clay.

Friday, June 20, 2014

A Tutorial for a Hornet's Nest Ornament

I photographed my hornet's nest ornament outside in the crab apple tree. I think it looks pretty convincing. The next time I see it, it will be hanging on a pine tree instead.
A European hornet or a "bell hornet" nest
under construction. To read more about 
this type of hornet go here.
       Many years ago when my husband and I were first dating, we took a fall walk in the woods and came upon a large, abandoned hornets' nest. We were so excited to find one and in such marvelous condition too. My husband pulled down the branch the nest was hanging from and plucked off the nest to take home to his mother. She was absolutely over-joyed to see it!
      This is the memory I thought of when I found a large, dead hornet on my front walk last year. It was perfectly preserved and I believe that it may have been a queen because of it's size. I carefully removed it and tucked it into a drawer for later use. In our family, ornaments are frequently given to remind each other of a particular event. The event doesn't need to seem special to anyone other than ourselves. Today, I made a hornets' nest from paper, dryer lint, a twig and the hornet that I collected last year. I think Doug will enjoy the memory that it brings to mind.

Supply List:
  • old egg carton
  • twig
  • dryer lint (or cotton batting dyed grey)
  • a hornet or two (You can purchase fake ones from a silk flower supply.)
  • A bronze colored Sharpie
  • white school glue and super tacky glue
  • masking tape
  • newsprint, any kind
  • thin wire
Step-by-Step Instructions:
  1. Select a strong twig from outdoors to "hang" your hornets' nest from.
  2. Twist a piece of newsprint and a couple of thin wires around the center of the twig. Leave a good quantity of the paper to dangle below the twig. Set this aside.
  3. Cut up an old egg carton and tape a few pieced together to serve as the walls of the hornet's nest.
  4. glue and tape the tail ends of newsprint inside the egg cup and then wrap the whole form together as one shape in masking tape.
  5. Lay out flat a thin sheet of dryer lint. Coat half of the "hive" with white school glue and lay the lint sheet, randomly gathered onto the tacky surface. Repeat the same for the remaining backside of the hive.
  6. Now glue into the layered lint, shredded egg carton scraps. Let the hive dry. This may take a day. I didn't cover the entire surface of my hive with paper shreds; I wanted to expose some of the nice textures and colors of the dryer lint.
  7. Use a bronze colored Sharpie to draw horizontal lines on top of the shredded egg carton scraps.
  8. Glue your wasps down firmly anywhere about the hive with tacky glue. 
  9. Fill in cracks where the insects meet the hive so that these will attach well.
  10. Coat the finished ornament with a watery glue layer.
Steps 1 - 4. The inside of the hornet's nest will be covered entirely with masking tape when completed.
After you have completed step 5., your hornets' nest should look something like the one pictured above.
Here you can see how I have added shredded egg carton to my hive in order to make it look more realistic. I also use a tacky white glue to attach my real hornet to the hive before drawing stripes onto the paper pieces with the bronze colored Sharpie. I found this hornet on the front walkway of my home, a dead queen bell hornet perfectly preserved, very curious.
Here is my completed hornet's nest. It looks so lifelike. Perhaps my husband will be startled when he unwraps his gift? I hope he doesn't throw it!
     "Watch a European hornet nest with the founding queen in the center of the video. Notice the size difference from the working hornets"