Tuesday, April 28, 2015

Make This Nostalgic Circus Elephant Seat

Illustration of the completed elephant seat.
       Your small child will take pride in possessing this gaily colored chair, and anyone can make it with a scroll saw and a screwdriver. All parts are cut from 1/2 -in. plywood and assembled with flat-head screws. These should be countersunk carefully and puttied over. The chair looks nice with the elephants finished in light gray and the blankets painted on with a darker gray and bordered with brilliant orange.  
Enlarge elephant blueprint to scale.

Personalize a Handcrafted Tie Rack for Dad

      Using enlargements of favorite photos, you can make these tie racks for yourself, and they will be appreciated as gifts by your friends. A photo of the head and shoulders is glued to 1/4-in. plywood and then cut out with a jig saw. When finished, the photo should be about 7 in. high. If desired, silhouettes can be substituted for photos. In this case, the outline of a photo is traced directly on the wood, which is then sawed to shape and painted black. The rack for the ties is a block of 3/4-inch hardwood cut as shown and screwed to the plywood back near the lower edge. L-hooks to hold the ties are then driven into the edge of the hardwood piece.

Build This Sailboat Lamp for A Child's Room

Process of putting the pieces together shown in
 the above illustration.

      "LIGHT UP" with this novel sailboat lamp means "Port your helm," with the rudder arm and rudder, which controls the toggle switch to turn the light on and off. The light itself is enclosed within a parchment shade, which is shaped around wire frames at top and bottom to resemble a ship's sail. Most of the construction concerns the hull of the boat. As shown in Left, the bottom part of the boat is a separate piece, while the upper part and the cabin are cut from a single thickness of 2-in. stock. By band sawing the deck line carefully, the cabin will fit into place perfectly. Shaping of the hull sides is accomplished by simply tilting the band-saw table to an angle of 83 degrees. A few strokes with a plane will round off the forward sections. After shaping the outside of the hull, the pieces can be taken apart and the necessary cutouts made for the cockpit switch and wires, as shown. It is advisable to make a full-size plan of second picture below, erecting the station lines on 2-in. centers, before commencing the actual construction.
      The sail is made from parchment paper, which may be purchased flat or cut from a discarded shade. It is laced around wire loops at the top and the bottom, and then can be laced to the 1/2-in. dowel which serves as a mast. The jib sail is merely a
triangular piece of parchment, cut to the size shown, and suspended on a string running from the mast to the bow of the boat. The boom and the gaff are made easily, and add to the sailboat motif while helping to hold the shade securely in place.
      The last illustration shows the switch detail. This is made by slotting the arm of a small toggle switch so that the brass rudder can be soldered in place. The rudder arm, which is made of 1/8-inch brass, is soldered to the rudder, the whole unit serving as the light switch. The light socket is carried on a 1/8 inch by 3-inch pipe nipple, which is held to the base of the hull by means of two locknuts. The pipe is cut near the lower end to allow the wires to be connected with the switch.

Plywood template, draw to scale before starting your projects.
       Additional finishing touches can be added if desired, such as port holes, a small anchor, mooring line, etc. As shown in the heading photo, the hull is done in white pine with a colorful lacquer finish. A varnish finish on hardwood would make up nicely also. The lead in the lower part of the hull makes the lamp "stay put," but could be omitted if desired. The bottom should be covered with felt to prevent the wood from marring polished surfaces.
Wiring and Switch Detail.

Craft a Prairie Schooner Mail Box

      Can lids for wheels, and four cut-outs of horses hitched to one end give this rural mailbox the novel appearance of a prairie schooner. The box is mounted on two wood blocks, which are supported by a 1 by 6-in. board nailed to the top of a post, the wheels being pivoted on nails driven into the bottom of the box. Horses, tongue and doubletrees are 1/4-inch wood, while the harness is strips of leather. The assembly is painted in appropriate color's.

6 Different Decorative Doorbell Plates to Craft

Click to see a much larger image.
      If you have a flush- type doorbell push button which guests find hard to locate, especially in the dark, an ornamental cutout placed around it will overcome the trouble and add a novel touch to the doorway. Several designs of cutouts for this purpose are shown here as suggestions, or you can make one to suit your own fancy. You can use just one piece of metal, or you can obtain contrast by mounting the cut-out on a plate of different metal, as for instance aluminum or brass over copper or iron painted black. Simple silhouettes in hammered iron, painted black, are very effective against , light-colored surfaces. The work can be done with a hand coping saw or on a power scroll saw. All edges and corners of the plate are carefully rounded with a file before starting on the paint job, or in the case of brass or copper, you polish the metal first and then apply a coat of clear lacquer. 

Craft a Mexican Powder Box

       Concealing a supply of face powder in his rotund body and a lipstick in his sombrero, the colorful gentleman shown in the picture will prove a favorite on any dressing table. The lid and box are turned separately on the faceplate, turning out the inside of each and rabbeting the edges to fit together snugly. Then the two pieces are placed together and mounted between lathe centers to shape the outside.
      The lipstick forming the crown of the hat should fit loosely in a hole at the top so that it may be removed easily. Allow it to project about 1/2 inch above the top. The base is notched at the front and back to simulate feet. The inside should be sanded smoothly and shellacked. 

Saturday, April 18, 2015

Craft a Toy Animal Box With Moving Facial Features

Click to see a larger illustration.
      Wagged from side to side by a pendulum, the head of this toy has interchangeable eyes, mouth, nose and ears, which can be used in various combinations to produce unusual facial expressions. Variations of these facial parts are shown in the squared detail. All parts have dowels attached for anchoring them in place, and they all fit in holes in the face except the ears, which slip into staples on the back of the head. The base for the head is a box with the front side painted to resemble the bars of a cage. As shown in the lower; left-hand detail, the head is attached off center to a dowel, which turns in a hole through the side of the box. Washers are used as spacers between the head, box and pendulum, which is fastened rigidly to the end of the dowel inside the box. The box of the original was painted yellow, bars black and face white with black features.

More Small Wooden Box Crafts:

Turn a Swedish Top, It Sings While It Spins!

This unique Christmas gift for a small child is designed for those of you who have experience using a lathe.
      Patterned from an original made in Sweden more than a century ago, this unusual, wooden top, which is turned on a lathe, produces a pleasing hum as it spins swiftly over the floor. The hollow, ball part of the top is turned from two maple blocks on a faceplate, each half first being glued to a scrap, pine block, after which the latter is attached to the faceplate. Then the center of each half of the ball is turned concave and the edges rabbeted to fit together snugly. Stock for the spinner is glued at the base of one block and the two halves are glued and clamped together between the lathe centers. The outside diameter is turned to the dimensions given above, checking the work frequently with a cardboard template to obtain a perfect sphere. The square opening made in one side of the ball is filed to shape after first drilling a starting hole. Variation in sounds can be obtained by varying the size of the opening, this being accomplished by providing snug-fitting inserts of various sizes which can be pressed into the opening.
      The handle, in which the top is held to spin it, is turned from a 2 3/8-in. square piece and is planed or sanded flat on two sides to measure 1 in. thick. A hole to take the spinner is bored through the center of the flat portion and an opening is made through the side through which a string is pulled to spin the top. To do this, the string is wound around the spinner, as shown in the upper photo, after which the end of the string is passed through the hole in the side of the handle. Holding the top upright as shown in the lower photo, give the string a quick pull and with a slight upward motion, throw the top clear of the handle to alight on the floor.

More Toy You Can Make With a Lathe:

Craft a Corner Whatnot Shelf in a Maple-Leaf Design

      Just the thing to dress up a corner in your living room, this whatnot shelf has duplicate plywood sides that can be cut together. However, one must be 1/4 in. wider than the other at the back edge. After sanding thoroughly, the sides are assembled with glue and small brads, and the shelves are spaced as indicated on the squared drawing. Finishing the original shelf to carry out the maple effect consisted of applying maple oil stain, followed by a coat of white shellac. When the shellac was dry, the surface was sanded, dusted clean and given a coat of clear varnish.

This project is perfect for those of you who know how to use a scroll saw. Click directly on the image to see a larger blue print here.
Similar Scroll Saw Projects:

How to Craft a Memo Cabinet for The Kitchen

Click to see finer details. Above you can see the tree dimensional blueprint showing how to put the memo cabinet together.
       This tiny kitchen cabinet with a mirror set in its front, encloses a small blackboard and has pockets for note and cook books as well as chalk and pencils. Front and back are made of 1/4-in. plywood. Two coats of blackboard slating paint are applied to the back to provide a writing surface for chalk. The front has a window which is rabbeted to take the mirror from the inside. For a novel effect, round the front corners and score the wood with a wire brush. Then finish in ivory or white and rub some burnt umber or other pigment into the scored scratches, wiping the whole surface clean. Jigsaw the letters and paint the sides, then brad them in place and paint the top surfaces. Nail and glue wooden strips to the back of the lid to form the pockets, sides and bottoms. Mortise narrow brass strips into the side pieces to hold articles in the pockets. The hinges must be mortised to their full depth when folded, with the pins standing well out so that the front can swing out more than at right angles. Two holes at the top of the blackboard fit over screwhooks in the wall to hold the memo.

Similar Projects:

Wednesday, February 18, 2015

Over 100 Nostalgic Toy Ideas You Can Craft for Christmas!


      Santa's job will be easier when you turn toymaker and lend a helping hand to relieve the burden on his North Pole workshop. Among this collection of exciting toys, there’s at least one that will surely make Christmas extra merry for some youngster.  Construction of these, as well as the others, is apparent from the drawings, which include patterns for the parts that require jigsawing. Enlarging the patterns full size is easy. First, count the number of squares given and rule on paper an equal number of 1-in. squares unless otherwise stated on the graph itself.
      Next, number the rows of squares 1, 2, 3, etc., across the top and down one side of both the magazine pattern and the ruled paper. Now, begin enlarging the pattern by drawing that portion of the outline which is in square No. 1 in the magazine in the corresponding square on your ruled paper. Then advance to the next square, and so on, until the complete pattern is enlarged. With practice, you’ll find it easy to enlarge any pattern by the square method.
      With the exception of the table-and-chair set, which should be made of plywood, common 3/4-in. white pine is ideal material for most of the wooden toys.

A Child's Table and Chair Set
      A child's table and chair set. Photo of finished project plus graph depicting the measurements of each part for the assembly of chairs and a table. Exceptionally sturdy but not especially fancy, this plywood table-and-chair set will appeal to the dad or big brother who works with little more than a handsaw, drill, screwdriver and paintbrush.

More Table and Chair Sets For Children:
Children's Toy Chest Plans:
Swinging Arm Dolls

      Here is how to make these adorable swinging-arm dolls. With old wooden packing boxes laid out in 1/2″ squares as material, mark the patterns according to the squared charts shown above. Before cutting out the figures, bore a hole through the shoulders and up one leg, as shown by dotted lines in diagrams at the right.
      The sailor’s hat is made of thin wood cut in circular shape and nailed to the head. Bore a hole through the under side of each arm about %” deep and a 1″ hole lengthwise to take the wire which passes through the shoulders.
      Straight grained shingles or thin wood will do for paddles. Fasten them by driving a small brad or wire pin through the joint. Set the paddles at an angle (about 45 degrees) allowing easy turning by the wind.
      When assembly is made, be sure to leave a small space between the arms and the body to permit swelling of the wood.
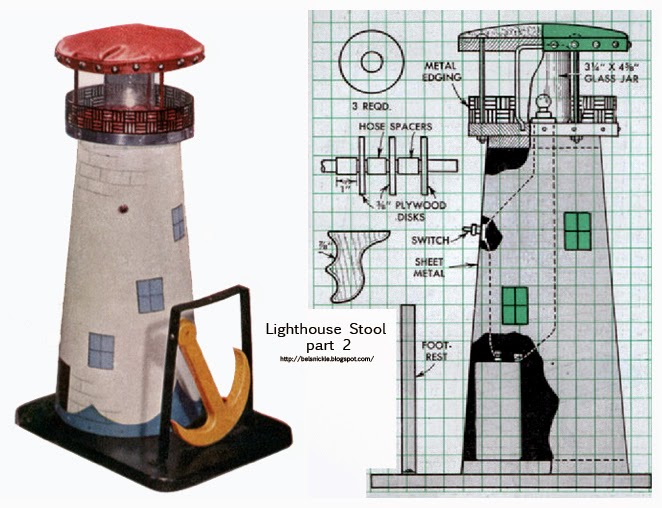
A Lighthouse Stool

       The "beacon of the lighthouse stool, which is enclosed in an inverted glass jar, consists of a 1.5 volt flashlight bulb. This is inserted in a socket and wired to a push-button switch and dry cell. Removal of the screws at the base of the lighthouse permits renewal of the dry cell. Three 1/4 inch carriage bolts attach the padded top of the stool, lengths of tubing being slipped over the bolts to support the top slightly above the glass jar. The pattern for the sheet-metal base of the lighthouse is given at the right. The metal is lapped at the seam and fastened together with sheet-metal screws.
        Any boy can build one of these mirror-scopes at a small expense, and for his efforts see, when looking through the peephole, three miniature objects increase to a multitude.
      Here is the way it is done. Construct a wooden box about two feet long and five or six inches square. Against the inside of the front fasten a mirror as illustrated in the drawings above and drill a small peephole about two inches from the bottom. Also scratch a similarly sized peephole in the silvering on the back. Then cut a hole six or eight inches long in the top of the box and fit into it a piece of ground glass to admit light.
      The rear is built up of two pieces of wood as illustrated in the accompanying drawings. Attach a second mirror to the inside of the end, then hinge the latter as shown. Paint the inside of the box white and you are ready to install the figures.
      Many miniature images can be purchased at the five and ten store. Arrange not over four figures in a nice grouping. Close the end and it will seem as if hundreds of images inhabited the box when you look through the peephole. Images of ships, men, animals, etc., are recommended.

Toys Similar to a Mirror-Scope:
Wood Choppers

      The stock required is 1/4" thick. Two bodies, two arms with axes, and two bars are needed for this toy. The upper bar has a place 5/8" from its center which is widened to resemble a tree stump an inch high. The pairs of parts are held together while holes are being bored thru them. The shoulders of the men and arms should have small holes to make a fixed joint while the men's legs and the bars should have holes closely fitting 1" nails. Both bars are located on the side of the men on which the arms are fastened. Color the coats, hats and sleeves blue, boots and axes black, arms, fingers, faces pink, and trousers red, bars green, and stump brown.

Bucking Goats
      From 1/4" stock, saw out two bodies, as shown in the full-size drawing, and two bars shown in the dimensioned drawing. Place the two bodies together and bore holes in the hind legs, as shown, for 1" nails. Do likewise with the two bars. Color the goats white, with large brown spots on their backs, necks and legs. Color the horns and hoofs black, and the bars gray or brown. Fasten with movable joints, one bar on each side of the goats, having them cross as indicated in the assembled drawing.

Similar Hand-Held Toys:
A Bucking Bronco Rocker

      This bucking bronco rocker requires plate casters for the footrest and a socket-type caster for the rear leg. The two sections of the toy are pivoted together with a carriage bolt and a small pillow-block bearing. A coil spring between the legs give the "cowboy" a bucking ride that bounces him up and down in the saddle.
Bucking bronco instructions and pattern.
A Walking Turtle Pull Toy 

      When pulled, on a string, the wooden turtle illustrated below moves its legs and draws its head in and out in a lifelike manner.
      Turn the shell from a band-sawed pine blank. Hold it in a chuck for recessing, and then fit the recess to another chuck for shaping the outside. Groove the segment zones and divide them radially.
Bend the crankshaft from baling wire, the bearing from a strip of sheet iron. The connecting rods are strips of sheet iron, pushed onto the cranks before the wheels are added. The latter are keyed by bending the shaft ends back on themselves and forcing them into small holes in the wheels, where a drop of celluloid cement holds them. Screw the bearing inside the recess, slit the ends to the bearing holes, and force in the crankshaft.
      Shape the head and neck semicircular on top. The neck slides in a groove in the shell, being held with a metal plate. The connecting rod enters a slot, where a nail holds it. The tail is a strip of inner-tube rubber.

More Old-Fashioned Pull Toy Patterns:
An Organ Grinder Toy

Front side, and open rear view of the animated organ-grinder toy.
 The sand motor is "wound" by turning the house sidewise through a
complete revolution as shown at the far left.
      An everlasting sand motor provides the power to drive the mechanical organ grinder illustrated. To “wind up” the mechanism, it is necessary merely to give the box a complete turn in the direction indicated in the drawings. This brings the sand back into the hopper ready to run down and turn the small paddle wheel. Other adaptations will suggest themselves, such as a woman pumping water or a hobo sawing wood.
      For the box, plywood is used, the joints being well fitted to prevent leakage of sand. The six-bladed paddle wheel is scroll-sawed from a block of white pine. The axle is a piece of bicycle spoke turning in glass-bead bearings, which are recessed into the wood as shown. Short lengths of brass tubing will serve just as well as the beads.
      The hole in the sand hopper should not be over 1/8″ in diameter for beach sand. Incidentally, beach sand is the best because the grains are smooth and pour more readily. Sand from a creek bed is also satisfactory. To facilitate adjustment, the back panel with the window is fastened with No. 3 screws.
      The organ grinder is scroll-sawed from material and painted in bright colors. The girl is painted on cardboard, together with the window frame, and glued to the box, as is the hand organ.—L. R. Browne.

A Sand or Water Mill

      This is an interesting beach toy as either fine sand or water may be used to operate it. It is very simple to construct and is made as follows: The base is constructed of 1/2 " pine, 7 1/2" wide and 7 1/2 " long; and the four blocks which are glued and bradded to the corners, are 1/2 "x1"x1". The two uprights are 3/4"x7/8"x8 1/4", and the two cross supports at the tops measure 3/4"x7/8"x2 1/2".
  • Two holes are bored in the base for the screws that  hold the uprights in place. These holes are 2y 4 " from  the end and 2^" from the sides.    
  • Holes are bored in the little top braces )A" from the  two ends and one just in the middle, or iy 4 " from the  ends. These are for the screws that hold the braces to  the uprights and to the top piece. All holes are bored  with a drill suitable to take iy 4 " No. 8 flat-head screws,  and all are countersunk on the side where the screw  enters.   
  • The top piece is made J/4"x5*4"x5*/>" with the two  front corners slightly rounded, as shown.     
  • A hole is bored of a size to receive the funnel used,  \y 2 " from the front edge and 2^" from the sides.   
  • A hole is drilled in each upright piece, 3 l / 2 " from the  lower end, of a size that will insure a driving fit to the  wire used, in this case being a piece of No. 12 copper-  dipped, 4^4" long.   
  • A piece of J4" dowel is cut off %" long and a similar  hole is bored about two-thirds of the way through, as  shown.    
  • Four holes are bored, as indicated on the drawing, for  the quills, which are later glued in place. Feathers from  the poultry yard will furnish these.    
  • Sand all pieces with No. 1 sandpaper and first assemble the top, the two uprights and the two cross supports.  Paint these two coats of red paint.    
  • Attach the cross blocks to the base with glue and  •U" brads and paint two coats of yellow. Paint the tun-  nel two coats of bright green.    
  • While these are drying construct the paddle wheel.  The piece through which the wire axle runs is ^4"x34"x  2J4". The four blades are y 4 "x2y 4 "x2y 4 ".    
  • After these are sanded and a hole is bored through the  center piece, nail the blades to the center piece, in the  position shown in the side view. Use y 4 " brads and glue  for fastening the blades. Paint two coats of yellow.   
  •  When the parts so far assembled are thoroughly dry,  finish the assembly, using \y 4 " No. 8 flat-head screws  and glue.   The toy is now ready to operate.
 More Water and Sand Toy Ideas:
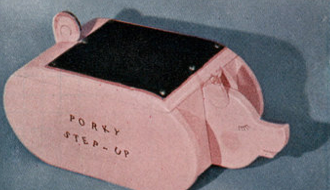
A Step-Up Stool

       Little ones may need a bit of help in the washroom reaching the sink so why not build a little helper? This little step-up stool features a curly tail and a pink pig snout. Don't forget to tack on a non-skid rubber mat to prevent slippery falls!

  More Bath Related Toys:
A Toy Freighter

      A colorful Toy Freighter for quantity production boats are among the most fascinating toys for young children. If they can play with a boat in the bathtub or in a wading box or pool, so much the better, but they also get much enjoyment in playing with one on the floor if it is of a flat-bottomed type.
      The little freighter illustrated is adapted for either purpose, and the design is especially well suited to quantity production because of its simple construction and the small amount of materials required. The capacious cargo hold will carry a large shipment of dummy boxes and barrels made from scraps of wood.
      White pine, redwood, or any fairly lightweight wood may be used. The hull is built up as shown and fastened with casein glue to a waterproof plywood bottom. The plywood should be of the outdoor type. Avoid using nails or brads unless galvanized, because ordinary nails will eventually cause rusty streaks.
      Deck planking can be simulated by scoring the wood with a hard lead pencil and then varnishing the surface. Take care to round off the tip of the mast as well as that of the dowel behind the deck house. If the toy is intended for a very small child, the mast should be eliminated so that there would be no danger of his falling upon it.
      Use the brightest reds and greens in painting, because the appeal of this freighter lies principally in its coloring. Stenciled windows and doors add to its appearance, but are not absolutely necessary. The cargo hold is painted gray.

Craft Little Toy Cars, Boats and Trains:
Playing Make Believe at The Car Wash:
Road Rugs and Mats For Little Toy Cars:
Creative Playthings for Marbles:
Build A Child's Doll House:
Craft Your Own Math Toys:
Dress-Ups Aren't Just For Halloween, These Also Make Great Gifts For Christmas:
Tools and Workbenches for The Youngest Carpenters:
Homemade Toys for Little Campers:
Build Child Sized Markets:
Build Your Child a Durable Kitchen Play Set:
Make Your Own Play Food:
Instructions for this project from Cathie Filian and Steve Piacenza.
 This kitchen is a recycled child's dresser.

Monday, January 5, 2015

Two Ways To Craft Dangling Valentine Ornaments

       Below are two variations of the same craft. One of the ornaments uses flat cardboard hearts with three dimensional stickers and the other uses three dimensional Styrofoam hearts and flat lace stickers. Either way, you can't go wrong with this simple process. Make endless decorative heart combinations to fill the branches of your Valentine tree!
Two dangling cardboard hearts including three dimensional cherubim stickers.
Supply List:
  • three dimensional cherubim stickers
  • cardboard hearts
  • decorative papers to cover the heart shapes
  • a small selection of glass beads
  • thin red rick-rack
  • hot glue gun and glue
  • tacky white glue
  • wire for hanging and a bit extra to shape U shaped hooks
Directions:
  1. Cut out a heart shape from a sturdy piece of card stock.
  2. Cut two small 1/2 inch pieces of thin wire. 
  3. Bend each wire into a U shape.
  4. Using hot glue attach one U shape bent wire to each end of the heart. Make sure the U shape tips are facing towards the center of the heart. 
  5. Bend a wire hook to thread through the top U shaped wire to hang the heart.
  6. Use a needle threaded with dental floss to string a few decorative glass beads through the U shaped hook suspended from the cardboard heart's bottom half.
  7. Cut two hearts the exact same size as your cardboard heart from decorative papers.
  8. Glue these onto the cardboard heart using white tacky glue.
  9. Paste a thin red rick-rack trim around the outside edge of the paper covered cardboard heart.
  10. Glue on three dimensional cherubim to both the front and back sides of the dangling cardboard heart so that the ornament will look nice when it spins on the branches of a Valentine tree.
A dangling Styrofoam heart ornament.
Supply List:
  • a three dimensional Styrofoam heart covered with red glitter
  • lace patterned heart stickers
  • gold chenille stem
  • a small assortment of red glass beads
  • dental floss
  • needle
  • white tacky craft glue
  • wire hook for hanging
  • gold rick-rack
Directions:
  1. Use tacky white glue to adhere a small piece of gold rick-rack around the outside edge of the Styrofoam heart.
  2. Glue on a selection of lace heart stickers.
  3. Cut two small 1/2 inch pieces of thin wire. 
  4. Bend each wire into a U shape.
  5. Push the U shaped wire ends into opposite ends of the Styrofoam heart. Pull these out and fill the holes with tacky white glue and then reinsert the U shaped wires.
  6. Let the hooks in the heart dry before stringing the top end of the Styrofoam heart with a wire for hanging. 
  7. Bend a tinsel chenille stem through the bottom wire hook of the Styrofoam heart and shape this stem into a heart shape. Hook the end tip into the beginning point of the stem.
  8. Use a needle threaded with dental floss to string a few decorative glass beads through the U shaped hook suspended from the Styrofoam heart's bottom half.

Little Ones Can Print Snowmen With Their Hands for Christmas

These hand printed snowmen were made by my nephew a few years ago.
Supply List:
  • Solid colored Christmas baubles, plastic or glass
  • acrylic white and black paints
  • sponge
  • paper plate
  • permanent black, blue and orange ink markers
Directions:
  1. Squirt out a bit of white acrylic paint onto a paper plate. Dip the sponge into it and paint both the palms and inside fingers of your child's hand.
  2. With the top of your bauble right side up, place the ornament into the painted palm of your child's hand. Carefully close his or her fingers around the bauble's round surface without letting their hand shift.
  3. Now ask them to gently remove their hand from the surface.
  4. Then hang the bauble in a place where the paint can dry without being disturbed.
  5. Wash your little ones hands.
  6. After the white acrylic paint has dried, paint black top hats on each of the printed white finger tips.
  7. Using your permanent markers, add details to each of the snowman's faces: eyes, noses, smiles and scarfs.
  8. Sign and date the ornament with a black permanent marker on the bottom of the palm print.
"Heidi demonstrates how to make a great holiday gift with 
your child's hand print. Great fun for the kids and a great gift idea."

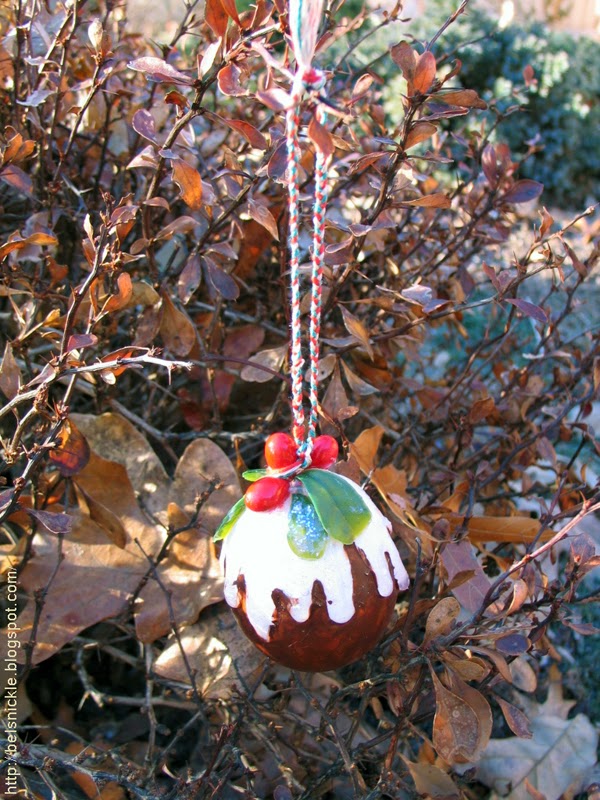
Craft a Plum Pudding Ornament from A Hollow Egg

Close up photographs of my Christmas plum pudding made from a hollow egg shell.
       This Christmas pudding is designed to hang from a tree. It is crafted from a hollow egg and it is so light weight that it may be hung from the most delicate of tree branches.

A very light weight plum pudding ornament for the tree.
Supply List:
  • sharp embroidery needle
  • fresh, uncooked egg
  • small bowl
  • white glitter
  • white puff paint
  • small red berries and green leaf for trim (artificial)
  • brown acrylic paint
  • tiny paint brush
  • twine for hanging
  • white tacky craft glue
  • rubbing alcohol
  • clear nail polish
Step-by-Step Instructions:
  1.  First you will need to blow the contents of an egg from it's shell. Use a sharp embroidery needle to poke two holes into the top and bottom of a raw egg. Dip a tissue into a bit of rubbing alcohol and wipe down the surface of the egg so that it is clean. Position your lips over the smaller of the two holes and blow the raw yolk out of the lower hole. You can watch a video here to see just how this may be done.
  2. After blowing out the yolk, shake the egg to listen and make sure that it is indeed empty. Set the egg out on top of paper towels to dry completely before painting it.
  3. Take your tacky craft glue and adhere your choice of berries and green leafs to the top narrow half of the egg. Let this application dry completely.
  4. use a generous amount of translucent or white puff paint to drip underneath the trims and to drip down the side of your egg. This is puff paint is the vanilla sauce of your Christmas pudding.
  5. Sprinkle white glitter on this puff paint before it dries. Let the egg dry.
  6. Using a delicate, small paint brush, apply a brown cinnamon looking layer of paint to the lower half of the egg. Carefully avoid painting into the faux vanilla sauce.
  7. After the paint dries apply a coat of clear nail polish to the painted surface areas.
  8. Strategically tie a braided cord to the tip of a berry in order to hang the Christmas pudding from a tree.
More Christmas Pudding Ornaments:

Sunday, December 21, 2014

Remembering Marshall Field's at Christmas Time

The famous clock at Marshall Field's State
Street store in Chicago.
       When my husband and I were dating, we lived in Chicago for a brief time. I have so many fond memories of that city, especially Christmas memories. The first time we visited downtown to look at window displays and purchase gifts we stopped at Marshall Fields to have a bite to eat. 
       Among the "firsts" by Marshall Field's was the concept of the department store tea room. In the 19th century, ladies shopping downtown returned home for lunch; having lunch at a downtown restaurant unescorted by a gentleman was not considered ladylike. But after a Marshall Field's clerk shared her lunch with a tired shopper (a chicken pot pie), Field's hit on the idea of opening a department store tea room, so that women shoppers would not feel the need to make two trips to complete their shopping. To this day, the Walnut Room serves the traditional Mrs. Herring's chicken pot pie.

The South Grill Room, Marshall Field & Co., Retail Chicago.
       That is just one among many innovations by Marshall Field's. Field's had the first European buying office, which was located in Manchester, England, and the first bridal registry. The company was the first to introduce the concept of the personal shopper, and that service was provided without charge in every Field's store, right up to the chain's last days under the Marshall Field's name. It was the first store to offer revolving credit and the first department store to use escalators. Marshall Field's book department in the State Street store was legendary; it pioneered the concept of the "book signing." Moreover, every year at Christmas, Marshall Field's downtown store windows were filled with animated displays as part of the downtown shopping district display; the "theme" window displays became famous for their ingenuity and beauty, and visiting the Marshall Field's windows at Christmas became a tradition for Chicagoans and visitors alike, as popular a local practice as visiting the Walnut Room with its equally famous Christmas tree or meeting "under the clock" on State Street.
       Marshall Field was famous for his slogan "Give the lady what she wants." He was also famous for his integrity, character, and community philanthropy and leadership. After his death, the company remained to the very end a major philanthropic contributor to its Chicago-area community.
Left, Marshall Field's Wholesale Store around 1890, Center, 1934 Marshall Field & CO. Store for men. Right, 1934 Narcissus Fountain Room at Marshall Field Co.
        Field, the store he created, and his successor John G. Shedd, helped establish Chicago's prominence throughout the world in business, art, culture, and education. The Art Institute of Chicago, the Field Museum of Natural History (as renamed in 1905 for its first major benefactor), the Museum of Science and Industry, the John G. Shedd Aquarium, and the University of Chicago all have been aided by the philanthropy of Marshall Field's. Marshall Field was also a major sponsor of the 1893 World's Columbian Exposition. Read more...


       "Marshall Fields and Christmas were practically synonymous. Generations of Chicagoans and out-of-towners made a pilgrimage to the legendary State Street department store to shop for gifts and enjoy Fields marvelous holiday ambiance and superb quality service. This video blends historical images and Christmas music from a bygone era with latter-day clips to recreate a whirlwind tour of the palatial building circa 1945-1955. Stroll down Candy Cane Lane, dine in the Walnut Room next to the Great Tree, and visit Santas Cozy Cloud Cottage. Fields became Macys in 2006. Macys has continued some of the holiday traditions, but the magic and soul of the old store are now just memories."