Monday, January 5, 2015

Craft a Plum Pudding Ornament from A Hollow Egg

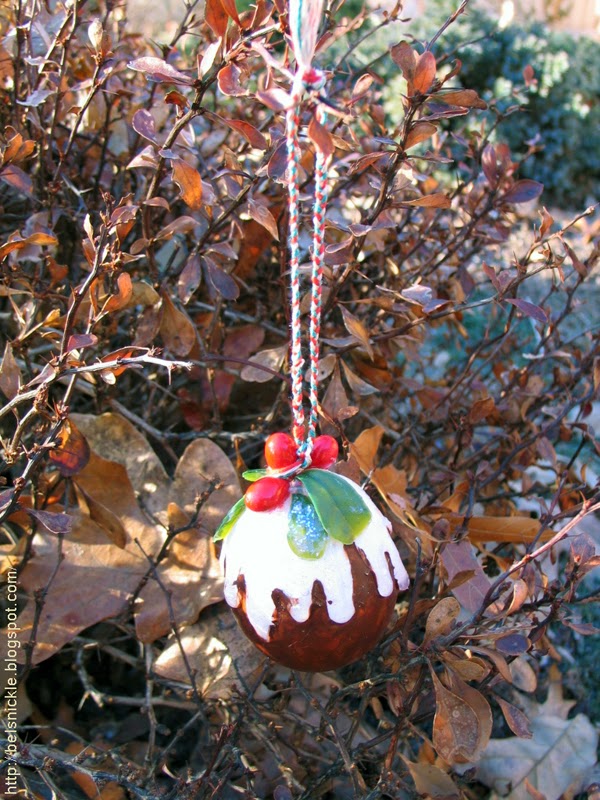
Close up photographs of my Christmas plum pudding made from a hollow egg shell.
       This Christmas pudding is designed to hang from a tree. It is crafted from a hollow egg and it is so light weight that it may be hung from the most delicate of tree branches.

A very light weight plum pudding ornament for the tree.
Supply List:
  • sharp embroidery needle
  • fresh, uncooked egg
  • small bowl
  • white glitter
  • white puff paint
  • small red berries and green leaf for trim (artificial)
  • brown acrylic paint
  • tiny paint brush
  • twine for hanging
  • white tacky craft glue
  • rubbing alcohol
  • clear nail polish
Step-by-Step Instructions:
  1.  First you will need to blow the contents of an egg from it's shell. Use a sharp embroidery needle to poke two holes into the top and bottom of a raw egg. Dip a tissue into a bit of rubbing alcohol and wipe down the surface of the egg so that it is clean. Position your lips over the smaller of the two holes and blow the raw yolk out of the lower hole. You can watch a video here to see just how this may be done.
  2. After blowing out the yolk, shake the egg to listen and make sure that it is indeed empty. Set the egg out on top of paper towels to dry completely before painting it.
  3. Take your tacky craft glue and adhere your choice of berries and green leafs to the top narrow half of the egg. Let this application dry completely.
  4. use a generous amount of translucent or white puff paint to drip underneath the trims and to drip down the side of your egg. This is puff paint is the vanilla sauce of your Christmas pudding.
  5. Sprinkle white glitter on this puff paint before it dries. Let the egg dry.
  6. Using a delicate, small paint brush, apply a brown cinnamon looking layer of paint to the lower half of the egg. Carefully avoid painting into the faux vanilla sauce.
  7. After the paint dries apply a coat of clear nail polish to the painted surface areas.
  8. Strategically tie a braided cord to the tip of a berry in order to hang the Christmas pudding from a tree.
More Christmas Pudding Ornaments:

Sunday, December 21, 2014

Remembering Marshall Field's at Christmas Time

The famous clock at Marshall Field's State
Street store in Chicago.
       When my husband and I were dating, we lived in Chicago for a brief time. I have so many fond memories of that city, especially Christmas memories. The first time we visited downtown to look at window displays and purchase gifts we stopped at Marshall Fields to have a bite to eat. 
       Among the "firsts" by Marshall Field's was the concept of the department store tea room. In the 19th century, ladies shopping downtown returned home for lunch; having lunch at a downtown restaurant unescorted by a gentleman was not considered ladylike. But after a Marshall Field's clerk shared her lunch with a tired shopper (a chicken pot pie), Field's hit on the idea of opening a department store tea room, so that women shoppers would not feel the need to make two trips to complete their shopping. To this day, the Walnut Room serves the traditional Mrs. Herring's chicken pot pie.

The South Grill Room, Marshall Field & Co., Retail Chicago.
       That is just one among many innovations by Marshall Field's. Field's had the first European buying office, which was located in Manchester, England, and the first bridal registry. The company was the first to introduce the concept of the personal shopper, and that service was provided without charge in every Field's store, right up to the chain's last days under the Marshall Field's name. It was the first store to offer revolving credit and the first department store to use escalators. Marshall Field's book department in the State Street store was legendary; it pioneered the concept of the "book signing." Moreover, every year at Christmas, Marshall Field's downtown store windows were filled with animated displays as part of the downtown shopping district display; the "theme" window displays became famous for their ingenuity and beauty, and visiting the Marshall Field's windows at Christmas became a tradition for Chicagoans and visitors alike, as popular a local practice as visiting the Walnut Room with its equally famous Christmas tree or meeting "under the clock" on State Street.
       Marshall Field was famous for his slogan "Give the lady what she wants." He was also famous for his integrity, character, and community philanthropy and leadership. After his death, the company remained to the very end a major philanthropic contributor to its Chicago-area community.
Left, Marshall Field's Wholesale Store around 1890, Center, 1934 Marshall Field & CO. Store for men. Right, 1934 Narcissus Fountain Room at Marshall Field Co.
        Field, the store he created, and his successor John G. Shedd, helped establish Chicago's prominence throughout the world in business, art, culture, and education. The Art Institute of Chicago, the Field Museum of Natural History (as renamed in 1905 for its first major benefactor), the Museum of Science and Industry, the John G. Shedd Aquarium, and the University of Chicago all have been aided by the philanthropy of Marshall Field's. Marshall Field was also a major sponsor of the 1893 World's Columbian Exposition. Read more...


       "Marshall Fields and Christmas were practically synonymous. Generations of Chicagoans and out-of-towners made a pilgrimage to the legendary State Street department store to shop for gifts and enjoy Fields marvelous holiday ambiance and superb quality service. This video blends historical images and Christmas music from a bygone era with latter-day clips to recreate a whirlwind tour of the palatial building circa 1945-1955. Stroll down Candy Cane Lane, dine in the Walnut Room next to the Great Tree, and visit Santas Cozy Cloud Cottage. Fields became Macys in 2006. Macys has continued some of the holiday traditions, but the magic and soul of the old store are now just memories."

Saturday, December 20, 2014

Flying Kewpie Christmas Ornaments

       This Christmas ornament clip art by Rose O'Neill was cleaned and colorized by Kathy Grimm. Please read the Terms of Use before printing it out for personal crafts only.

We Want to Fly About Your Christmas Tree
Designed by Rose O'Neill

       Cut out the backs and fronts of the Flying Kewpies, join them together, inserting a loop of red string or ribbon in the topknot before it dries. Lay under a weight.
       Hang the Flying Kewpies by their loops from the twigs of your Christmas tree. Be sure to wait till the paste is perfectly dry or the strings will come out and Kewpies fall.


       The Kewpies love to fly in the green branches of a Christmas tree, among the glittering bells and the shiny tinsel and the children's legs. Pop! goes Kewpie Army's gun as he shoots at a Teddy Bear. Kewpie Cook feels gay, for he's seen some dolly cookies and he means to get the recipe for the Kewpies.
 
 
       The flying Kewpies never have such good times anywhere else as they have in a Christmas tree. They skip and caper, dance and prance, and gurgle and grin so gleefully that all little boys and girls, babies and grown ups who see them and even the stuffed animals and the jumping jacks who see them laugh too.

Have a question about the illustration? Just type it in the comment box and I'll get back to you as soon as possible. I only publish content that is closely related to the subject, folks.

Learn More About Rose O'Neill:

Friday, December 19, 2014

Christmas Clip Art by Ellen Clapsaddle

       Ellen Hattie Clapsaddle (January 8, 1865 - January 7, 1934) was an American illustrator/commercial artist in the late 19th and early 20th centuries. Not only is her style greatly admired and well recognized, today she is recognized as the most prolific souvenir/postcard and greeting card artist of her era.
Boy with Christmas candle by E. H. Clapsaddle.
        Ellen was born during the Civil War period in the small farming community of South Columbia in Herkimer County, New York, near Columbia, New York on January 8, 1865. She was the child of Dennis L. and Harriet (Beckwith) Clapsaddle. From an early age she loved to draw—she is said to have been a shy and delicate child who displayed artistic ability and was highly encouraged by her parents to develop her skills in art. Clapsaddle was the great-granddaughter of the American Revolutionary War hero, Major Dennis Clapsaddle.
       She attended a one-room school until the 8th grade and then graduated from Richfield Springs Seminary, a local academy (later known as high schools) in Richfield Springs that prepared young ladies for higher education, today known as a college in 1882.
       Ellen's parents and teachers highly encouraged her to pursue a career in art so she applied and received a scholarship to attend a selective private college for two years, the Cooper Institute known as the Cooper Union Institute for the Advancement of Science and Art in New York City. Only highly recognized individuals are chosen to attend this college and all attend on scholarship. Upon the completion of her studies, around 1884, she returned to her parents' home in South Columbia. She placed an ad in a local newspaper to offer private painting lessons and began her career of teaching art out of her home.
       Ellen started by giving art lessons in her home in South Columbia. At the same time she created her own landscapes and was commissioned to paint portraits of families in Richfield Springs. She also submitted her work to publishers in New York City and became a recognized commercial artist. Her illustrations were often used in advertising and on porcelain goods, calendars, paper fans, trade and greeting cards. Her greatest success was in the development of her artwork into single-faced cards that could be kept as souvenirs or mailed as postcards and she specialized in designing illustrations specifically for that purpose. She has been credited with over 3000 designs in the souvenir/post card field.

       The following Christmas designs by Clapsaddle have been restored and colorized by Kathy Grimm for the personal use of our visitors only. Read the Terms of Use here.

Clapsaddle's boy with violin.
Children under an umbrella by Clapsaddle.

Have a question about the illustration? Just type it in the comment box and I'll get back to you as soon as possible. I only publish content that is closely related to the subject, folks.

Child Elf Christmas Clip Art

      Please read the Terms of Use before using this elf clip art in your personal projects, Thank You.
Child elf clip art in full color.
Monochromatic blue child elf clip art.
Monochromatic green child elf clip art.
Monochromatic red child elf clip art.


Restored "Nimble Nicks" for Christmas 2014

       Love "nimble nicks" as much as we do? Here are the latest editions for 2014, fully restored and simply adorable! Read Terms of Use folks.

Nimble Nicks sled down hill at break neck speeds!

Nimble Nick wishes you "A Tip-Top Christmas!"

This holiday greeting by a cute little nimble nick reads:

"In spite of miles,
Storms and obstacles
My kindest wishes
Will be with you on
Christmas Morning"
Have a question about the illustration? Just type it in the comment box and I'll get back to you as soon as possible. I only publish content that is closely related to the subject, folks.

Christmas Clipart or Clip Art Pages On This Blog: 1 2 3 4 5 6 7 8 9 10 11 12 13 14 15 16 17 18 19 20 21 22 23 24 25 26 27 28 29 30 31 32 33 34 35 36 37 38 39 40 41 42 43 44 45 46 47 48 49 50 51 52 53 54 55 56 57 58 59 60 61

Return to The Clip Art Index and Terms of Use

Monday, December 15, 2014

Print "Three Ships" by Henry Payne for Christmas Letters

      The following pictures by Henry Payne were restored by Kathy Grimm for the purpose of reprinting on Christmas Cards or including a little print with a handwritten letter for a loved one. Visitors should read The Terms of Use before downloading them from here. Use them in your own personal crafts and letters freely but do not redistribute them over the web or profit from them by selling the work in it's original state. (This means burning the jpgs. to CDs or using them to draw traffic to web pages.) Click directly on one of the four options to download the largest files.


Sunday, December 14, 2014

The Bride's Christmas Tree

Above are ornament types often found on the bride's first Christmas tree in Germany.
       In Germany it is customary to give Christmas ornaments to the bride on her wedding day. Below are the original meanings attached to the traditional ornaments that hang upon the couple's first Christmas tree. The ornaments are most frequently made of glass, however, you could give a selection of these Christmas ornaments made from any number of interesting materials. A young girl might even collect each ornament herself over a longer period of time and store them in a hope chest.
      My husband's mother collected his first ornaments, one per year, every year, until he married. Then these ornaments were boxed up and gifted to me at my wedding shower.
  1. Acorn - Resurrection in Christ
  2. Angel - messengers from God
  3. Apple - reminder to avoid temptations
  4. Bell - joyful noise, announcing important news
  5. Birds - bring messages of joy
  6. Bird Nest - money, fortune, physical wealth
  7. Carrot - good luck in the kitchen
  8. Church - spiritual family/home
  9. Devil - He serves St. Nickolas, according to legend, for one day every year (Christmas) as form of punishment because of his disloyalty to God.
  10. Dove - symbol of the Holy Spirit, the third person of The Holy Trinity
  11. Fir Tree - Everlasting life through Christ, because it remains green during winter
  12. Fish - identity in Christ, provision, Peter finds the tax hidden in a fish
  13. Flower Basket - symbolic of hope, it springs eternal
  14. Fruit Basket - abundance of good health, harvest
  15. Grape Cluster - communion with Christ and other believers
  16. Heart - love
  17. House - shelter
  18. Orange - wealth and prosperity, during many centuries to have oranges in winter months was considered a luxury 
  19. Pickle - game, extra gift goes to those who find it on their tree
  20. Pine Cone - wisdom
  21. Rabbit - fertility, rabbits multiply easily
  22. Pink Rose - Virgin Mary
  23. Yellow Rose - Friendship
  24. Walnut - good fortune, also connected with telling fortunes
  25. White Rose - Spiritual Love
  26. Saint Nicholas - generosity and goodwill towards others, The Bishop of Myra was an abolitionist
  27. Ship - passage through trouble or over troubled waters
  28. Star - guiding light, early believers used the night sky to guide them on their journeys, astrologers from the east followed a constellation to find Jesus
  29. Teapot - hospitality, offering tea to strangers has ancient roots
  30. Tulip - A red tulip means eternal love

Ornaments Made from Angel Cross Stitch Patterns

By Prairie School and perfectly lovely addition,
I think, to a Medieval Christmas Tree.

        These little cross stitch angel patterns, created 1993, were based upon Byzantine designs. They were also intended to be produced on black canvas backgrounds. Several years ago my oldest child stitched a couple of these unusual angelic motifs for our family Christmas tree. 
Michael and Gabriel, two archangels
        The Prairie School patterns depict angels in brilliant colors, formally positioned wings and with iconographic portrait features. I've included a sample of Byzantine angels in this post so that you may make your own comparisons.
       During the medieval period senior angels were often clad in every brilliant color, while junior ranks wore white by artists. Early Renaissance painters such as Jan van Eyck and Fra Angelico painted angels with multicolored wings. Depictions of angels came to combine medieval notions of beauty with feminine ideals of grace and beauty, as in da Panicale's 1435 Baptism of Christ.
      The two angels on the right were painted in a 12th Century icon. They are the two archangels, Michael and Gabriel. They wear the loros of the Imperial guards. The loros is one of the most important and distinctive parts of the most formal and ceremonial type of imperial Byzantine costume. It developed out of the trabea triumphalis of the Roman consuls. The loros was a long, narrow and embroidered scarf which was wrapped around the torso and dropped over the left hand. It was embroidered with gold and heavily embellished with gems.
       You can search online to find a wider variety of angels dating from the Medieval Period, 5th century to the 15th, in order to design your own ornaments. Ebay sometimes offers old Prairie School patterns for sale as well.

View and Read About Different Angel Types from The Medieval Period:

"A Mistletoe Maid"


A Mistletoe Maid
by Irving
 
I kissed her--yes, I did--beneath
The mystic mistletoe
When Christmas bells were pealing out
Across the drifted snow.
She was a maiden sweet to see
And just my style to boot,
And so upon her ruby lips
I placed a swift salute.

For she had twined the berried
bough
On chandelier and wall,
And wreathed it all around the door,
And draped it in the hall,
And pinned it to the picture frames,
And hung it on the latch,
And tucked it in her hair, and so
I had to toe the scratch.

Saturday, December 13, 2014

How To Make a Pine Cone Christmas Tree Ornament

Two versions of the same Christmas pine cone craft. The appearance of this particular ornament may be altered by switching out the materials that you use. School children in American often make this craft using pom poms. However, adults can use the same method to craft a very lovely woodland version of the ornament.
Woodland Pine Cone Christmas Tree Version
Above are detailed photos of the woodland pine cone Christmas tree.
 In this version, I used metallic beads to decorate my miniature tree instead
of the traditional pom poms.
 Supply List:
  • pine cones
  • a tiny acorn cap
  • metallic beads for the ornaments
  • hot glue gun 
  • white tacky glue
  • white school glue
  • white cotton batting balls
  • twine for hanging the ornament
  • glitter (optional)
  • pliers and scissors
Step-by-Step Directions:
  1. Glue a fluffy white cotton ball to the top of your pine cone and then turn it upside down so that the pine cone resembles a fir tree.
  2. Add a bit more of the white school glue to the snowy looking surface and spread this out with your finger tips. Let dry. You may decide to add glitter to the cotton for a extra bit of glamor. 
  3. Unravel a couple of white cotton balls and take these apart to form small amounts of fluff for the tips of your pine cone tree. 
  4. Add just a small amount of white glue to each scale and glue white cotton into place.
  5. Now use a hot glue gun to squirt a bit of the hot glue before gently pushing each metallic bead inside the cone. Work with no more than two squirts of glue and two beads at a time; hot glue dries quickly and will harden before you have had time to position the beads into place.
  6. Assemble the pine cone angel by taking apart an additional pine cone with pliers. You may need to cut and trim off the inside edge of each scale before gluing these together again.
  7. I used tacky glue to arrange the tiny scales around the tip of my index finger and then glued a piece of cotton batting to the top and inside portion of the skirt to hold everything in place. I then glued an additional teir (or ruffle)  to the angel's skirt. (pictured below)
  8. Roll a small amount of white cotton batting into the shape of a tiny head and glue this to the top of the cone shaped angel body. 
  9. Glue on a halo made from an acorn cap.
  10. Glue a metallic wire to the inside of the pine cone for hanging.
Here you can see me assemble the skirt of the angel tree topper from pine cone scales and a bit of cotton batting. The head is also made from cotton batting. The halo of my angel is made from an acorn cap.
I have glued two pine cone scales together with tacky glue and a wad of cotton batting. After these wings dry, you can then attach them with glue to the back shoulder blades of your angel. You will need to hold them in position until the glue hardens a bit.
Pine Cone Christmas Tree Version with Red Pom Poms
 
Above, I have included detailed photographs of the red pom pom variation of
this pine cone Christmas tree ornament. This version is also topped off with a
tiny turned wooden Santa figure.
  Supply List:
  • pine cones
  • hot glue gun
  • wooden spool
  • paints and/or decorative paper 
  • twine for hanging the ornament
  • A tiny ornament or star for the "tree topper"
Step-by-Step Directions:
  1. First you will need to decorate your wooden spool. I painted the edges of the one pictured above and then cut a piece of polka dot paper and glued this to the inside of the spool. This step speeds up the process of decorating the ornament.
  2. Next, hot glue a pine cone with the top of the spool. The top of the pine cone should be the end that you glue to the spool base so that the pine cone will suggest the triangular shape of a Christmas pine tree.
  3. Hot glue your pom poms to the tips of the pine cone scales. If you've turned the pine cone upside down and glued it to the spool correctly, there should be a natural "lip" for the pom pom to nestle inside. This is where you will squirt a bit of the hot glue before gently pushing each pom pom inside the cone. Work with no more than two squirts of glue and two pom poms at a time; hot glue dries quickly and will harden before you have had time to position the pom poms.
  4. Now hot glue a tiny "tree topper" to the tip of your pine cone tree if you wish.
More Pine Cone Tree Ornaments:

Thursday, December 11, 2014

Craft Your Own Set of Spun Cotton Icicles

      If you are anything like me, you will be reading this post at 4:30 in the morning while surfing for one last craft to make for your tree. The only difference between us is perhaps that I am looking to teach it and you are looking to receive it. 
       Although I've managed to keep my pocket book under control and I don't spend as much money as most Americans do at Christmas time, I still dream of decorating my home with items that would cost a small fortune in real life. And this dreaming starts about mid June for me, every year, without fail.
       I walk through the rooms of my home and I can't help but fantasize about draping evergreens loaded with tinsel, ice and extravaganza. However, I'm not just thinking about them in my own home, I am also thinking about them in everybody else's and I guess this is what makes me a little strange.
       What is this madness all about? I'm not quite sure but I think it has something to do with my childhood. My father was quite a daydreamer, something like Walter Mitty. He pursued architecture, religion and history throughout his life in that very order. He had the kind of curiosity that only children understand.
       My mother was the opposite, full of common sense and a little restrictive. She had to be as long as he was alive. But, since my father has died, she has become just as romantic as he was. As we age we begin to realize that what others did for us must be repeated in ourselves in order for their memory to remain alive. I think this is why my father cared so much about history. He just wanted to keep repeating the best parts of it so that the people he loved would never be lost or forgotten.
      So here is my next contribution. During the late 1800s through the first World War, cotton batting ornaments were most popular and although you may not be able to purchase a set of these spun cotton icicles realistically, you can handcraft them with just a bit of time and patience.
I handcrafted a set of six cotton batting icicles for my tree.

Supply List:
  • Both white cotton batting balls and a white cotton batting sheet
  • iridescent glitter
  • red holly berries
  • faux pin needles (cut an artificial branch)
  • masking tape
  • wooden skewers
  • newsprint
  • white school glue
  • white tacky glue
  • scissors
  • wire to shape a hooks
Step-by-Step Instructions:
  1.  I purchased wooden skewers for this project from the grocery store and then broke them in half. You may make your own icicles any length that you desire. But, do use a strong stick, pencil or skewer inside the core of your icicles. These will prevent the ornaments from breaking, should these receive a bit of rough handling over time.
  2. Crush newsprint and layer masking tape on top of it to shape your icicle's form.
  3. I used cotton batting wire to shape hooks on top of each icicle for hanging. Glue and tape these firmly in place before you begin wrapping the icicles with cotton.
  4. In this case, I recommend that you wrap the first layer with a sheet of cotton batting and white school glue. Wrap the subsequent layers with unraveled cotton balls.
  5. After you have layered both cotton and glue, ending with a light coating of glue always, let the icicles dry thoroughly in a warm area.
  6. Poke a hole into the surface of your icicle and fill it with tacky white glue and faux berries/pine needles. Let dry.
  7. Unravel white cotton balls and apply glue in a spiral pattern down the length of your icicle. Wrap and twist a last layer of batting to form the pattern demonstrated in the photos below. 
  8. Wipe on a final coating of white school glue and sprinkle a generous amount of iridescent glitter onto the wet surface. Let the icicles dry and then hang them on the tree for an impressive winter display!
Pictured above are the wooden skewers wrapped and ready to be turned into something special.
The first layer of batting is made of a cotton sheet, normally this is used to line blankets and quilts with.
After your icicles dry, poke a holes into their surfaces and paste in faux pine needles and berries.
To add the final touches, wrap and twist cotton batting down the length of each icicle with glue. On the far right you can see that I've also sprinkled glitter onto the surfaces of my icicles.
See More Versions of Spun Cotton Icicles:

Wednesday, December 10, 2014

Fold Victorian Wire Ribbon Rosettes

My Victorian wire ribbon rosettes, three versions.
      Rosettes made with wire ribbon are made to last. They are considerably more durable and more expensive to make than the sample rosette projects that I have posted about in the past.
Left, wire edged ribbons. Center accordion fold from above. Right, accordion fold from the side.
       Wire ribbon may also be recycled easily. If you have dated looking bows and trims made with it, these can be taken apart and upcycled into something new. The Victorians often crafted with ribbon rosettes and so rosettes are frequently associated with the Victorian Era Christmas tree.
      Wire rosettes implement the accordion fold. This is the same fold that school children learn in order to shape basic paper craft projects. (video of accordion folding below)
Left, 3 wire, accordion folded rosettes. Center, cutting and pasting metallic paper rosettes. Right, gluing together the rosettes.
Left, back side of a completed rosette. Next, edge of a finished rosette. Center Victorian printed image. Right, pasted acrylic gem.

 Supply List:
  • acrylic gems
  • 2 to 2 1/2 inch wired ribbon
  • metallic cup cake liners
  • scissors 
  • stapler
  • tacky white glue
  • hot glue and gun
  • Victorian scrap angels
  • scrap cardboard
  • gold cord for hanging
Directions:
  1. Select a ribbon that you like, fold it front to back, on top of itself. I usually work with a length no longer then 20 inches. (pictured above)
  2. Pinch and adjust the folds so that these look consistent. Then pinch one end of all the folds together and staple.
  3. Now gently fan the unstapled side of the  accordion folded ribbon into the shape of a rosette. Staple together the two side ends of accordion folds. Conceal the stapled edges up inside the accordion folds or make sure that the staples are both on one side of the rosette. These will be less obvious on the back side of your ornament.
  4. For the ornaments shown above, I also layered metallic paper rosettes on top of the wired ribbon rosettes. These were made by first cutting the centers out of cup cake liners and then gluing the rippled paper edges back onto a sturdy cardboard round. This round was covered with the same metallic paper discarded from the centers of the cup cake liners. Why not just crush the cup cake liner without cutting it apart you may ask? Because it looks better.
  5. Then I used tacky white glue to attach a Victorian scrap angel to the center of the layered rosettes and pasted an acrylic gem to her halo.
  6. Fold an additional metallic paper rosette for the back side of your ornament. 
  7. Glue a gold cord between the layers of rosettes on the back side of your Victorian ornament and hang it on the tree.
Video by wonder studios.

Tuesday, December 9, 2014

Craft a Shabby Chic Pink Silk Bauble

Many people would look at this handcrafted bauble and think that it is Victorian but it's not; it is most definitely Shabby Chic. Why? you may ask? The Victorians were actually sticklers for symmetry. Those who are Shabby Chic fanatics sometimes love Victorian designs and hang these on their Christmas trees. But true Victorian Christmas collectors would never mistaken one for the other. In either case, both are over-the-top if you ask me!
      This pink silk bauble is extravagantly bodacious or eccentrically glamorous or just maybe a really ridiculous ornament. It was made by a Shabby Chic zealot and designed especially for a Shabby Chic Christmas tree. All you actually need to know is how to use a hot glue gun without burning yourself, in order to craft a similar project. I still burn myself after twenty years of using hot glue guns. 
       You may need to scour a few resale shops to find the silk covered baubles. Some years these are sold through drug store outlets, hobby and craft or dollar store, but this year these seem to be a bit scarce. 
       Glue the braid onto the sides of your bauble first so that it will be easier to position the broaches in the center of each half of the ornament. The egg shaped baubles are more versatile because they may be used for both Christmas and Easter decorating.

Supply List:
  • buff pink velvet ribbon
  • egg shaped ivory silk bauble
  • an old broach and an old pearl earring
  • heavy metallic braid, silver or gold
  • hot glue gun
  • both pearl head and plain pins
How to make Shabby Chic angel ornaments

Sunday, December 7, 2014

Calvary Episcopal's Famous Church Bazaar

      Ready to wait in line? Calvary Episcopal's Annual St. Nickolas Advent Bazaar in Columbia Missouri is so famous that folks have to stand in line in order to get the chance to purchase one of their church mice ornaments! Ladies of Calvary Episcopal have been making these little critters for charity since the 1970s and, boy, they are cute. They also hold raffles for larger quilted crafts and serve a fine hot breakfast for visitors. After all, if you've got to wait in the cold to buy an ornament, you will surely need breakfast to warm you up afterwards.


See More Church Mice & Handmade Church Craft Ladies:

Lego Christmas Ornaments for Charity

Young students making a difference with their crafts.

  "Be not forgetful to entertain strangers: for thereby some have entertained angels unawares." Hebrews 13:2

      Lego is a popular line of construction toys manufactured by The Lego Group, a privately held company based in Billund, Denmark. The company's flagship product, Lego, consists of colourful interlocking plastic bricks and an accompanying array of gears, minifigures and various other parts. Lego bricks can be assembled and connected in many ways, to construct such objects as vehicles, buildings, and even working robots. Anything constructed can then be taken apart again, and the pieces used to make other objects.
      Lego began manufacturing interlocking toy bricks in 1949. Since then a global Lego subculture has developed, supporting movies, games, competitions, and six themed amusement parks. As of 2013, around 560 billion Lego parts had been produced. Read more...

Friday, December 5, 2014

Celebrate Santa Lucia for Christmas, December 13th

Saint Lucia martyred for her faith is called, "Light" She is the patron
 saint for the blind among many Orthodox Christians.
       Saint Lucia's Day is on the 13th of December, in Advent. Her feast once coincided with the Winter Solstice, the shortest day of the year before calendar reforms, so her feastday has become a festival of light. St. Lucia’s Day is celebrated most commonly in Scandinavia, where it is a major feast day, and even in Italy with each emphasizing a different aspect of the story. This feast is particularly seen the in Scandinavian countries, with their long dark winters. There, a young girl dressed in a white dress and a red sash (as the symbol of martyrdom) carries palms and wears a crown or wreath of candles on her head. In both Norway and Sweden, girls dressed as Lucy carry rolls and cookies in procession as songs are sung. It is said that to vividly celebrate St. Lucy's Day will help one live the long winter days with enough light.
       In Italy, the Saint Lucy's Day is a church feast day dedicated to Lucia of Syracuse (d.304), also known as Saint Lucy, and is observed on 13 December. A special devotion to St. Lucy is practiced in the Italian regions of Lombardy, Emilia-Romagna, Veneto, Friuli Venezia Giulia, Trentino-Alto Adige, in the North of the country, and Sicily, in the South, as well as in Croatian coastal region of Dalmatia.
       Saint Lucia is one of the few saints celebrated by the overwhelmingly Lutheran Nordic people — Danes; Swedes; Finns and Norwegians but also in USA and Canada and Italy. The St. Lucy's Day celebrations retain many indigenous Germanic pagan, pre-Christian midwinter elements. Some of the practices associated with the day predate the adoption of Christianity in Scandinavia, and like much of Scandinavian folklore and even religiosity, is centered on the annual struggle between light and darkness.
       The Nordic observation of St. Lucy is first attested in the Middle Ages, and continued after the Protestant Reformation in the 1520s and 1530s, although the modern celebration is only about 200 years old. It is likely that tradition owes its popularity in the Nordic countries to the extreme change in daylight hours between the seasons in this region.
       The pre-Christian holiday of Yule, or jól, was the most important holiday in Scandinavia and Northern Europe. Originally the observance of the winter solstice, and the rebirth of the sun, it brought about many practices that remain in the Advent and Christmas celebrations today. The Yule season was a time for feasting, drinking, gift-giving, and gatherings, but also the season of awareness and fear of the forces of the dark. Read more...

       "Every Jultide season the Lindsborg Swedish Folk Dancers, a group of high school students, celebrate St. Lucia Day on the Saturday closest to the traditional date of December 13. The town of Lindsborg, Kansas was founded by settlers from Sweden in 1869. Townsfolk of both Swedish and non-Swedish decent honor the early pioneers with Swedish festivals throughout the year. For more see www.visitlindsborg.com."

More Links to Saint Lucia's Day Celebrations:

How to Sew Sock Snowmen Ornaments

Left, is a sock snowman made by my younger child when she was eight
 or nine years old. Right, is the snowman that I made while working along
with her during the family craft project. I can recall her giggles while
making these even now. Her snowman hangs on our family tree and mine
on her own tree in her bedroom.
       Sock snowmen are so easy to craft that your children can craft these along with you. They make great introductory assignments for a children's sewing class too. 
       Always be sure to give young people new needles to work with and do not allow them to share their needles with any other person. Keep peroxide on hand for accidental pricks!

Supply List:
  • clean, white tube socks (infant sizes)
  • additional decorative Christmas themed socks (infant sizes)
  • solid colored socks and fabric scraps
  • pom poms
  • buttons, beads and ribbons
  • needle and white thread
  • dental floss
  • cotton batting for stuffing
  • Sharp scissors 
Step-by-Step Directions:
  1.  Cut the top half of each white tube sock where the heal meets the ankle. This is the part of the tube sock that you will use to sew your snowman's body.
  2. Sew a straight stitch (with dental floss) across one end of the tube and then turn the sock inside out before stuffing it with cotton batting. It doesn't really matter if you choose the smooth side or the textured side to face outside for the body. This is a matter of preference.
  3. Sew the open end of the tube closed using a slip stitch and the dental floss. The floss is stronger and will stand up to wear.
  4. Thread/knot the floss on your needle again and then hand bast around the center of your stuffed figure, while pushing the stuffing to the left or right to form snow ball like shapes in the tube. Pull the basting firmly into place and back stitch over it so that it will not come loose. You may like to do this more than once in order to sew a snowman with multiple torso parts.
  5. You can dress your snow person by cutting up more decorative socks for his cap, sweater and scarf. Whenever you attach an additional knit piece be sure to turn under and slip stitch the ruff edges, otherwise these will unravel over time.
  6. Sew on buttons and beads to make interesting, quirky expressions.
  7. Tack on ribbon for hanging these funny little guys on your tree.
These sock snowmen are made with rubber bands and rice. 
A little too heavy for the tree but delightful to decorate 
tables and chimney mantels with.

More Sock Snowmen:
More Snowman Crafts for Christmas:
  1. Snowman diorama (video)
  2. Paper snowman mobile
  3. The snowman crafts from Crafty Journal
  4. Cotton Ball Snowman Craft For Kids
  5. Snowman made with egg cartons (video)
  6. How to make a snowman using large plastic cups (video)
  7. Hot glue snowman ornament
  8. Glow in the dark milk jug snowmen

Cut and Paste Victorian Clown Paper Rosette Ornaments

I chose to make the collars of my scrap clowns using cup cake liners; this allows me to price these little rosettes for less at craft fairs. I can also produce them quicker saving both time and money.
Supply List:
  • pom poms
  • striped and solid colored cup cake liners
  • Victorian scrap of clown heads (portraits)
  • thin metalic string for hanging
  • white glue
  • scissors
Directions:
  1. Purchase or print Victorian scrap of clowns
  2. Cut out the center unruffled portions of two or four striped cup cake liners. You can use more than this to make the ruffled collars of each clown; it's a matter of preference. 
  3. Glue the tips of each ruffle to the outer edge of a single circle backed with the same papers. 
  4. Glue two rosettes together, face sides out so that only the decorative parts are seen.
  5. Clip, ruffle and reglue a smaller rosette from a solid colored cup cake liner to the front of each collar. 
  6. Glue the Victorian clown scrap on top of this second layer. The cord for hanging should be sandwiched between these two final layers.
  7. Glue on pom poms.
More ornaments made with paper rosettes: