Tuesday, November 18, 2014

DIY White Feathered Angel Ornament

       I crafted this silver and white angel from a single porcelain head, one pipe cleaner and a fistful of white downy feathers. She would look marvelous on a Victorian tree!
Supply List:
  • white feathers
  • silver beaded thread
  • silver tinsel ruffle
  • silver gems
  • silver wired ribbon
  • silver cross charm
  • small porcelain doll head/breastplate
  • one white chenille stem
  • scissors
  • hot glue gun
  • toothpicks
Step-by-Step Instructions:
  1. Cut the chenille stem in half.
  2. Position the pipe cleaner or chenille stem in the center of the wired ribbon. Then wrap the stem while hot gluing the edges of the ribbon into shape. I did not use the full length of this ribbon to wrap my stem; I only used approximately 1/3 of the ribbon. See picture below.
  3. Now bend the covered stem in half and hot glue this up inside the breastplate of the doll. There should still be plenty of room left there for you to hot glue the feathers and silver tinsel.
  4. Hot glue the silver beaded thread around the outside of the angel's breastplate. (shown below)
  5. Hot glue multiple white feathers stacked on top of one another then hot glue the silver tinsel on top of the feathers.
  6. Hot glue the stack of feathers and tinsel to the inside cavity of the porcelain doll's breastplate just beneath the chenille stem arms.
  7. Bend the arms to the front and hot glue a small charm between the angel's hands; I chose a silver cross.
  8. Finally hot glue a selection of shorter white feathers to her backside; stacking and gluing until you are satisfied with the results. It's that easy!
  9. Hot glue the silver beaded thread on top of her head to make a halo. Use the tip of a toothpick to clean away excess glue while you are working. This will greatly improve the quality of the angel's appearance.
Position the pipe cleaner or chenille stem in the center of the wired ribbon.
 Then wrap the stem while hot gluing the edges of the ribbon into shape.
 I did not use the full length of this ribbon to wrap my stem; I only used
approximately 1/3 of the ribbon.
Left, you can see that I have wrapped and hot glued some tiny silver beads around the outside
 of the breast plate of my angel. Left, here I have hot glued the ribbon wrapped chenille stem
 to the inside shell of my porcelain doll's breast plate.
An angel crafted almost entirely with white feathers.
The angel's backside.
More Angels Made with Feathers:

How to Make a Paper Doily Angel

My version of a paper doily angel includes also a metallic
cupcake liner and accordion shaped wings. I left the face
blank because I thought it fitting for a stylized angelic
countenance.
Supply List:
  • (2) 4inch white paper lace doilies
  • tacky white glue
  • white school glue
  • hot glue gun
  • approx. 1/2 inch spun cotton head (white cotton balls to make)
  • tooth picks
  • metallic thread for hanger/hair
  • 1 metallic cupcake liner
Step-by-Step Instructions:
  1. Cut one paper doily in half.
  2. Shape one of these clippings into a cone and glue it along it's edge overlapping the two sides slightly. Set this cone aside to dry.
  3. Cut from the second clipping two sleeves. You will need to shorten these a bit in order to keep the arms in proportion with the skirt. Shorten the sleeves by cutting off the pointed half of each cutting. Use a toothpick to help you roll and shape the sleeves. Glue the edges together with white tacky glue. Set these tiny cone shaped sleeves aside to dry.
  4. Shape the cotton batting head by breaking a toothpick in half and wrapping a wad of cotton batting around it's tip. Add white school glue as you wrap the head shape. Set this piece aside to dry as well.
  5. Cut out the center of one metallic cupcake liner. Cut 3/4 of the accordion strip for the bottom ruffle of the angel's skirt and save the shorter ruffle for the top half of the angel's dress.
  6. Glue the longer metallic ruffle to the inside of the cone shaped skirt using a hot glue gun.
  7. Hot glue the second shorter ruffle around the top of the cone shaped skirting.
  8. Now use the white tacky glue to add a sleeve to either side of the angel's dress.
  9. Snip off a very small point of the cone dress to insert the cotton batting head.
  10. Use white tacky glue to adhere the head to the top of the cone shaped dress. It also helps to secure the head with glue on the inside of the cone shaped dress.
  11. Now finish the front of the dress by adding another clipping of the lace doily at the angel's collar.
  12. Hot glue a gold metallic loop to the backside of the angel's dress to hang the angel with.
  13. Cut a second doily in half and accordion fold each clipping. 
  14. Hot glue the wings to the backside of the paper doily angel covering the end tip of the metallic hanger.
  15. Wrap neatly a piece of gold twine in a circular fashion around the top of the angel's head using tiny amounts of hot glue as you go.
  16. I did not prefer to add a face to this stylized paper angel but you can add a few simple features if you wish.
Far left, my 4" doilies. Next, you will need two doilies cut in half for the project. Center, see how the sleeve sections are cut. Right, the simple cotton batting head is easy to wrap and shape from a cotton ball, half a toothpick and some white school glue.
Left, half of the paper doily folded into a cone shaped skirt. Center, tiny sleeves for the paper angel's arms. Right, it only takes one metallic cup cake liner to jazz this paper angel up a bit.
This is how the paper doily looks in the round before I have added the wings and hair/halo.
Watch these creative sisters craft a similar version on video. This angel includes a wooden bead for her head and yarn for her hair instead of my cotton batting head with gold twine for my angel's hair. Their version also excludes the foil cupcake liner.

Wrap a Rainbow Colored Wreath for Your Tree

A rainbow colored wreath made from an old-fashioned curtain ring, a turned wooden ornament and yarn.
      This rainbow colored Christmas wreath is so easy to make, even the kids will enjoy putting it together.
      Variegated yarns come in a wide selection of color combinations so, you can customize this ornament to match virtually any color scheme that you choose.
      I chose a bright pinks, yellows, blues and red to match the painted colors of my angelic skier. The wooden figure really dresses up this simple craft.

wooden curtain ring
Supply List:
  • old wooden curtain ring
  • some variegated rainbow yarn
  • white glue
  • hot glue (adult use only)
  • colorful ribbon
  • scissors
  • a tiny wooden figure 
Step-by-Step Directions:
  1. Spread white glue over small portions of the ring's surface as you wrap the variegated yarn around and through the wooden curtain ring. Cover the surface completely. Let the project dry.
  2. An adult can hot glue the figure at the top and/or bottom of the inside of your yarn covered wreath.
  3. Tie a bright bow and how glue this to the top of the curtain ring near the metal hook.
  4. I also added a bit of white glue to the edges of my bow to prevent it from further unraveling over time.
25 More Cute Curtain Ring Christmas Wreaths:
  1. Sparkly curtain ring wreath ornaments by Tuula
  2. Mini wreath tutorial by Katie Brown
  3. Red and white mini Christmas wreaths by Mellywood's Mansion
  4. Divine Twine Christmas Wreath Garland
  5. Curtain Ring Ornaments at the Little Pink Studio
  6. Simple Statement Ornament by Lisa Gutierrez
  7. DIY/ Do it yourself crochet curtain ring ornaments
  8. Homemade Christmas Ornaments made from Curtain Rings
  9. Christmas in September
  10. Curtain Ring Snowman Ornament
  11. Bobble Wheel Ornament Pattern by Made In K-Town
  12. Peppermint Snowflake Ring Ornament by Doni Speigle
  13. Tulle covered curtain ring ornament
  14. Curtain ring covered with buttons, beads, and things
  15. Curtain rings wrapped in yarn by Wee Wonderfuls
  16. Christmas ornament star by Zita de Wilde 
  17. Christmas Ball Ring Ornament by Whiskers and Wool and Rudolph the Red Nose Ring
  18. Star Christmas Ring Ornament by Doni Speigle
  19. Dorset Button Christmas Decoration
  20. Peppermint Candy Ring Ornament
  21. Small Angel Girl 'Jackie'
  22. mini wreaths with sequins and Santas
  23. Mini Monogram Wreaths
  24. A tape dispenser ring Christmas Tree Ornament!
  25. Easy ornamental mobile

Monday, November 17, 2014

DIY Sea Shell Star Ornament

This sea shell ornament is as light as a feather, no really!
Supply List:
  • metallic beads
  • quilter's thread (white)
  • plastic chocolate shell mold
  • sheet of cotton batting (quilt liner)
  • paper clay
  • light weight beading wire
  • star shaped cookie cutter
  • white tacky glue
Step-by-Step Instructions:
  1.  String metallic beads on a thin wire.
  2.  Shape the length of this beaded wire around a star shaped cookie cutter and twist together the joined ends.
  3. Thread your needle with quilter's thread.
  4.  Position your beaded star on top of a sheet of cotton batting used for lining quilts. Now whip stitch together the beaded wire and batting. Follow the entire outline of the beaded star.
  5.  Cut out your cotton star shape and repeat the process again with an additional layer of cotton batting liner. Cut around the second layer again.
  6.  Now whip stitch around the parameter of of the star attaching a random selection of metallic silver and gold beads.
  7.  Open your paper clay and quickly mold shells from your plastic chocolate mold. Let these light weight shell shapes dry.
  8. You can trim the edges of the paper clay if you need to after the shells dry.
  9. Use super tacky glue to attach the paper clay shells to the cotton batting star ornament.
More Textile Sea Shell Ornaments:

Children's Alphabet Block Ornaments

A toy soldier, sailboat and wooden zebra will make an adorable menagerie on my Christmas tree this year!
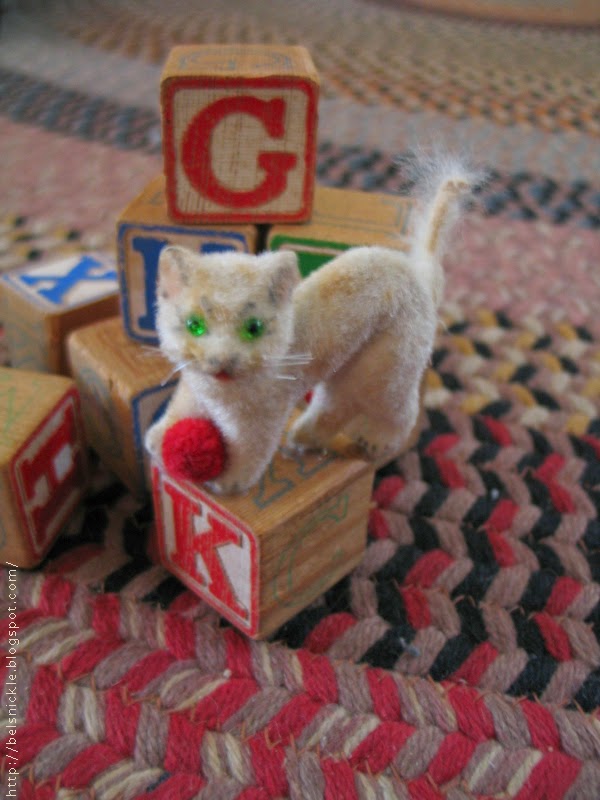
A flocked cat with bright green eyes plays with a
ball on top of the letter K alphabet block.
       There are so many tiny toys that small chubby hands have stuffed into drawers here and there throughout my home. These little creatures are too charming to throw away and yet they are of little to no use to anyone since our children have grown. So, I decided to glue them to a set of children's alphabet blocks I purchased for pennies from a resale shop.
      I used a tacky white glue to adhere the toys to the wooden surfaces. I will wire them on the bottom so that I can attach them to branches differently from hanging ornaments. I like to have several attachment options when it comes to decorating my Christmas trees.

More Alphabet Block Christmas Tree Ornaments:
My husband's little dog chewed on these tiny, wooden German toys when he was young. I hadn't the heart to throw them out.
Here I have attached some odd assortment of miniature china animals to a few of the alphabet blocks.
A small wood turned Santa Claus figure along with a bottle brush tree and wool tree skirt finish off the top of my letter G alphabet block.

Thursday, November 13, 2014

Paper Pulp, Silver Foil Belznickle Ornaments

These papier-mâché ornaments look much older than they
really are.
Supply List:
  • silver foil spray paint
  • acrylic paints: red, green, black, blue, white, flesh tone and brown
  • masking tape
  • paper pulp (Celluclay)
  • newspaper, newsprint
  • permanent ink marker
  • Acrylic varnish
Step-by-Step Instructions:
  1. Crush newsprint into the rough shapes of standing figures. You needn't add any detail as of yet. The details are made with the Celluclay after the newsprint has been covered completely with masking tape.
  2. Mask with tape the entire figure.
  3. Now take a permanent ink pin and roughly mark on your figures where the face, arms, tree and hoods should be. You can also rough in the features of your Belznickle.
  4. Add a wire hook to the backside of each figure with glue and masking tape. Make sure this sticks out a bit after you have added pulp around it.
  5. Mix together the Celluclay with a bit of warm water. If the mixture is too loose add more pulp; if the mixture is too dry add more water.
  6. Add a couple of Tablespoons of glue to the mixture to make it extra tacky.
  7. Shape the features of your Belznickle with the Celluclay. It will stick to the surface of the masking tape quite easily. You will need to let the front side of your Belznickle dry in a warm place for a few days before sculpting on the backside of the figures. As you may have guessed these ornaments are best made during the warmer times of the year.
  8. After the Belznickles have dried, you may spray paint them with silver foil paint. Do this in a well ventilated area, like a garage. Also put the figures inside of a large box while you spray. This will prevent the paint from floating onto the surface of something that you do not intend to cover with silver foil paint.
  9. When these little guys have dried, paint them with acrylic paints. Let them dry again.
  10. Varnish the figures with acrylic varnish and string them with a wire or ribbon for hanging.
This is what Celluclay looks like before and after you mix it with water and a bit of glue.

Wrap a Pipe-Cleaner Wreath Ornament

My finished pipe-cleaner wreath ornament.
Supply List:
  • tiny red pom poms
  • Green chenille stems (pipe cleaners)
  • a hexagonal pattern
  • cardboard
  • scratch paper
  • pencil
  • scissors
  • white glue
  • green ribbon
Step-by-Step Directions:
  1. Cut a hexagon from a then piece of sturdy cardboard. Use a pencil to draw a smaller hexagon on the inside of the shape in the exact center of the cardboard. 
  2. Cut out the smaller interior hexagon carefully.
  3. Now carefully wrap green chenille stems around the cardboard shaped wreath. You may choose to use a little white glue to help the chenille adhere to the cardboard surface as you work.
  4. Let the wreath dry. 
  5. Glue on tiny red pom poms to both sides.
  6. Tie on a lovely green silk ribbon to hang your ornament on the tree.
Hexagonal shaped wreath ornament. Left, paper template. Center, cardboard cut-out. Right, shape wrapped in chenille stems.
More Chenille Stem Wreath Ornaments: